
Halo: Campaign Evolved features the famous skulls among its collectibles. These items are hidden throughout the missions and, once collected, allow you to activate certain special modifiers that work like cheats. Although this game is a remake of the original 2001 Halo, it features plenty of brand-new skulls—16 never seen before, alongside 26 fan favorites. In this section of our guide, we'll help you find them all so you don't miss any.
There are 42 skulls in total in Halo: Campaign Evolved. Each of the 13 available missions contains up to 3. Below, we've listed them in the default order of the campaign, along with their locations and effects. Bear in mind that once you collect a skull, it will count as found and you do not need to finish the mission. Collecting them all will also earn you several trophies/achievements, including "Cranial", "Making a Necklace", "Headhunter" and "Collector's Addition"—the latter also requires you to find all the terminals.
During mission 1 of the bonus campaign, titled Boarding Action, you can find the following 3 skulls in this order:

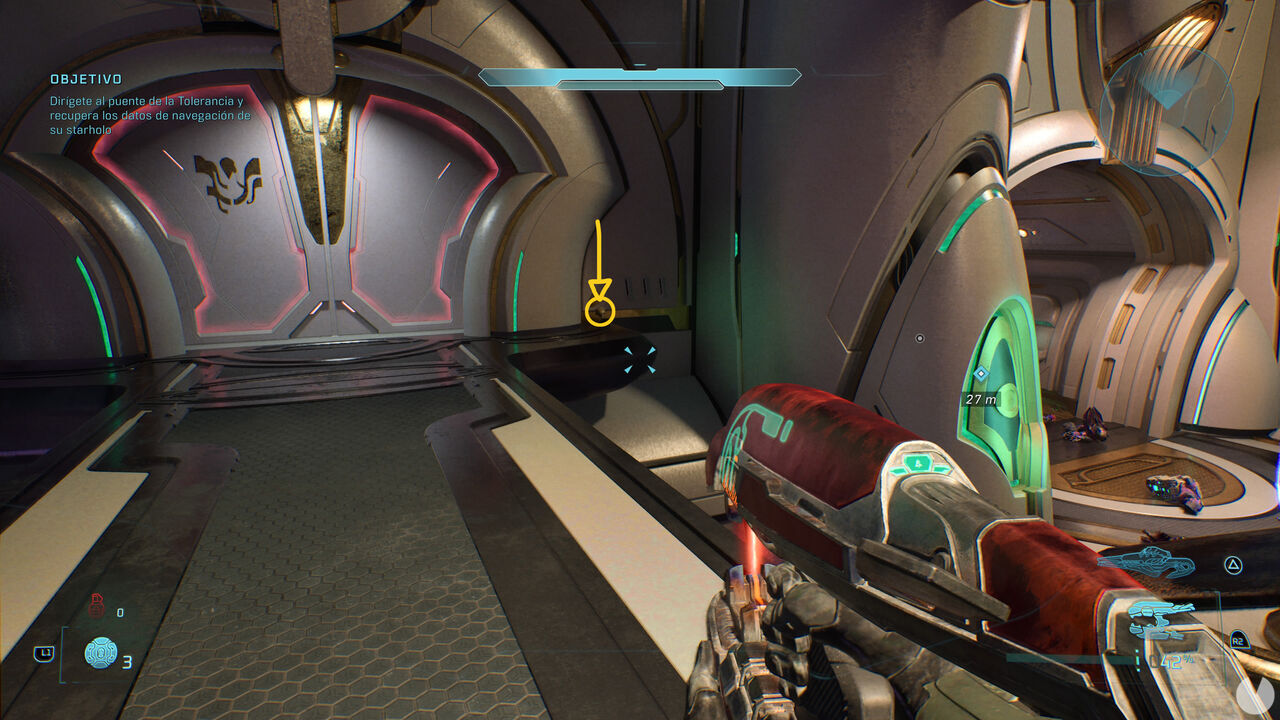
Once you reach the end of this rally point, after clearing the entire hangar of enemies, do not take the elevator yet when it activates and Johnson gets on. Instead, turn around and look over the edge of the platform for the door shown below, located one floor down:
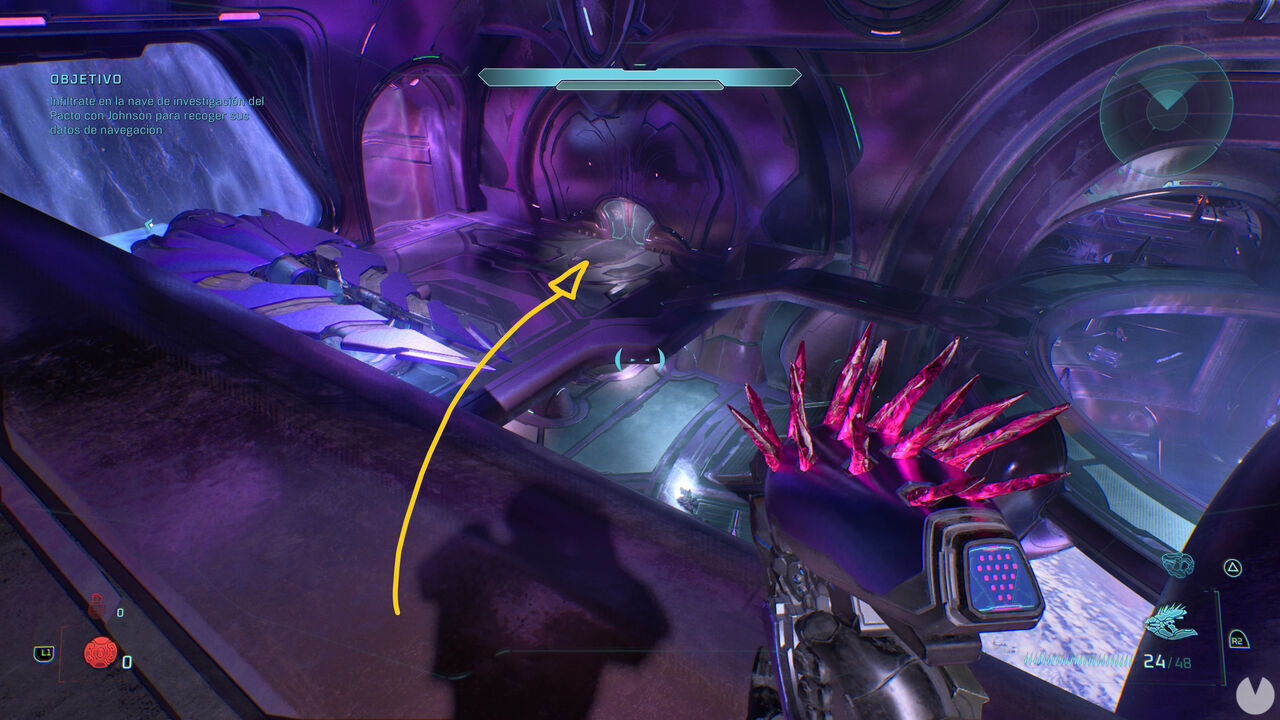
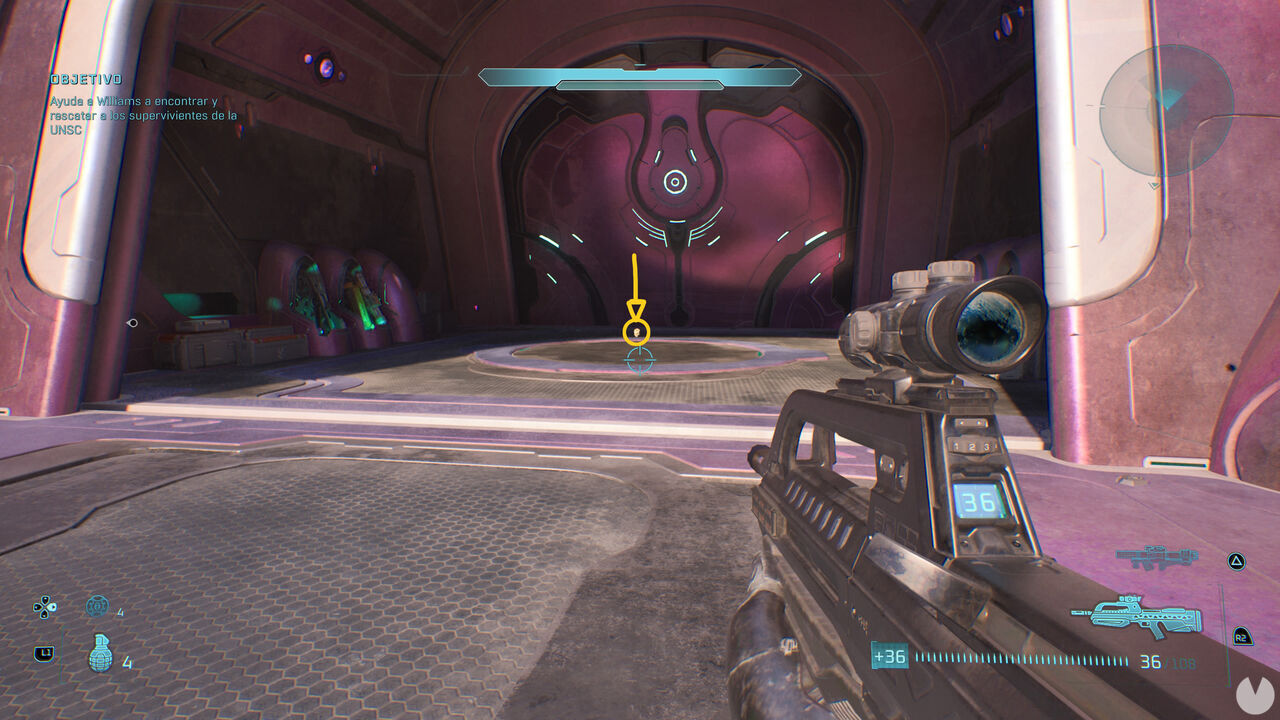
Jump down to this floor and go through the indicated door. You'll reach the room where the mission began, but this time you'll be on an elevated platform that was previously inaccessible. There is a walkway here, and you'll find the skull lying on the floor right in the middle of it.
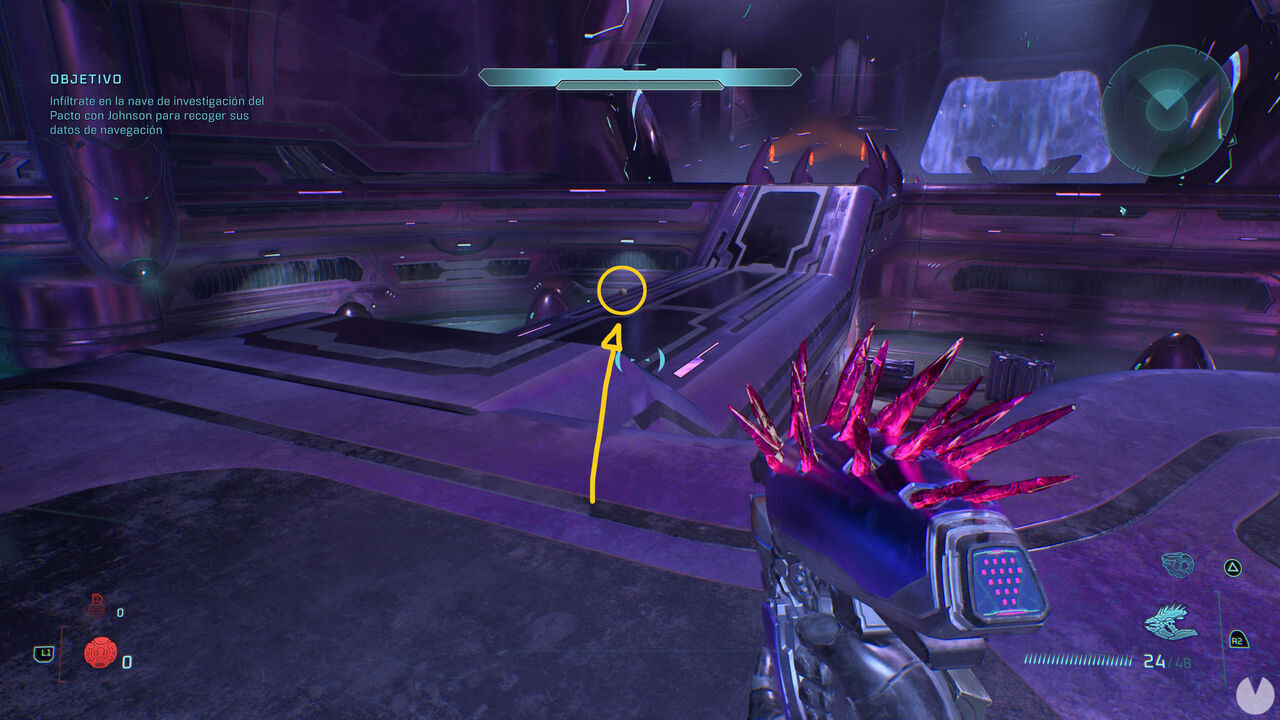

During this rally point, you'll enter a fairly large room filled with enemies and featuring a large purple energy tube near the ceiling. From the position shown in our image, head toward the door at the far end of the middle floor instead of continuing through the tube.
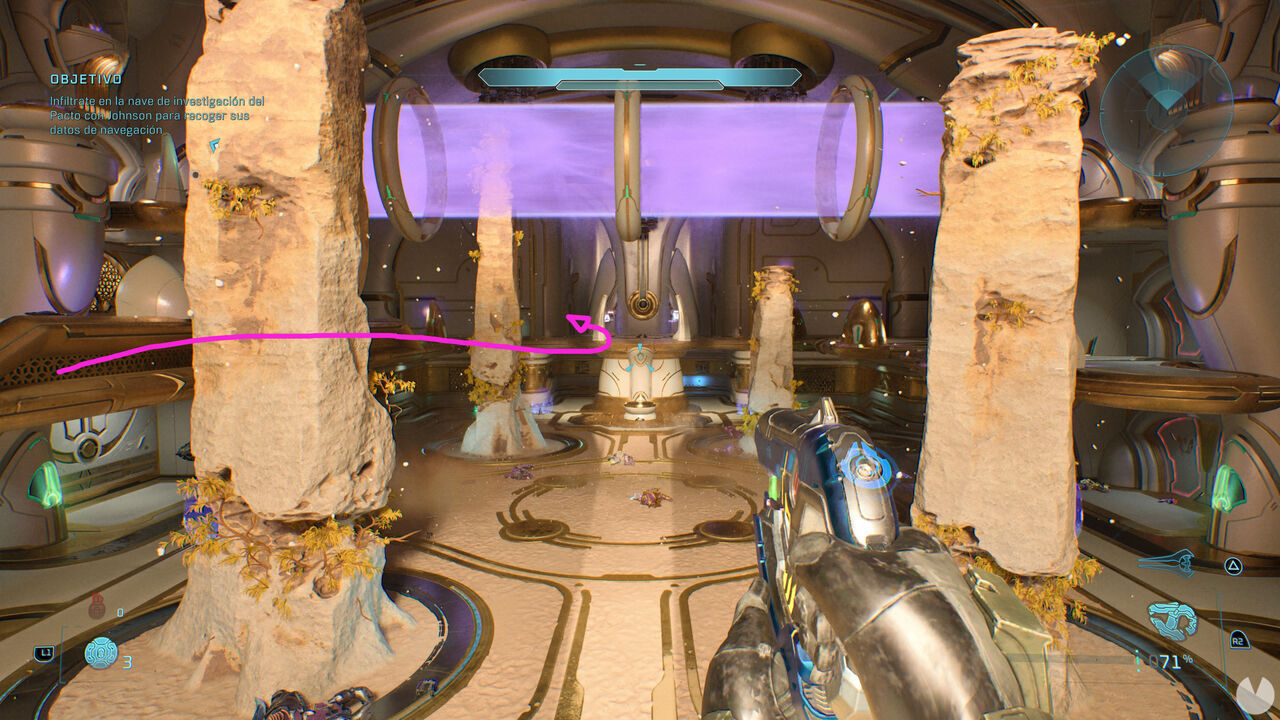
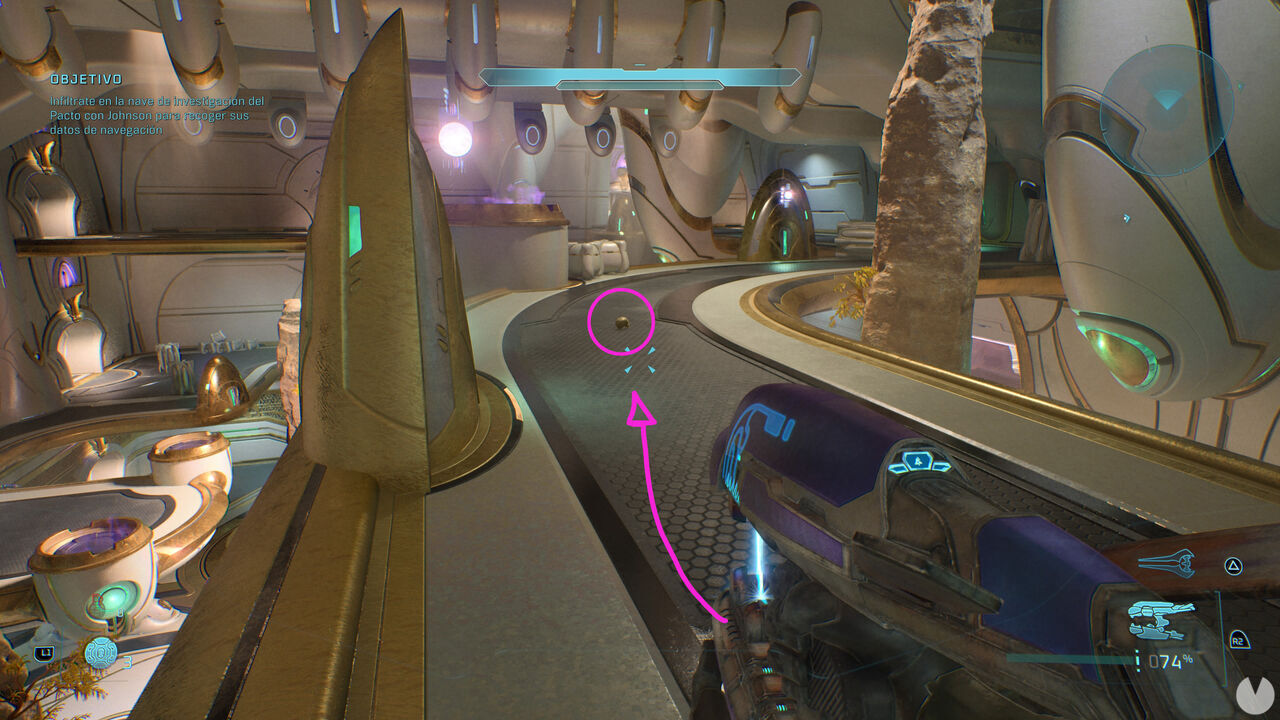
Go through this door and follow the corridor to emerge at the top of another room filled with enemies. You'll find the skull lying in plain sight on the floor of a curved walkway.

At the end of this rally point, after eliminating the enemies, Johnson will interact with a console that activates an elevator leading to another floor. Do not use it yet. Instead, head through the open door to the left of the elevator, which enemies previously emerged from.
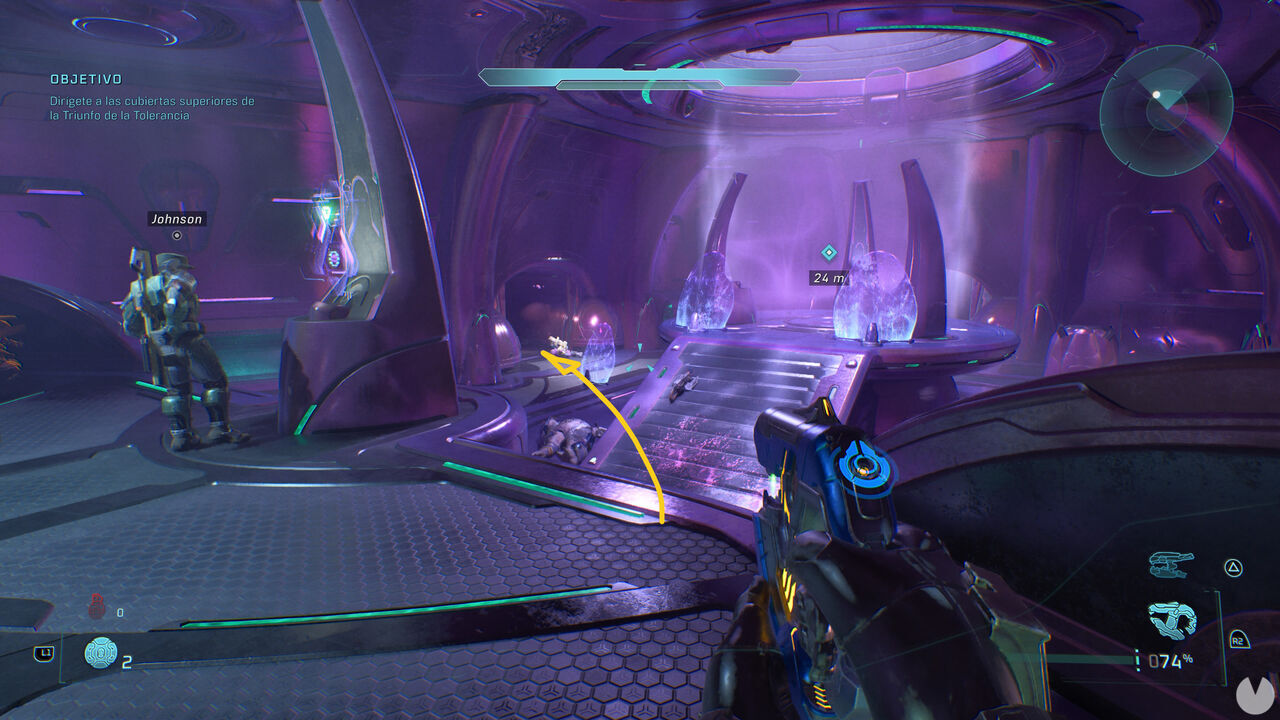
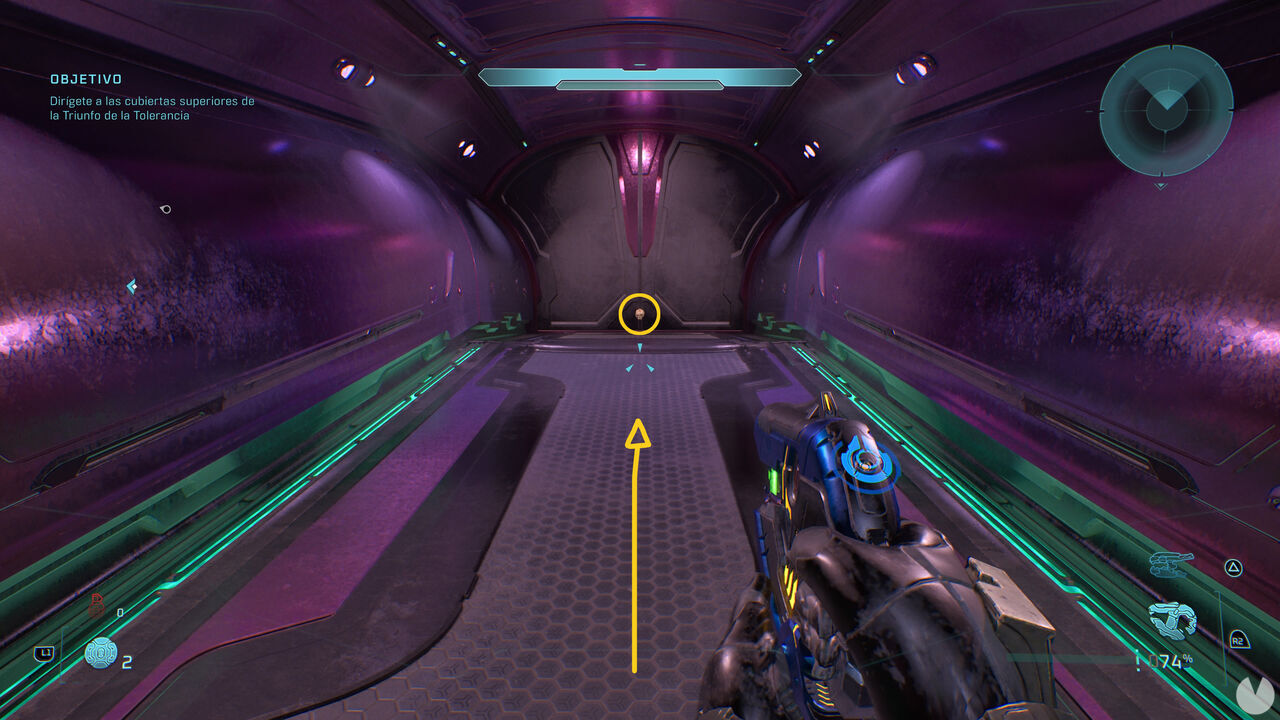
Follow this path to reach a dead-end corridor. The skull is lying at the far end.
During mission 2 of the bonus campaign, titled The Most Dangerous Game, you can find the following 3 skulls in this order:

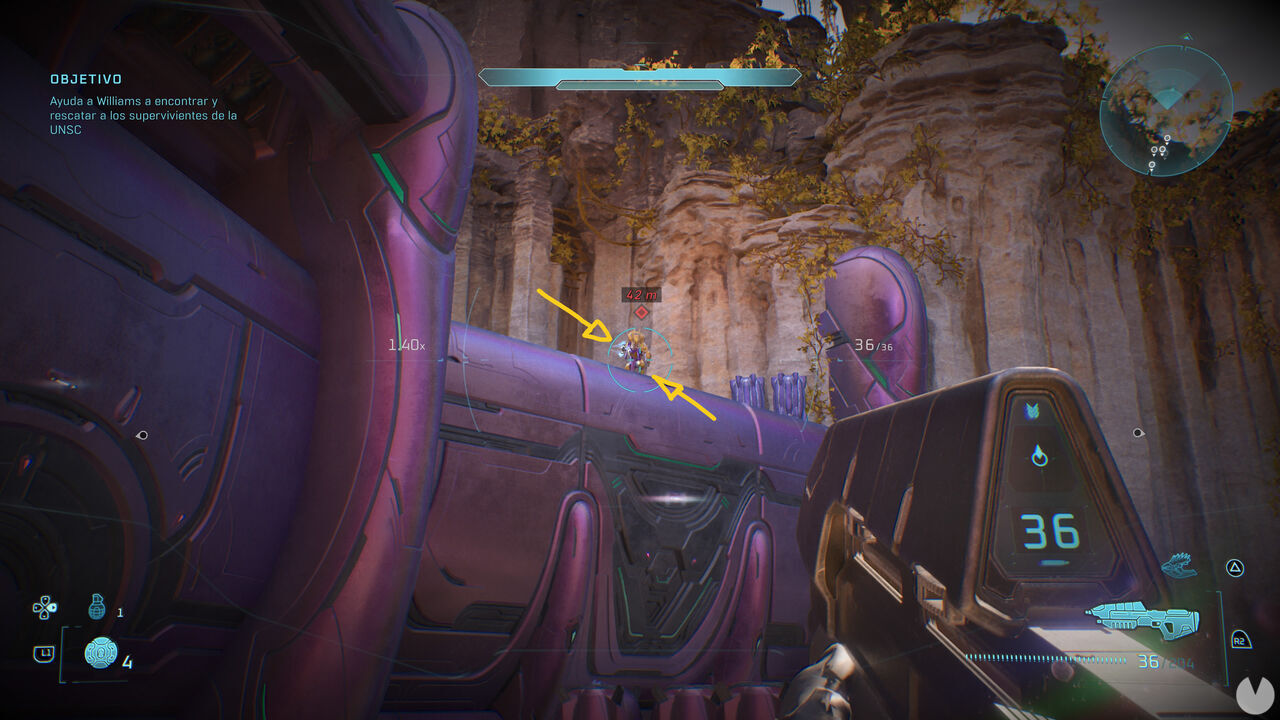
This skull is obtained in a rather unusual way. To find it, you need to shoot a particular Elite in the level on 3 separate occasions, making sure you completely break his shield each time. You can recognize him from a distance because he wears golden armor and carries an Energy Sword in his right hand.
Bear in mind that this enemy cannot be killed. Instead, he runs away after you start shooting at him, so you must make sure to break his shield quickly before he leaves each area in which he appears. If you fail, reload the checkpoint and try again.
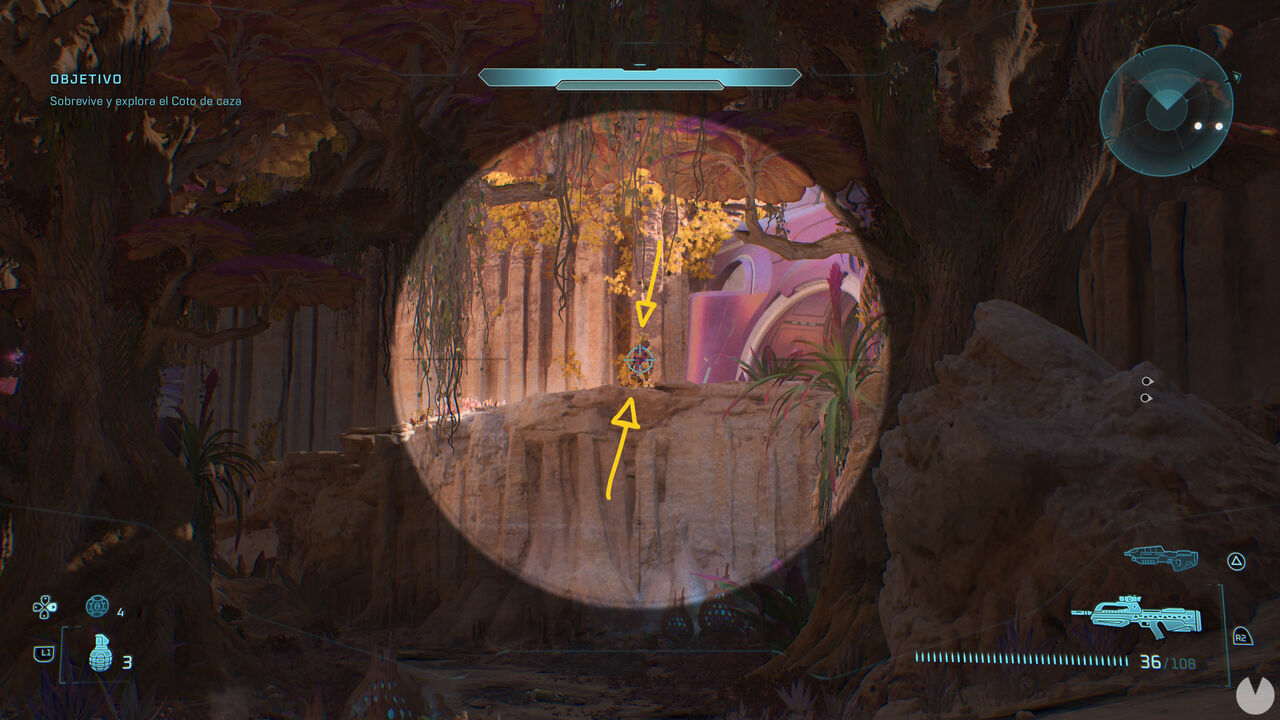
The first location where this special Elite appears is during Rally Point Alpha. Just after finding Williams, you'll enter a forest-like area filled with trees and enemies. As soon as you arrive, look toward the elevated ledge on the right, where you'll see the Elite you need to shoot:
After leaving the forest, you'll reach a bridge-like area with more enemies and a Wraith tank on the other side. The Elite appears for the second time at the far end, beside the building with the locked door that you need to reach.
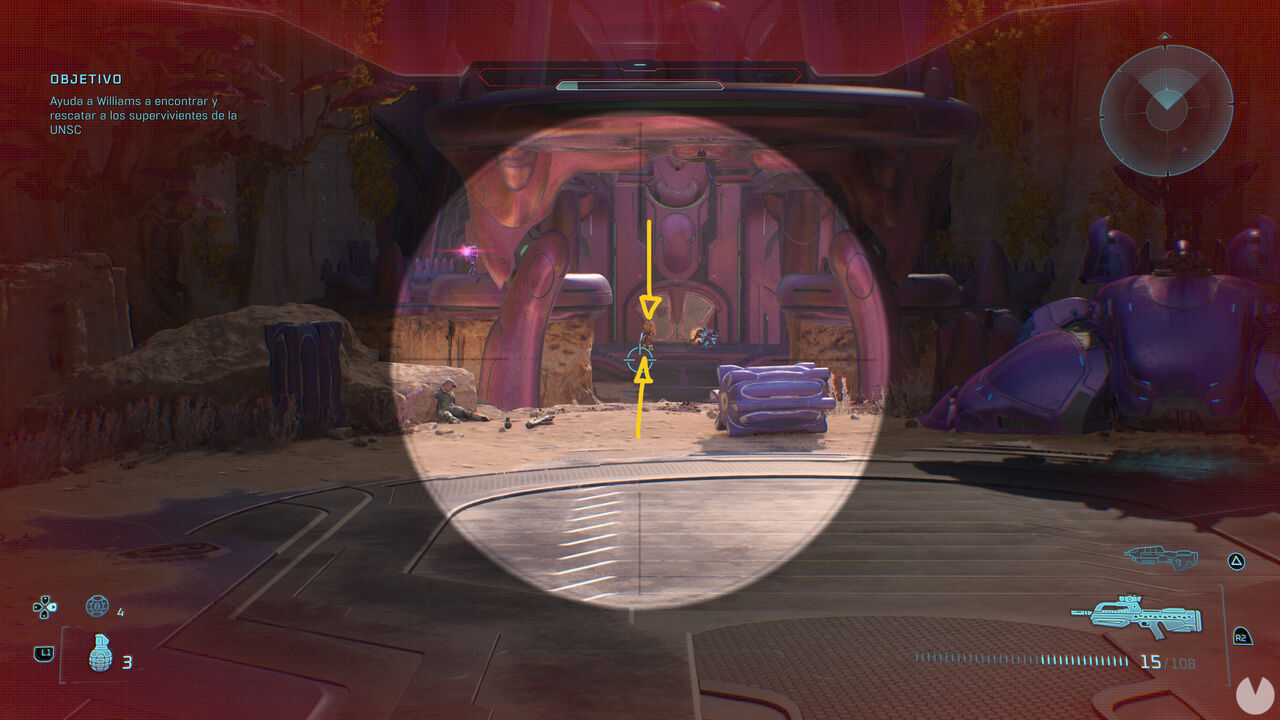
If you take too long to shoot him or get too close, he may escape through the door. The large number of enemies and the tank in the area can make things difficult. You should have enough time to destroy the tank and then shoot the Elite from the position shown in our image. If you're struggling, try playing the mission on Easy.
The third and final time you need to break this Elite's shield takes place during Rally Point Charlie, just after leaving the building containing the cells. You'll enter an outdoor courtyard with a structure in the middle. As soon as you step outside, look up and to the left to find the enemy on an elevated side platform.
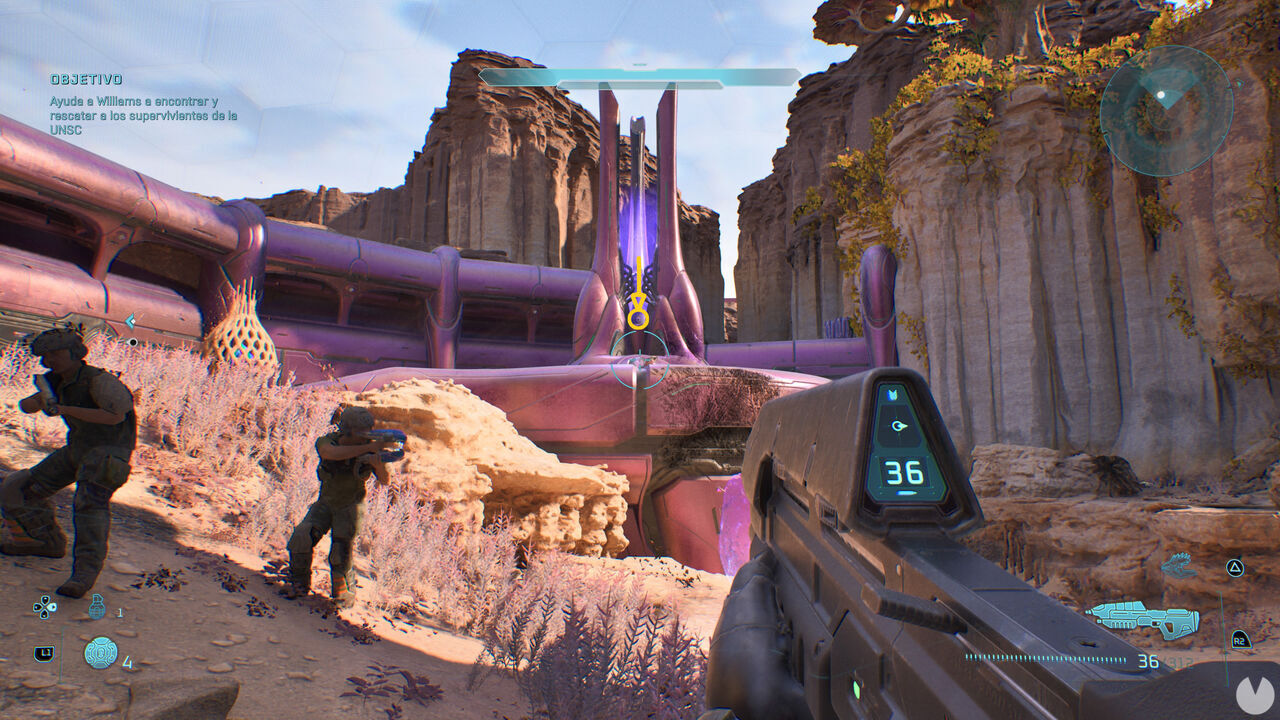
If you broke the enemy's shield all three times as explained above, the skull should appear after you finish the battle in this area. It will be in the center of the structure emitting a purple beam, right where we've marked below:
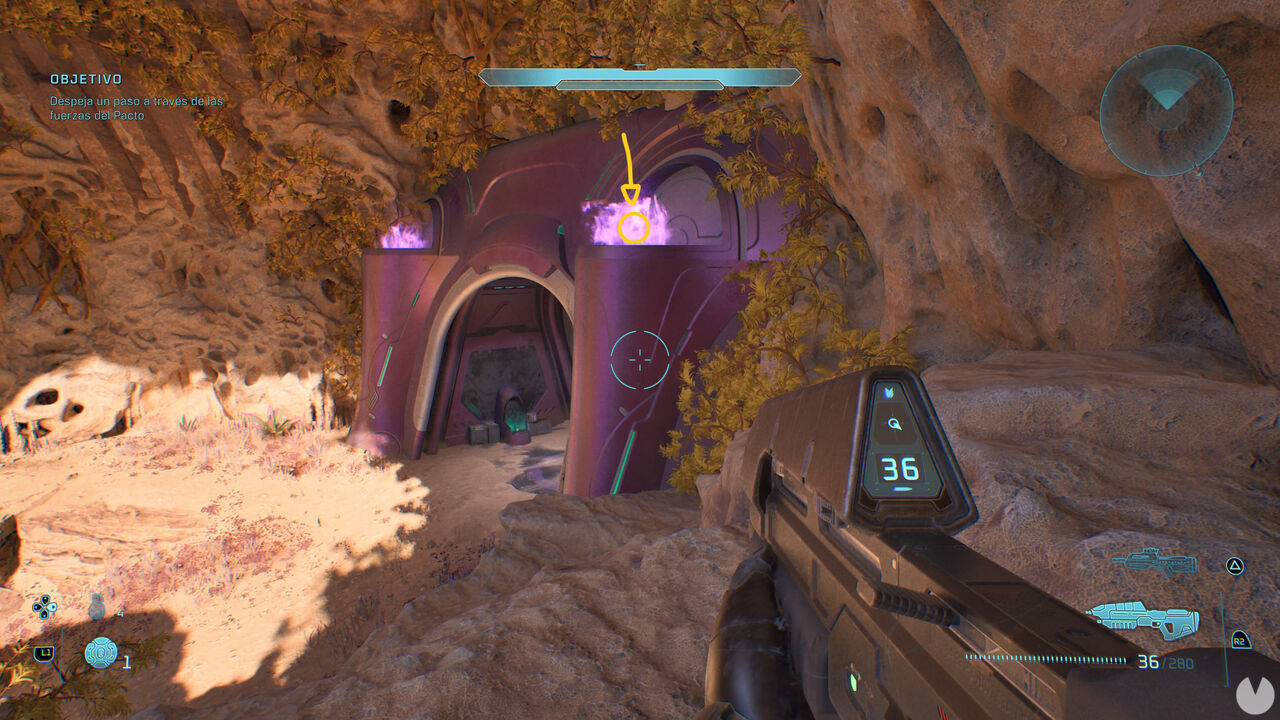
This skull is found in the area containing the bridge, several enemies, and the Wraith tank. As soon as you reach the bridge, do not cross it yet. Look to the right and you'll see a large locked door with two pillars on either side, each topped by a canister of purple fire:
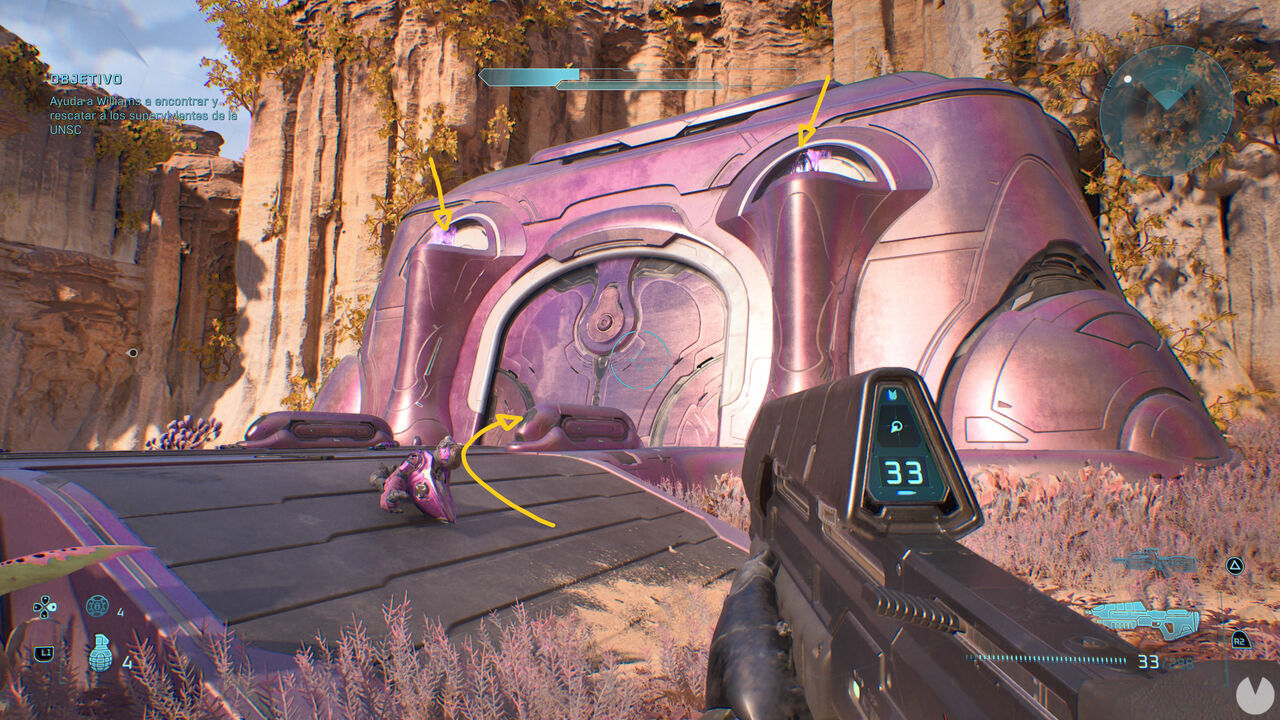
Shoot and blow up the fire canisters to open the locked door. You can then enter a garage-like room, where you'll find the skull lying on the floor.

After surviving the Banshee assault while crossing the bridge, you'll reach another area filled with enemies. The skull is on top of one of the pillars with purple flames beside the large door you entered through, right where we've marked in the following image:
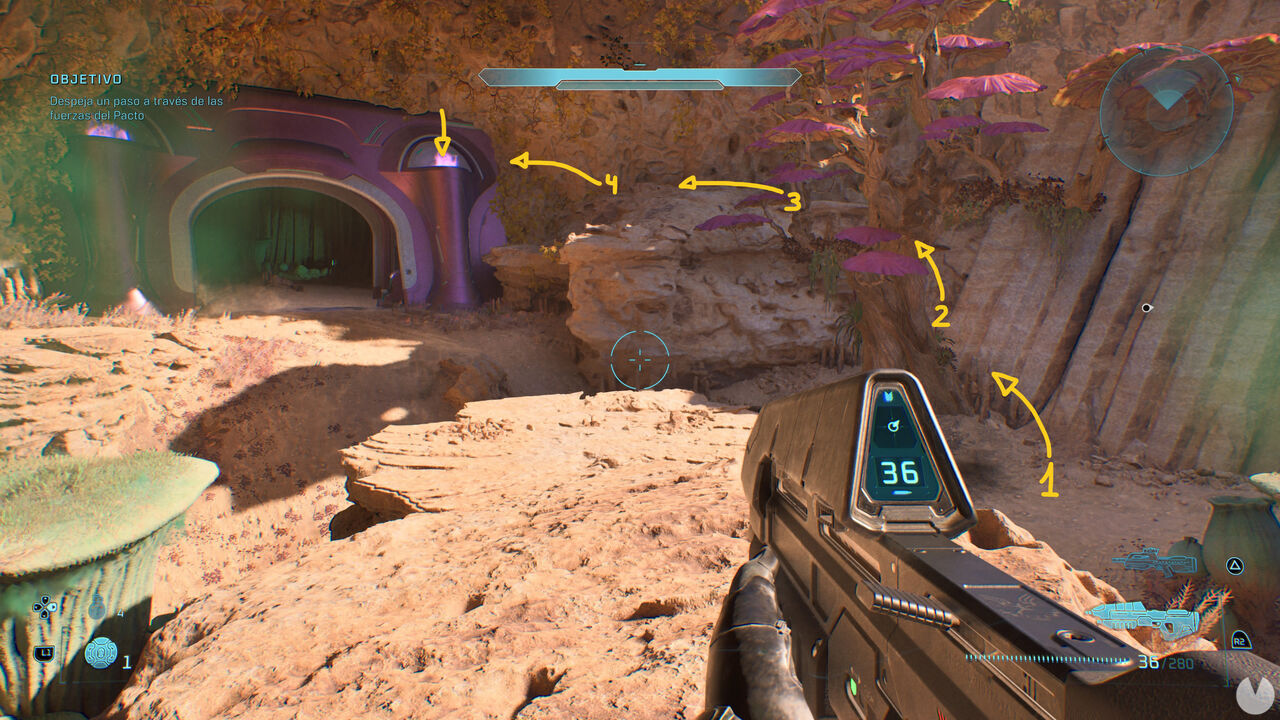
To reach the indicated pillar, you need to climb along the nearby stone wall, starting from the rocks beside the base of the purple-leafed tree.
During mission 3 of the bonus campaign, titled Heavy Burden, you can find the following 3 skulls in this order:

Continue through the opening rooms of the mission until you eventually reach a bridge filled with enemies, like the one shown below:
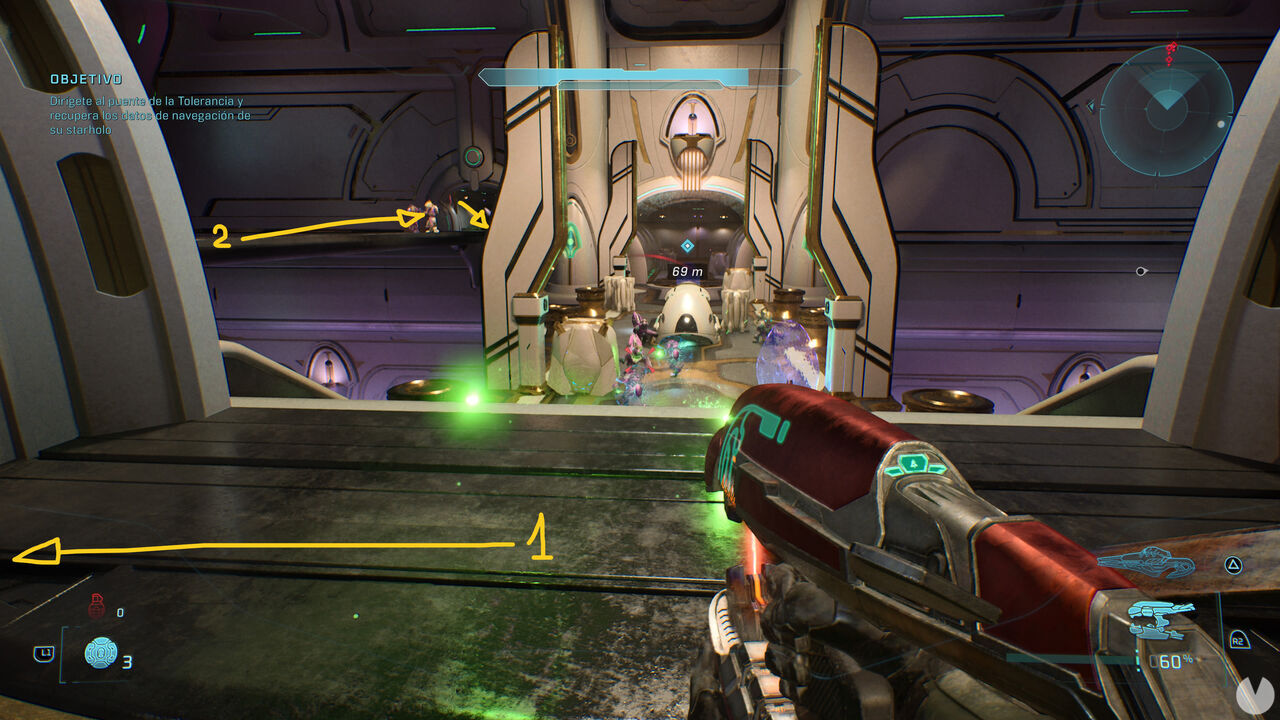
Before crossing the bridge, go through the door on the left leading to a side walkway. Follow it and you'll find the skull lying on the floor at the end of the walkway, beside a locked door.
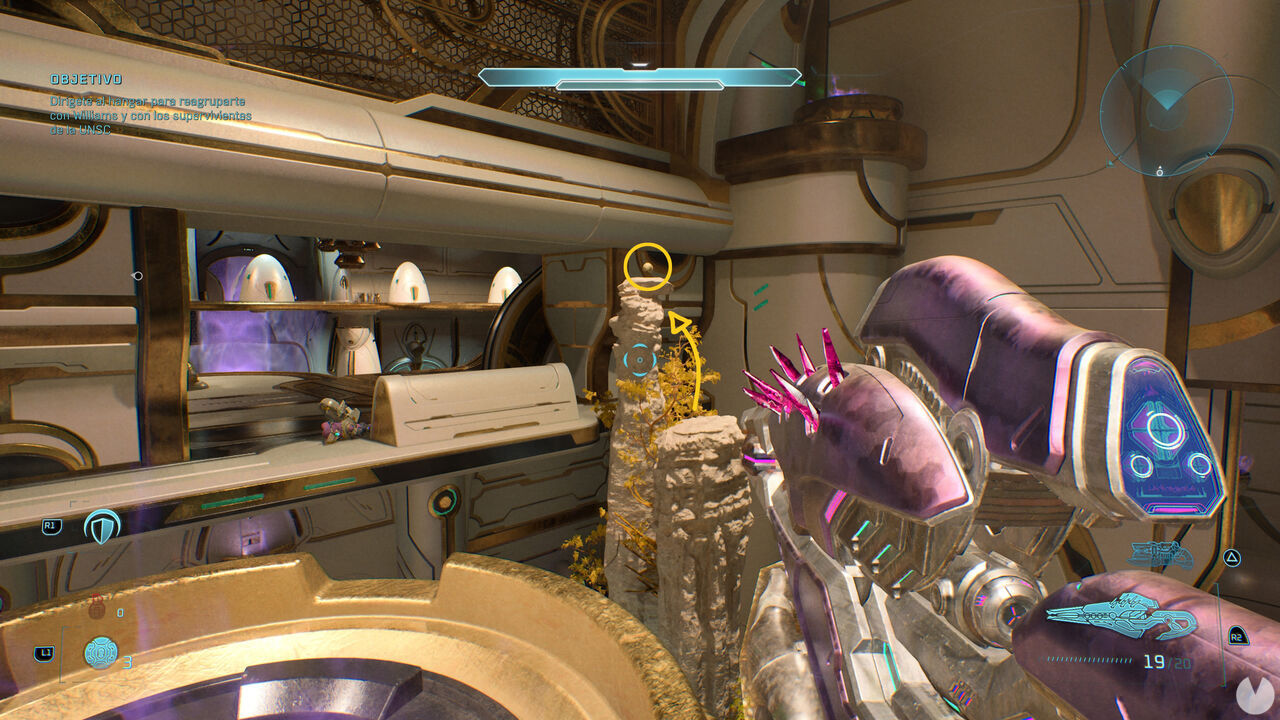
While heading toward the hangar to regroup with Williams, you'll pass through a large room that is three stories high, entering from the top floor. About halfway down, you'll see the skull on top of a rocky pillar surrounded by yellow leaves:
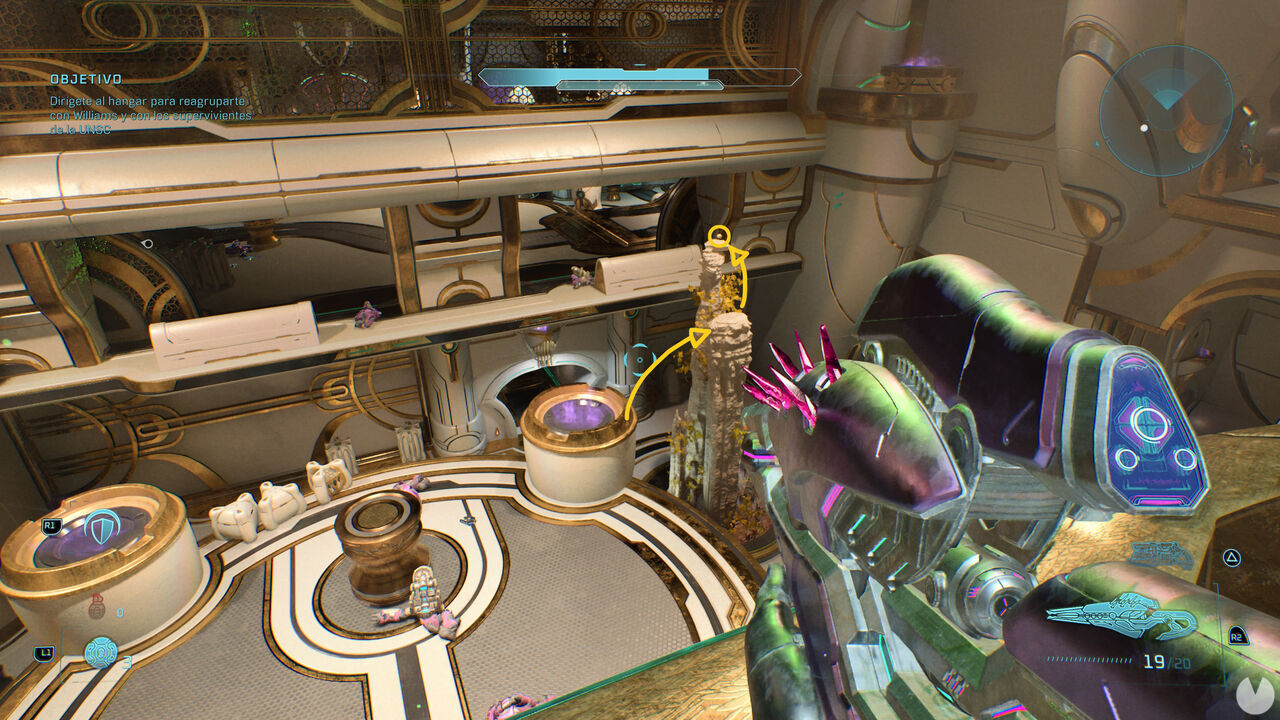
To reach the skull, jump onto the central platform on the second floor. From there, use the pedestal with the purple flame to jump onto the rocky pillar.
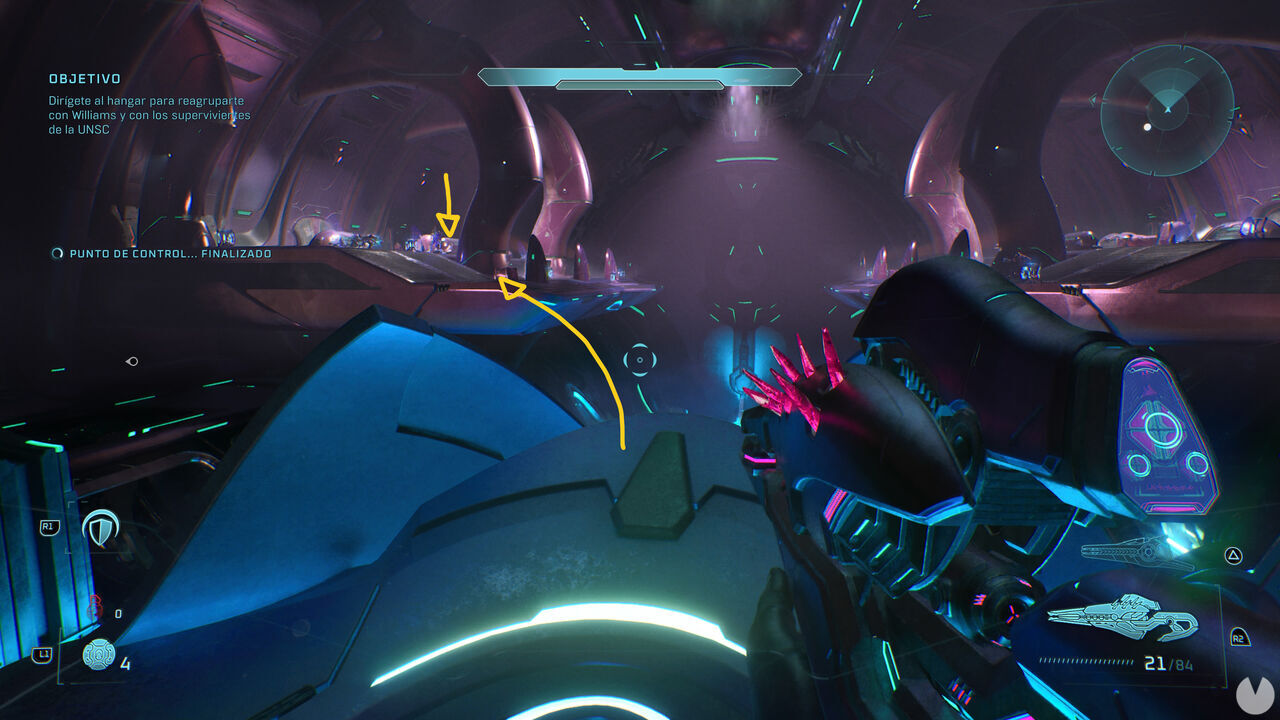
During this part of the mission, you'll ride a transit platform that moves forward while you defend yourself from enemies. After a while, the platform will stop and you'll need to restore its power to continue. Once it starts moving again, wait until a set of doors opens and a group of enemies appears in an area on the left, as shown below:
Once the platform has moved far enough forward, jump off it and onto this area on the left. You'll find the skull in the far corner, beside a locked door, right here:
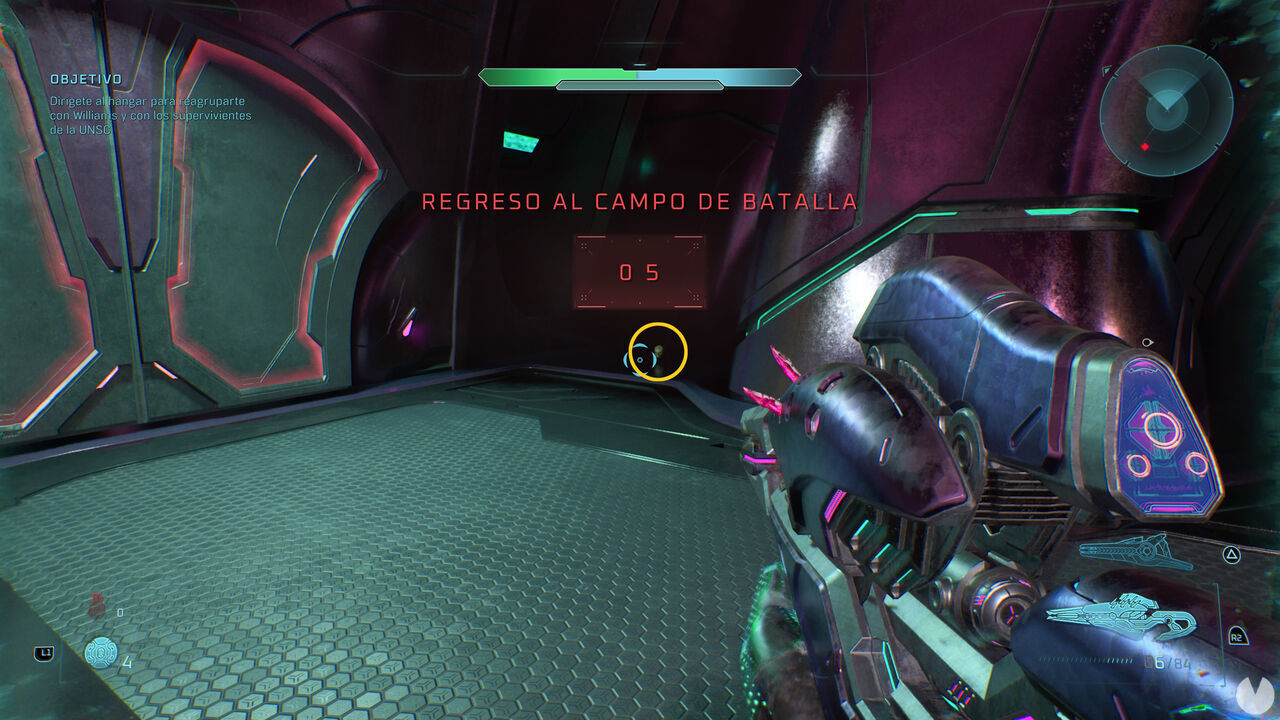
Bear in mind that jumping off the transit platform will trigger an out-of-bounds countdown, so be quick, grab the skull and don't waste time fighting the enemies. You'll probably die because there won't be enough time to return to the platform, but collecting the skull is enough for it to be added to your collection.
During mission 1 of the main campaign, titled The Pillar of Autumn, you can find the following 3 skulls in this order:

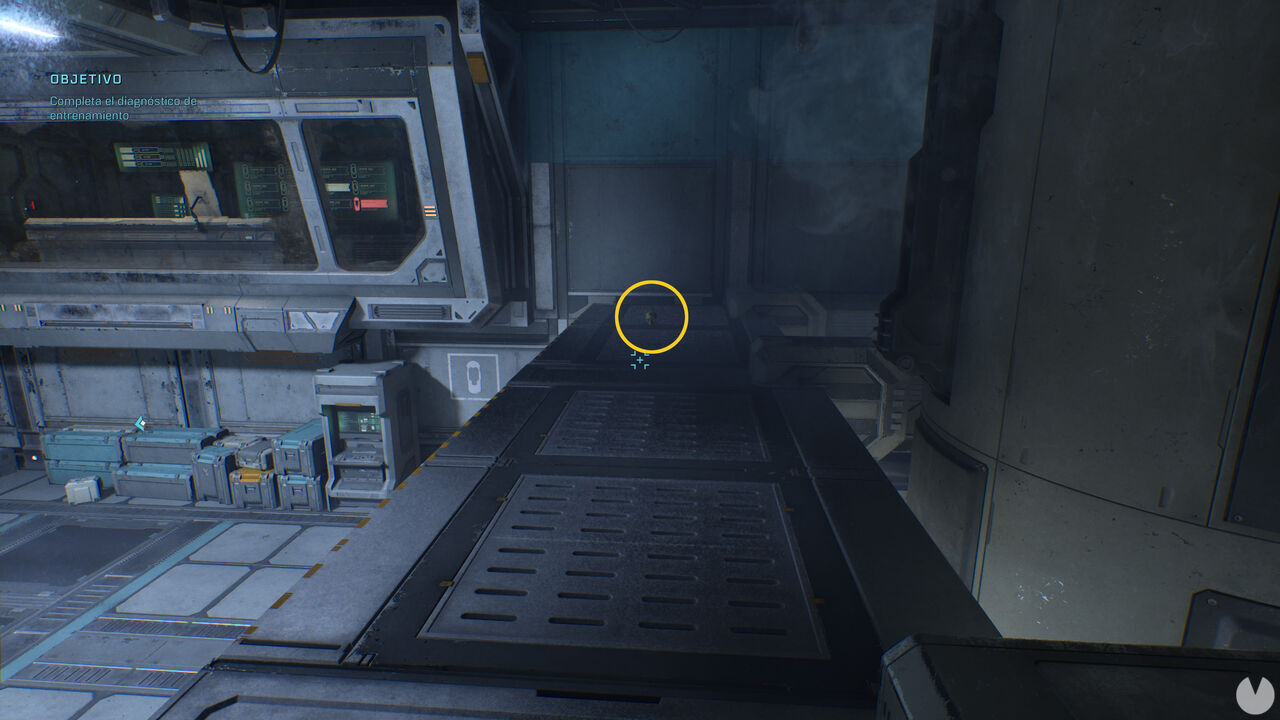
As soon as the mission begins in the cryogenic chamber, jump on top of the two canisters shown in the image below and use them to reach the side walkway.
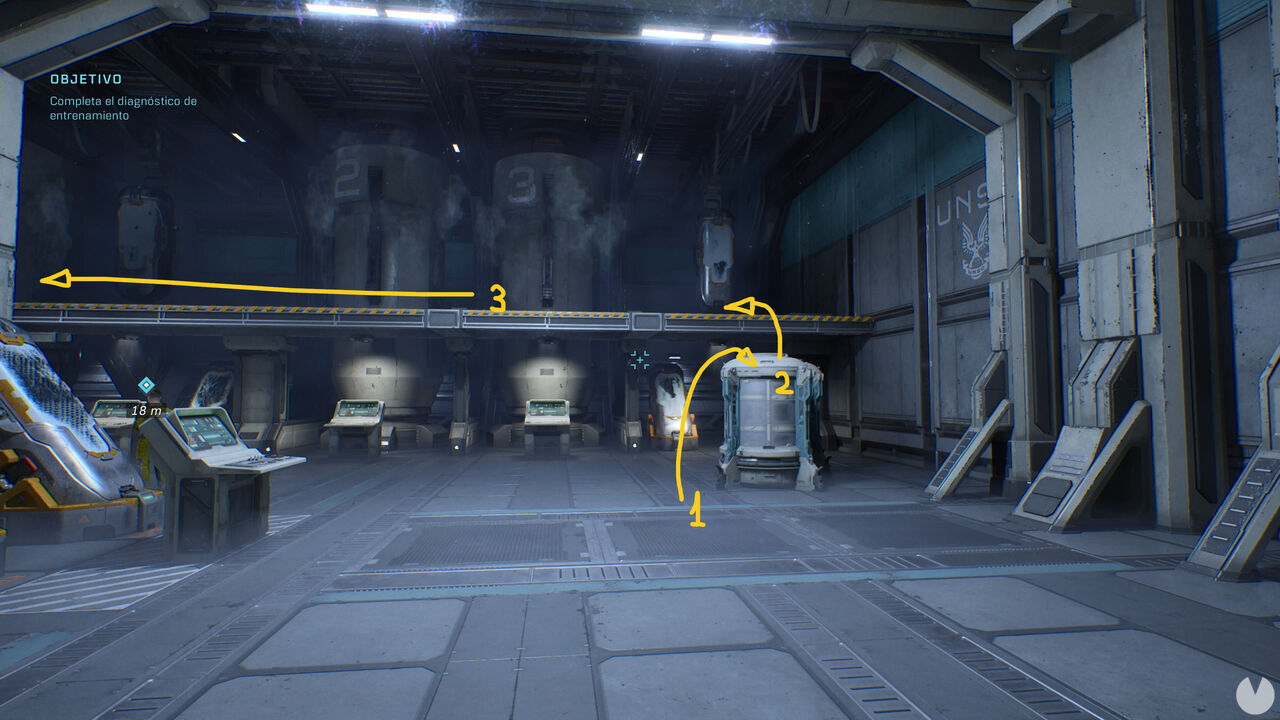
Follow the walkway to the end to find the skull lying on the floor.

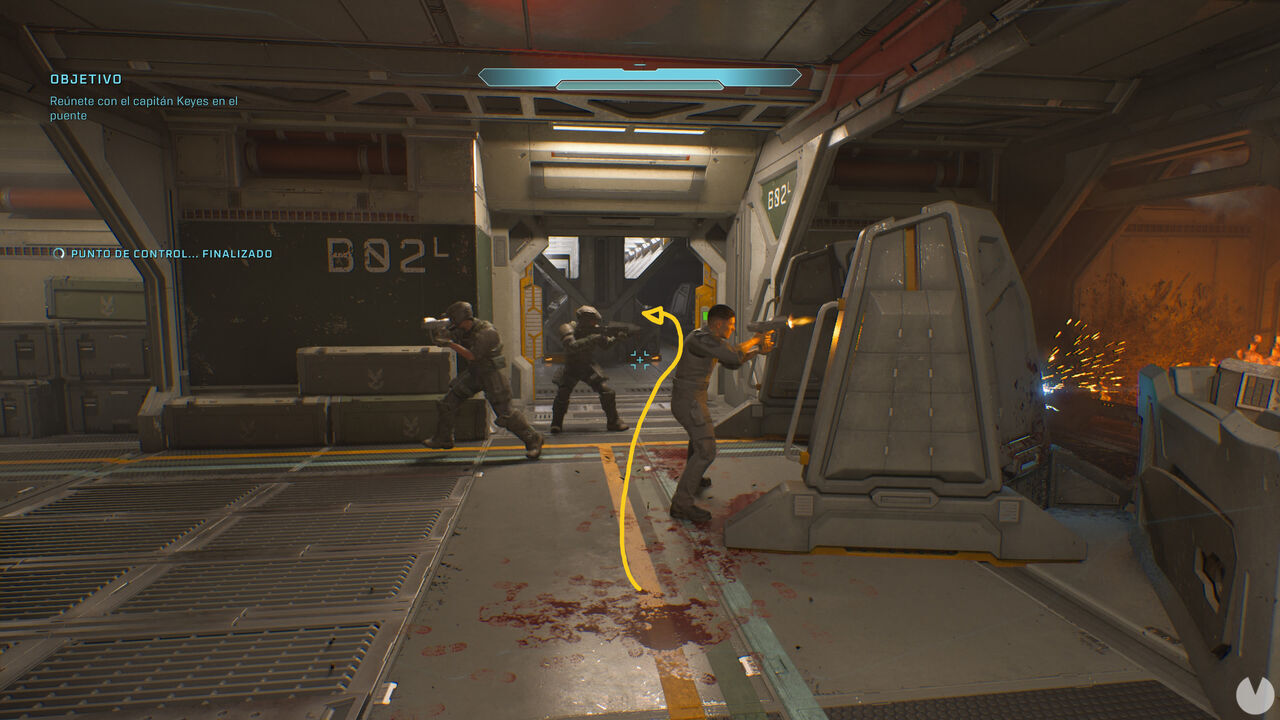
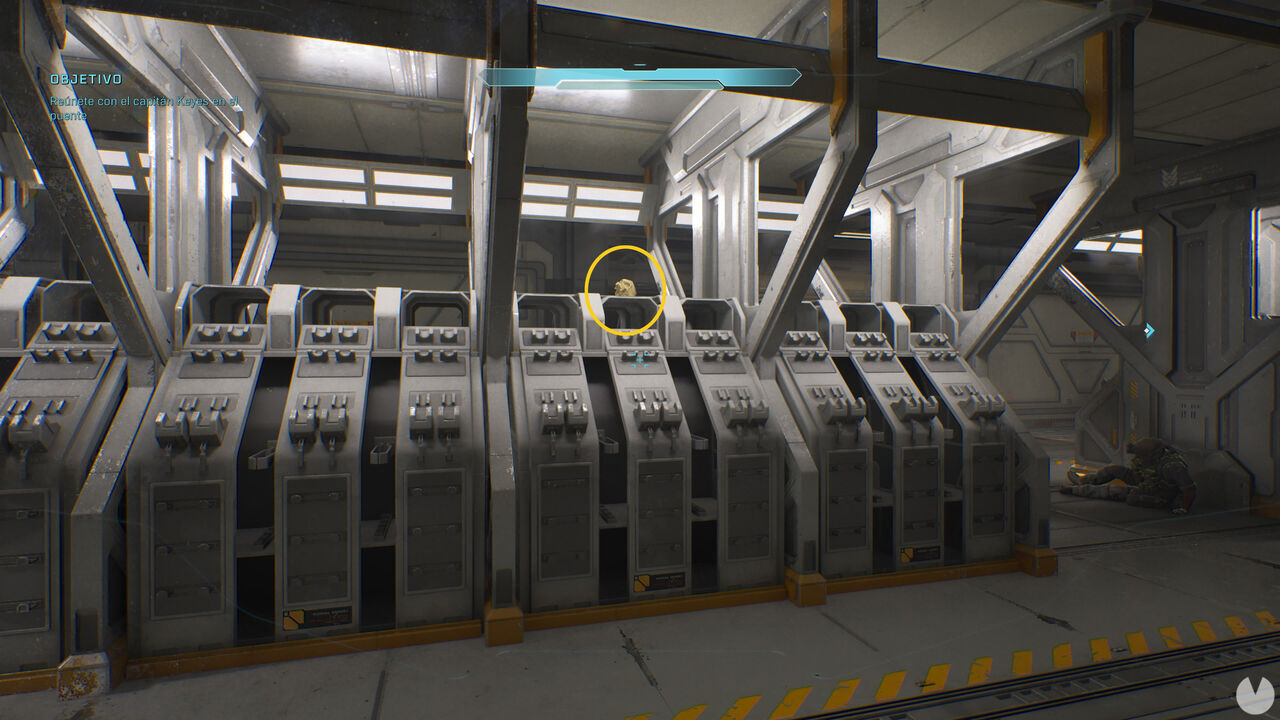
While making your way to the bridge to meet Captain Keyes, shortly after encountering the first enemy, you'll enter a room containing several empty racks.
The skull is on top of one of these racks illuminated by white lights.

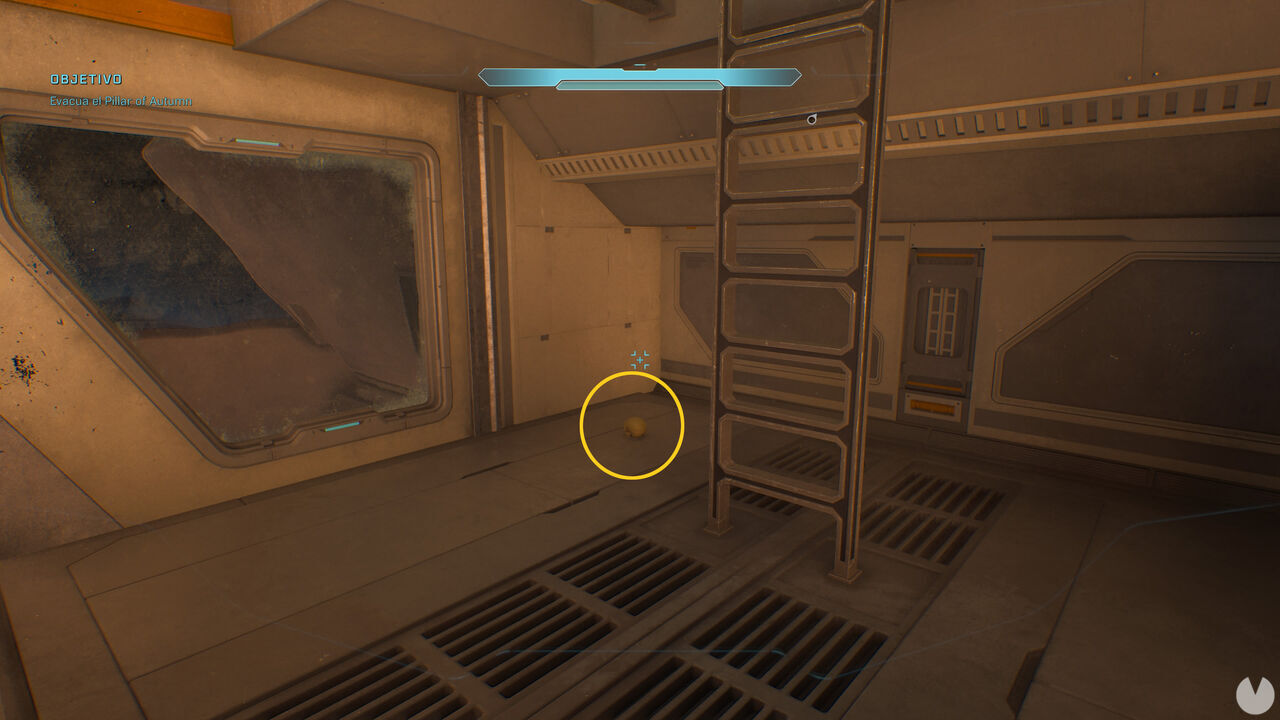
After meeting Captain Keyes on the bridge, as soon as you regain control, do not continue forward just yet. Head to the section of the bridge containing the two ship pilots, located behind Keyes:
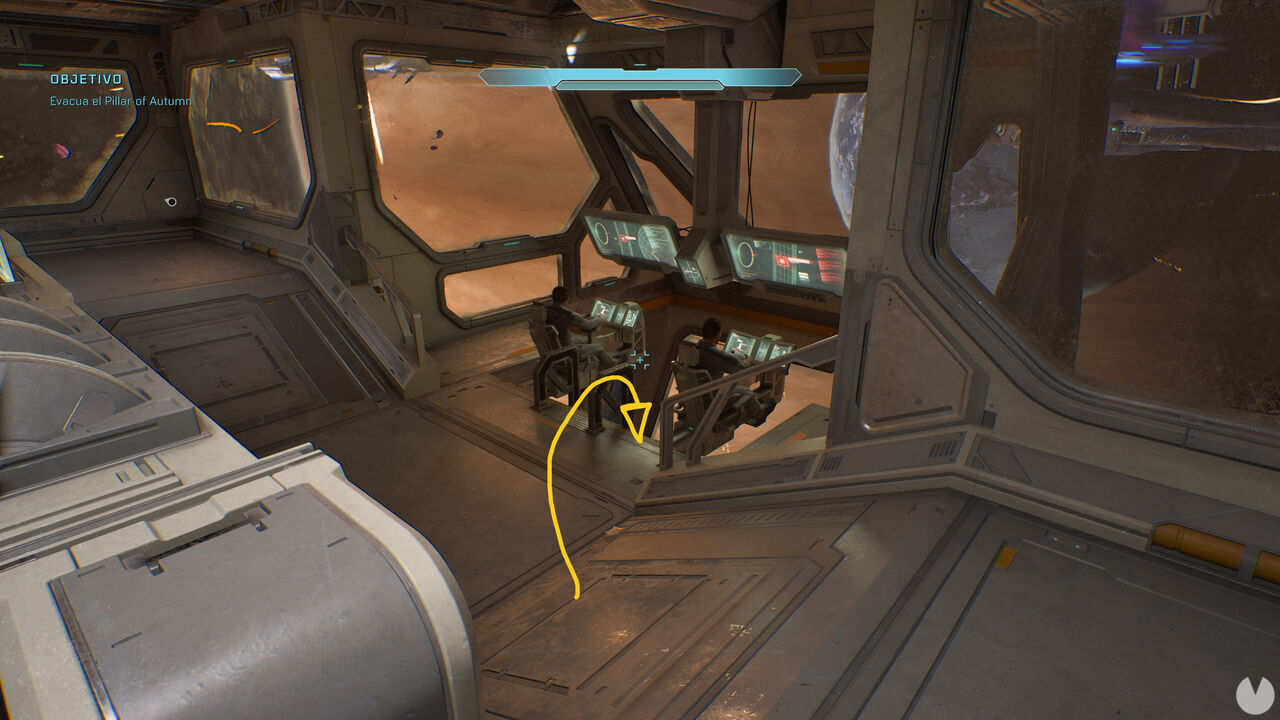
Drop down beneath the two pilots into a lower recess with windows and a ladder to find the skull.
During mission 2 of the main campaign, titled Halo, you can find the following 3 skulls in this order:
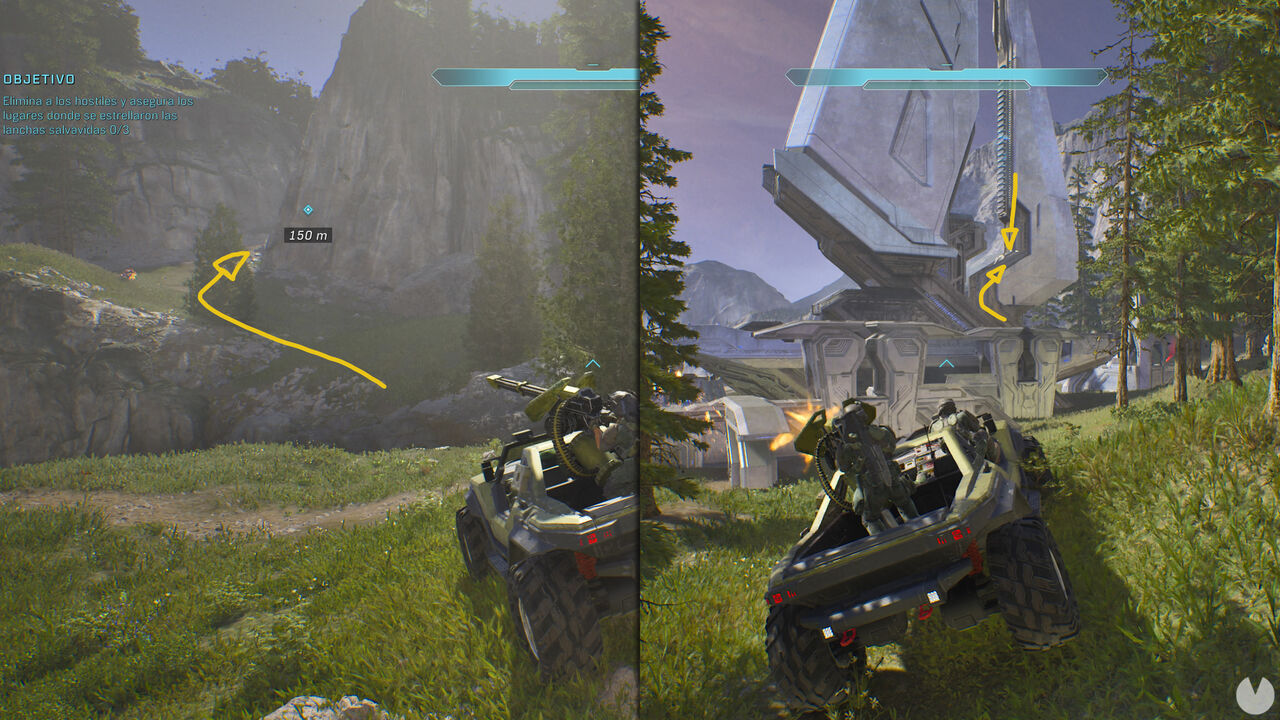
While completing the objective to secure the 3 lifeboat crash sites, head toward the tower shown in the image below—the one beside the cliff—to find the skull at the top of the structure.
To reach the skull, walk up the slope at the base of the tower and stand in the position marked with the number 2 in the image below. From here, you need to jump upward, but a regular jump will not be enough. You'll need a little extra momentum, so throw a frag grenade at your feet and jump at just the right moment to let the explosion propel you higher.
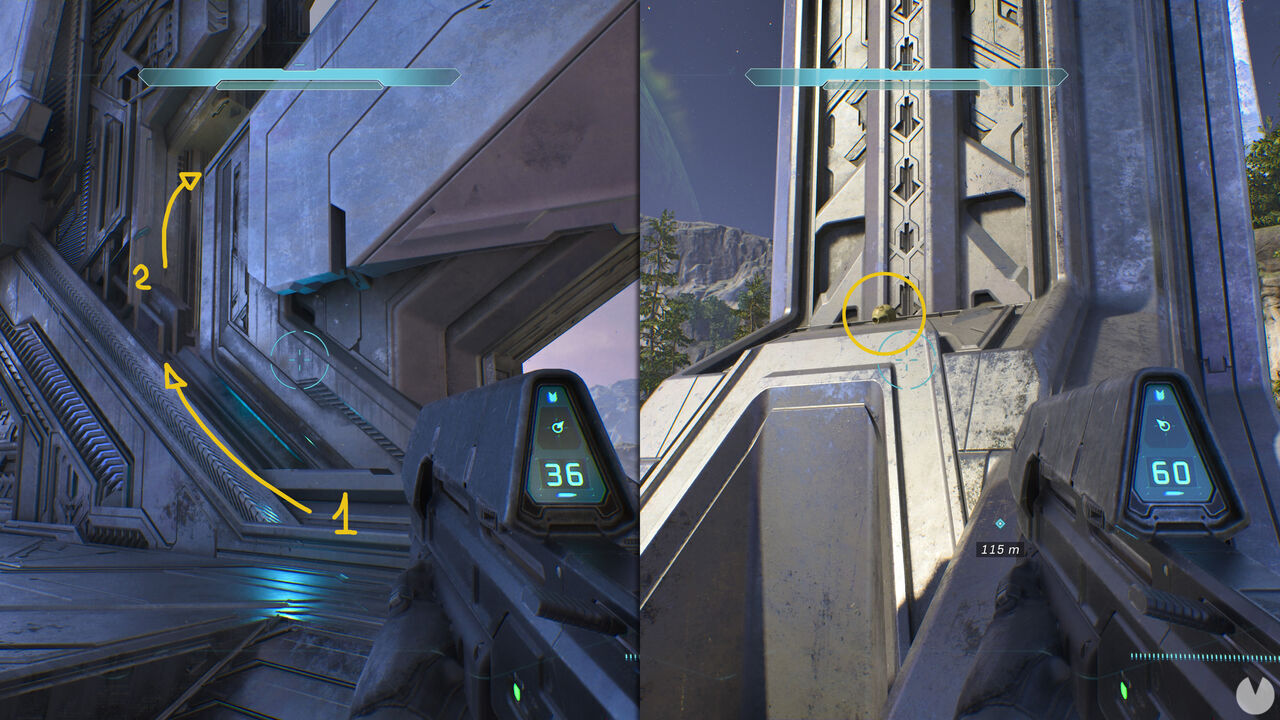
If you don't have any frag grenades or are struggling to time the jump correctly, you can always return once you've obtained the Acrophobia skull.

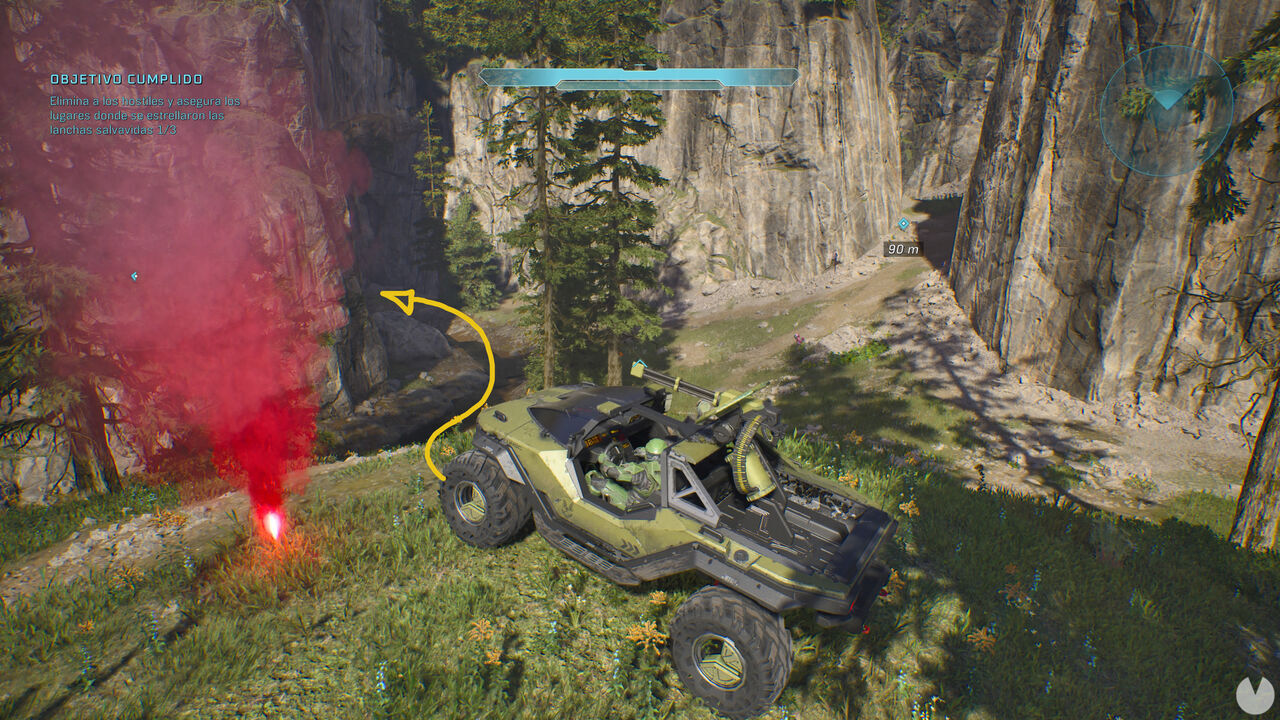
While completing the objective to secure the 3 lifeboat crash sites, head to the top of a hill near the riverbed, where you'll find a red flare like the one shown below:
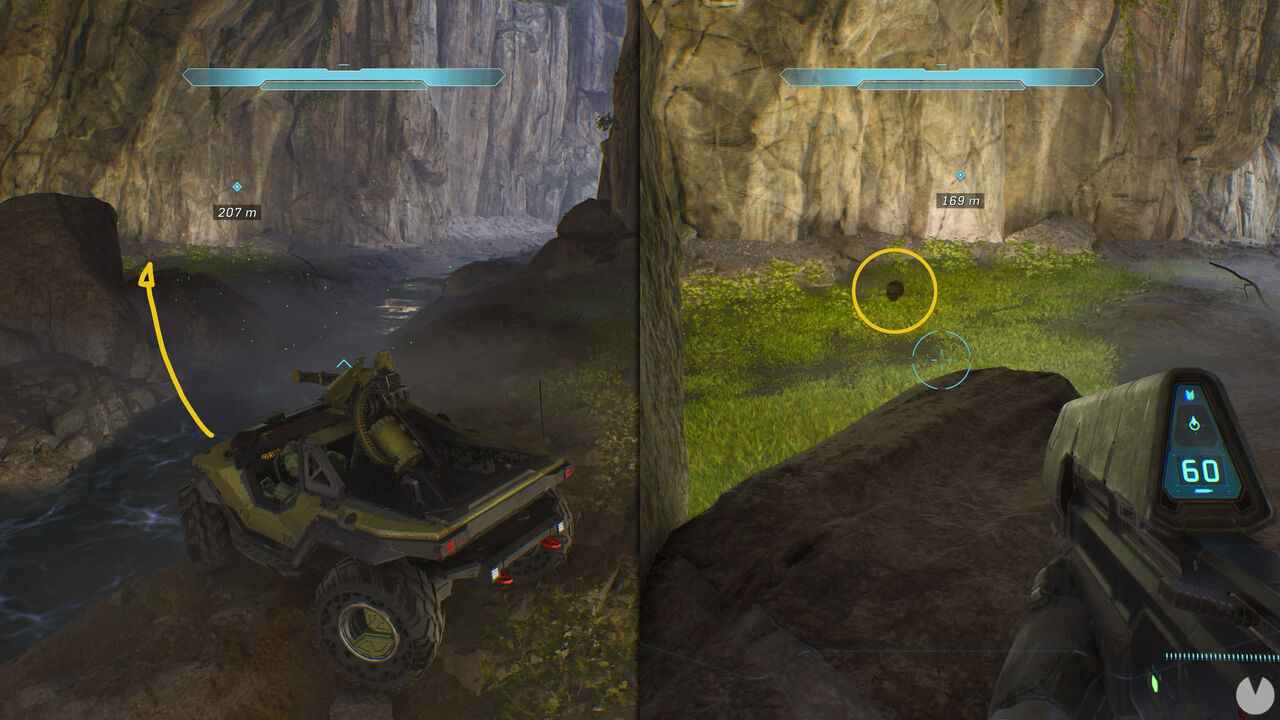
From here, follow the riverbed into a cave containing a swarm of fireflies. You'll find the skull floating above a rock:

While completing the objective to secure the 3 lifeboat crash sites, this time head toward the location in a valley between the mountains, which is filled with rocks. Climb toward the summit where the red flare is burning, as shown in the image below:
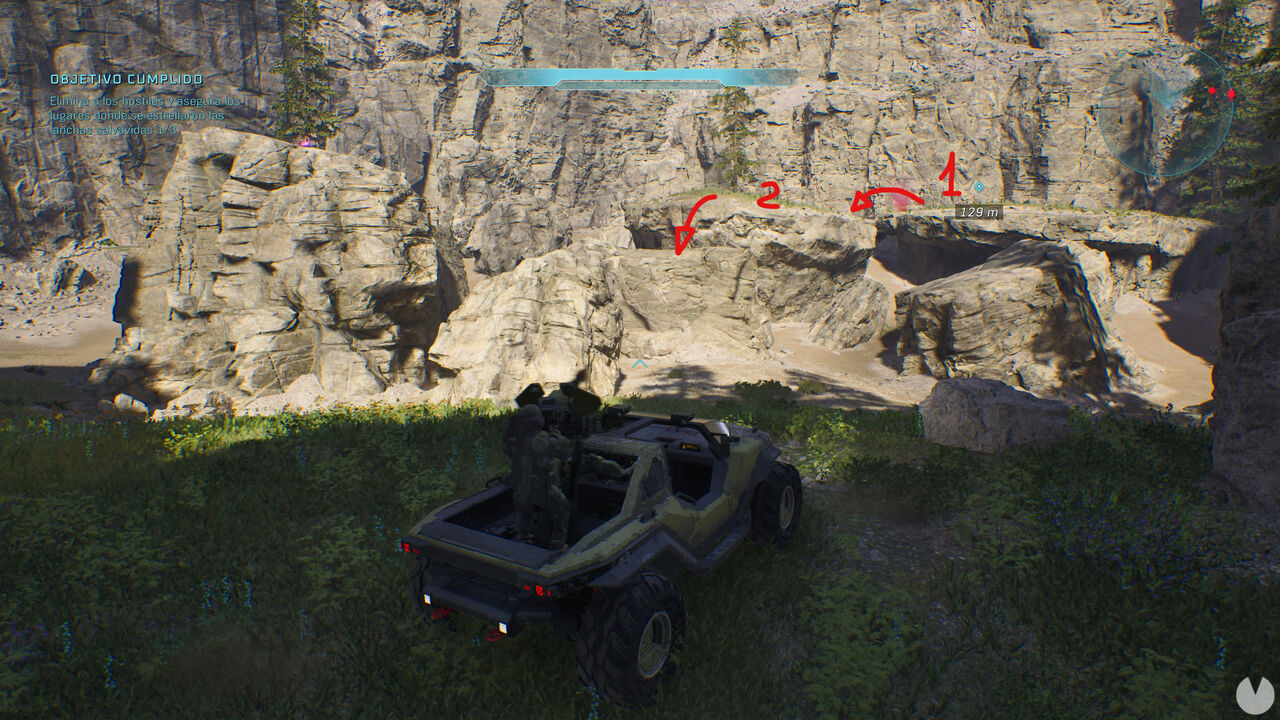
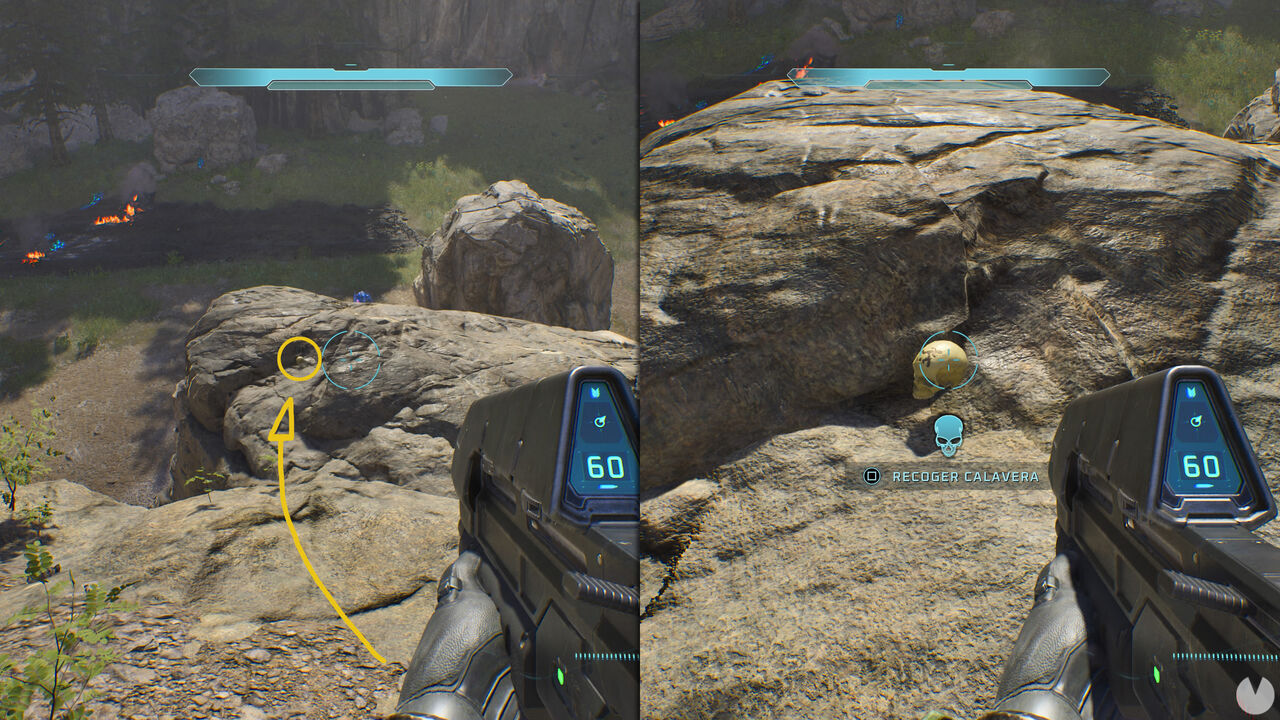
From the flare, jump down to a slightly lower rock formation and then across to another rock containing the skull.
During mission 3 of the main campaign, titled Truth and Reconciliation, you can find the following 3 skulls in this order:
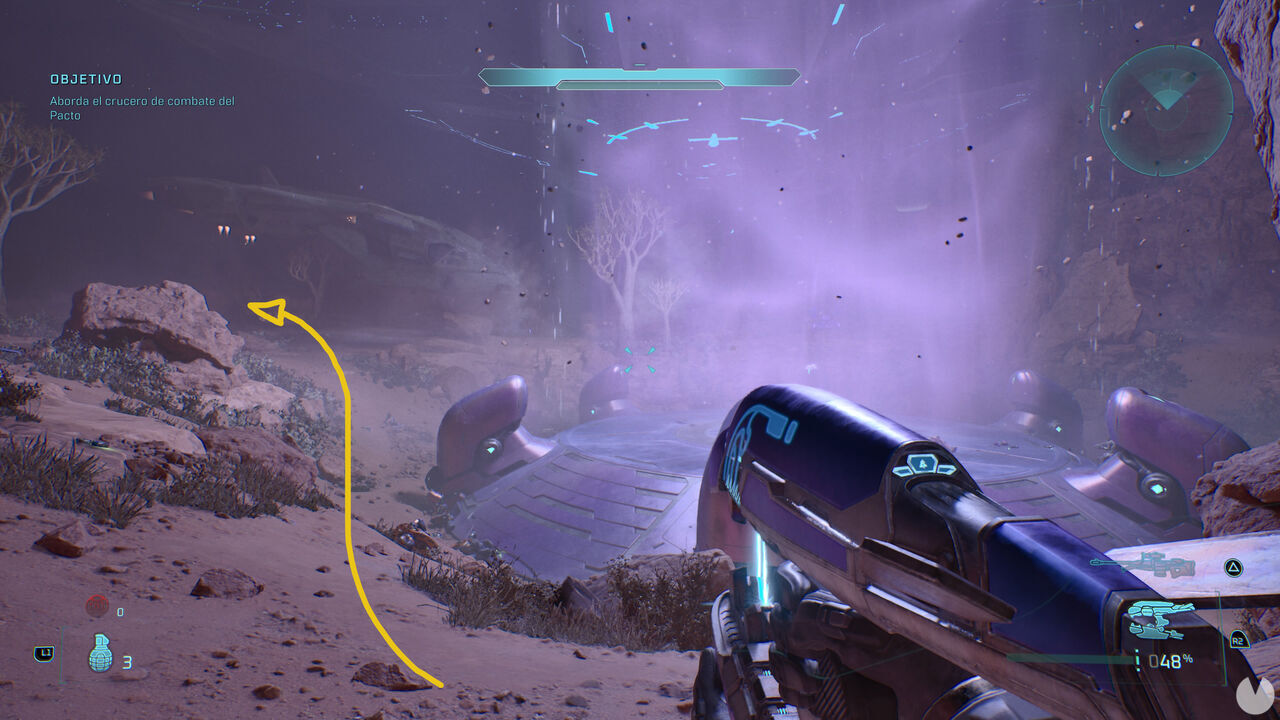
Once you reach the large gravity lift that leads up to the cruiser, do not enter it yet after clearing the area of enemies. Instead, head toward the cliff at the far end, near where the Marine dropship positions itself once the area is secure:
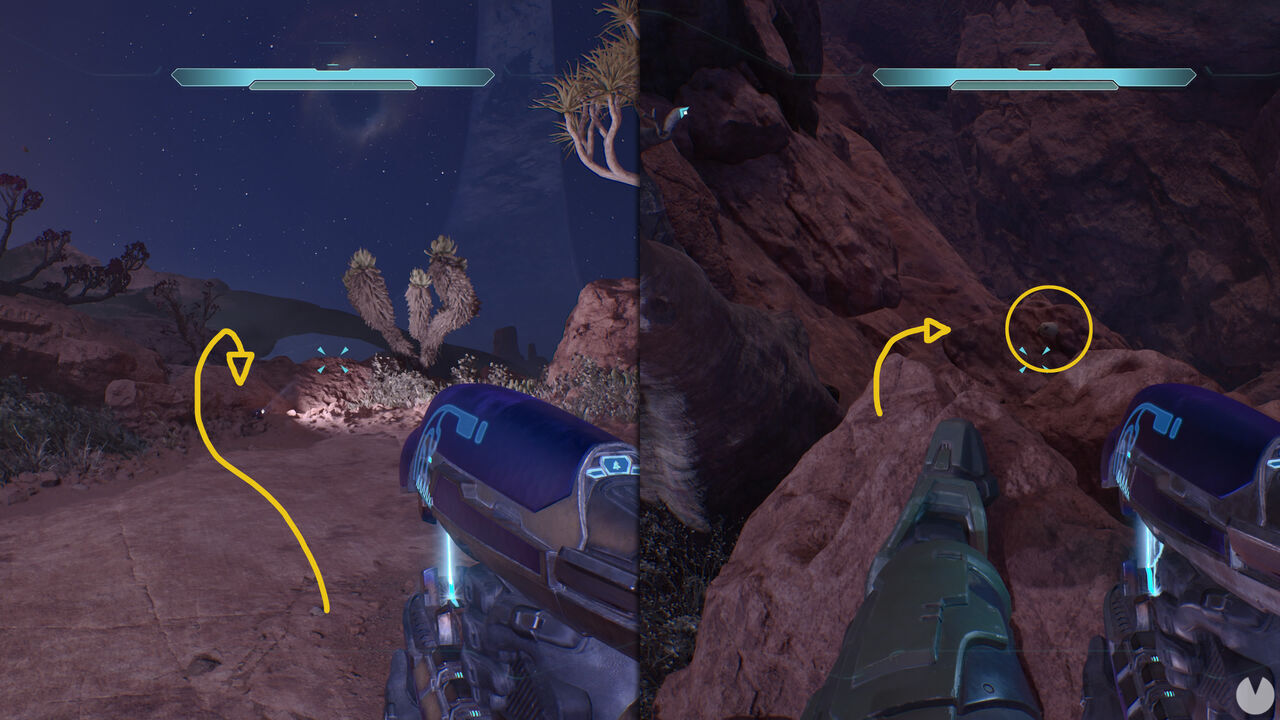
Look for a spotlight aimed at a cactus near the edge of the area. Look down from here to see the skull on a lower rock along the cliff. Drop down to collect it.
Once inside the ship, continue until you encounter a locked door that you need to open for the Marines from the other side. Follow the available path through the corridors above until you enter a large room with a lower floor. Walk around the upper passage to the corner opposite the entrance. From here, look toward the large metallic pillars inside the room.
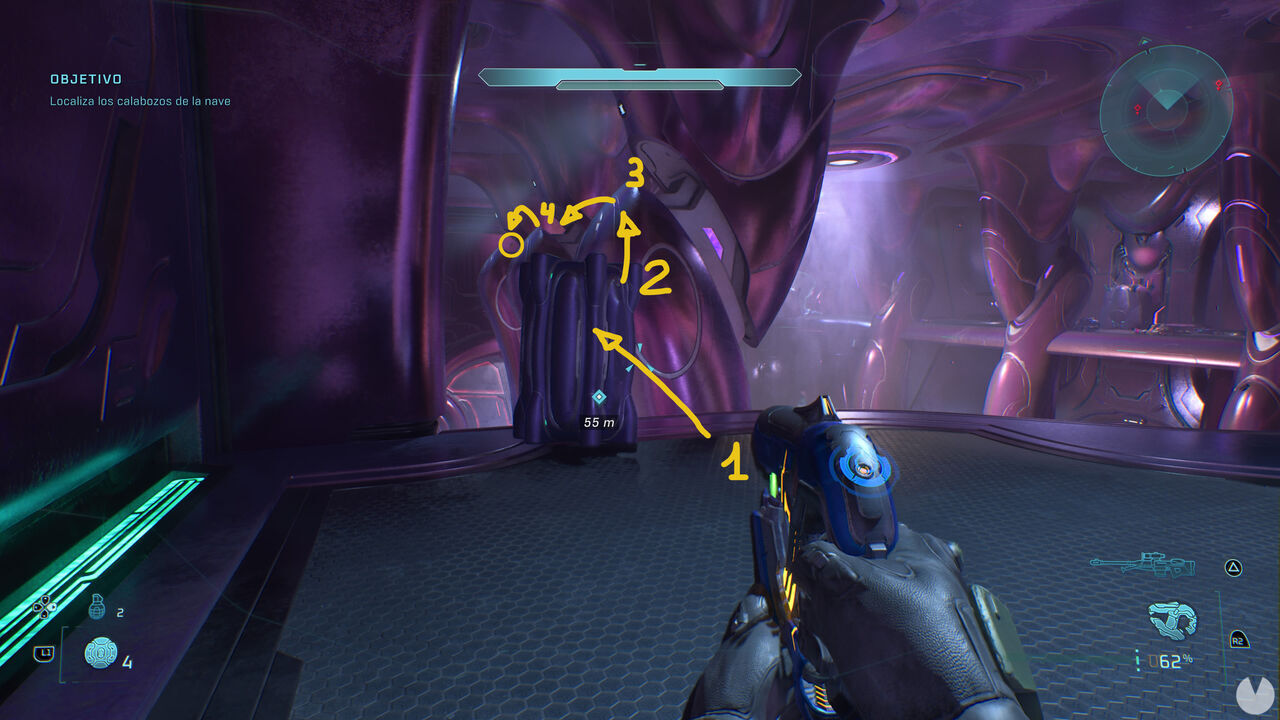
As shown in the image above, the skull is on the third and farthest pillar. You can first jump onto the nearby canister and then sprint and jump between the pillars to reach the skull.
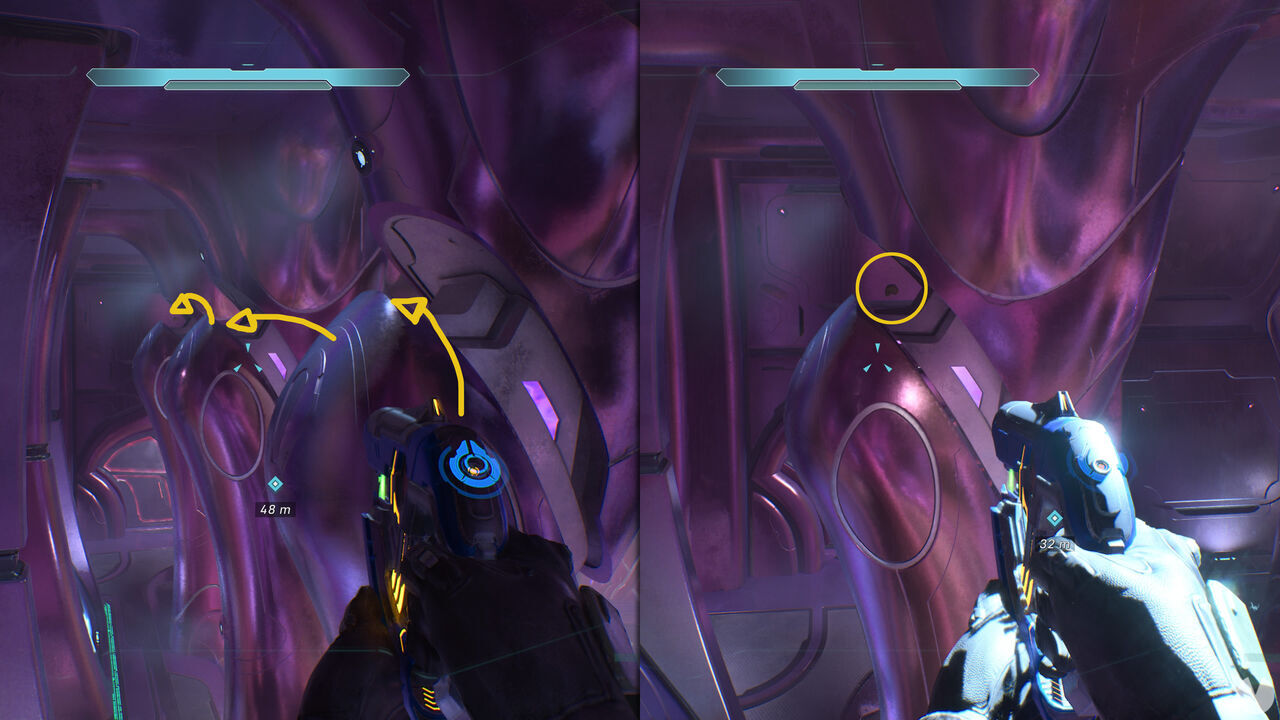
It will probably take several attempts to reach the skull, but you can make it if you line up each jump carefully. If you're struggling, you can always return once you have the Acrophobia skull, which makes collecting this one much easier.

Shortly after collecting the previous skull, while heading toward the cruiser's holding cells, you'll enter a hangar-like room filled with ships and enemies. From the entrance, head toward the far-right corner to find a locked door like the one shown below:
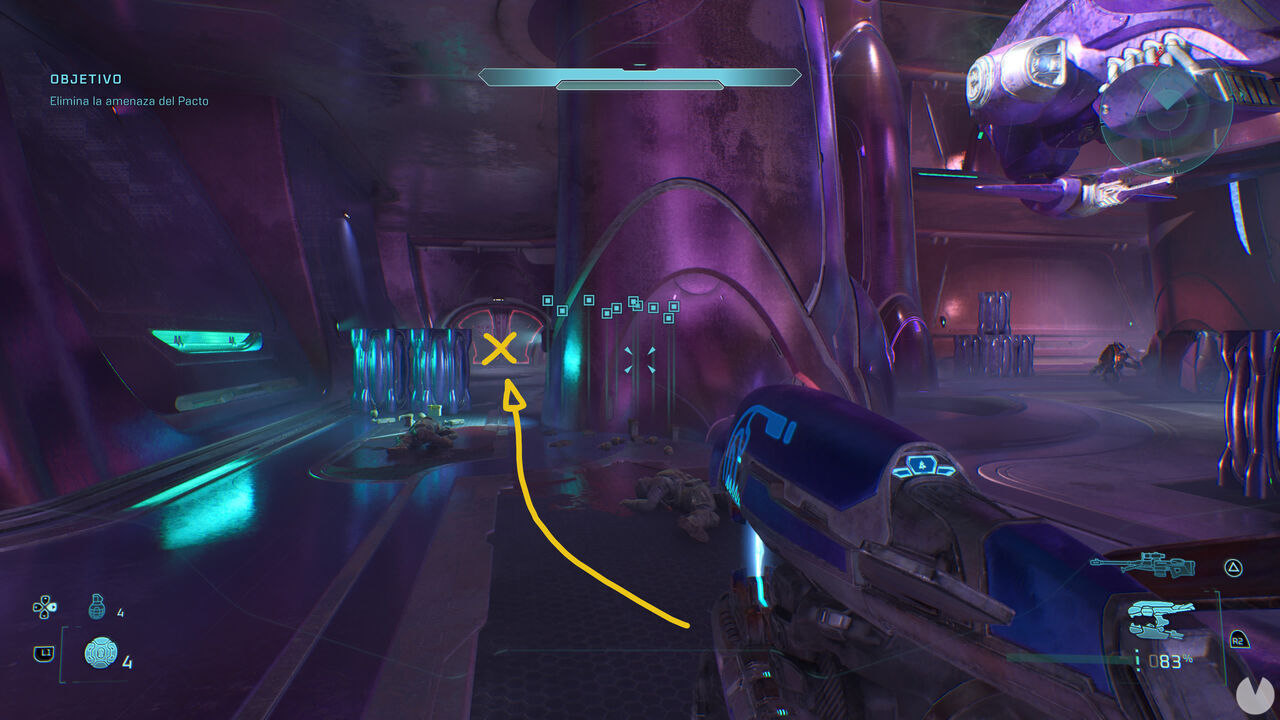
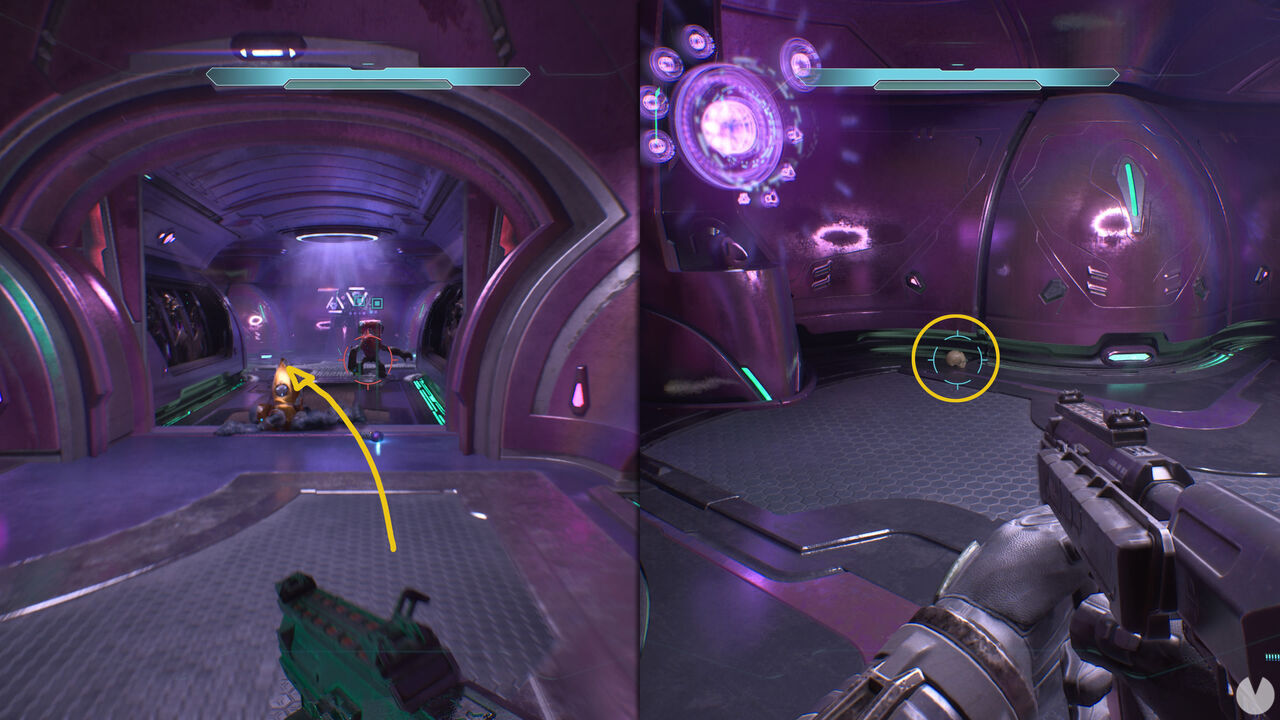
Keep an eye on this door while eliminating the enemies, as it will eventually open and more enemies will emerge from the corridor. Take the opportunity to go through the open door and you'll find the skull lying on the floor immediately to the left.
During mission 4 of the main campaign, titled The Silent Cartographer, you can find the following 3 skulls in this order:
Shortly after the mission begins, you'll get into a Warthog and need to drive toward the entrance to the map room. Once you reach the building's entrance, do not go inside yet.
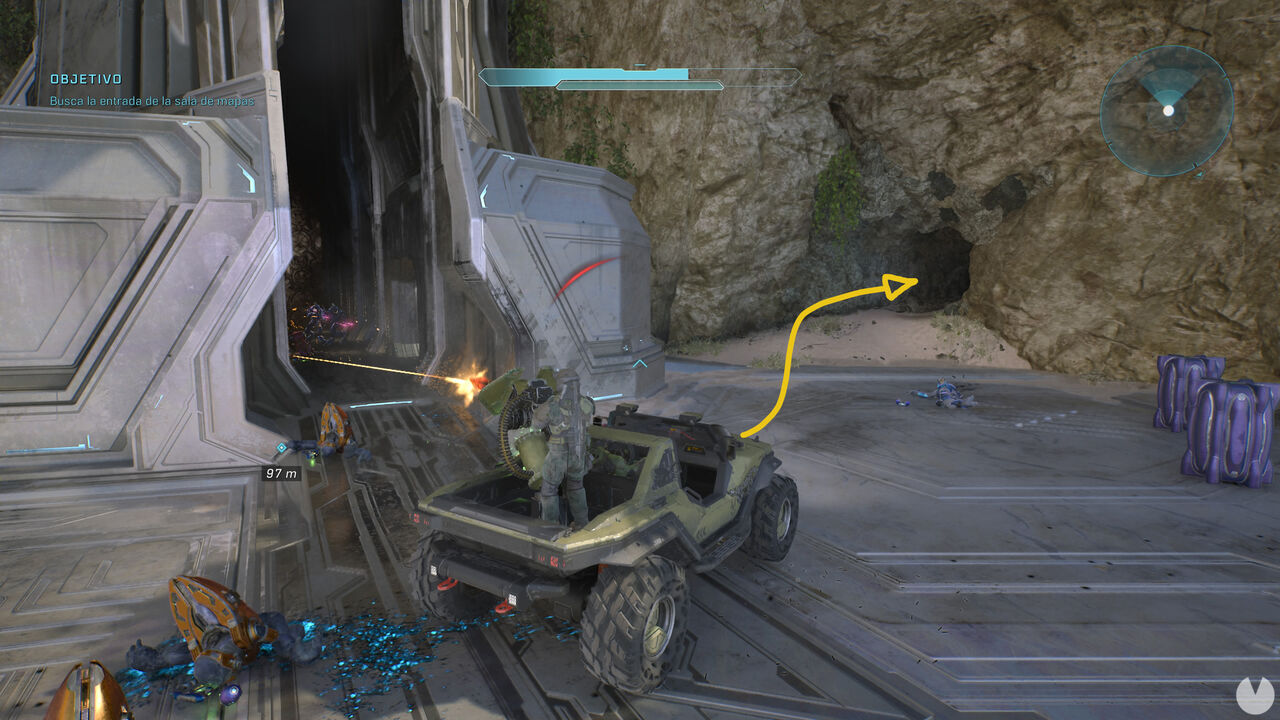
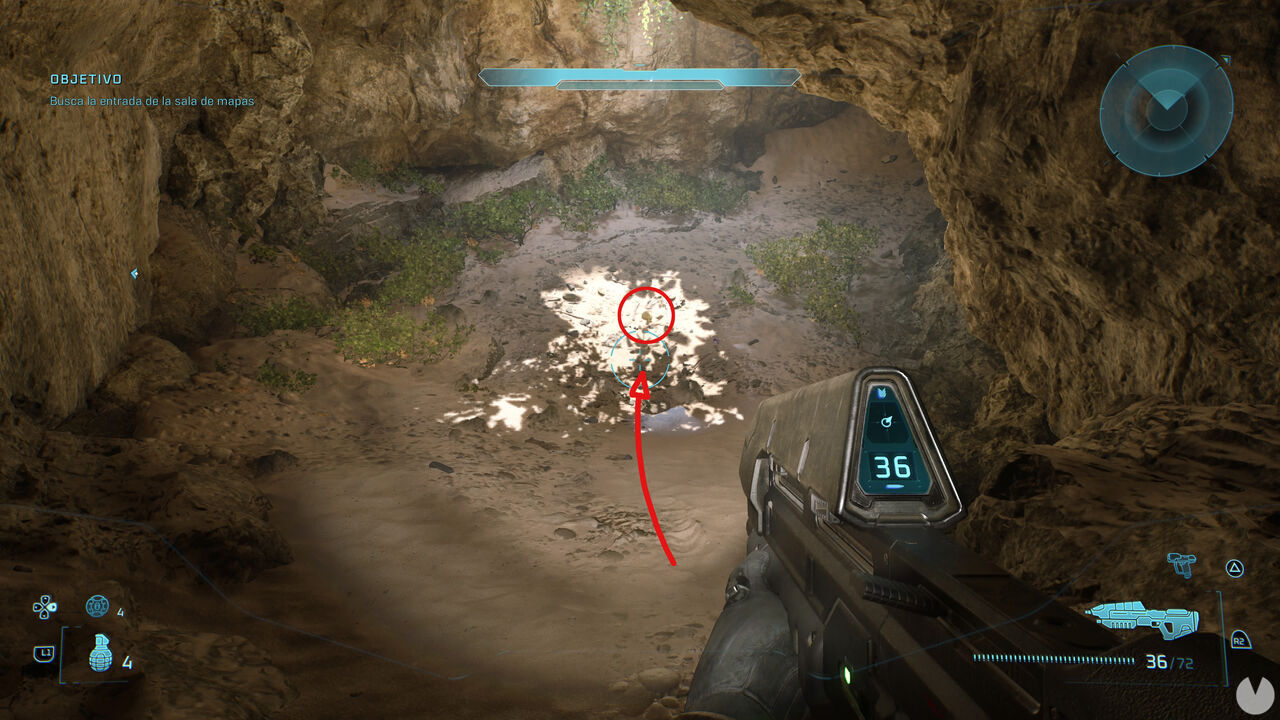
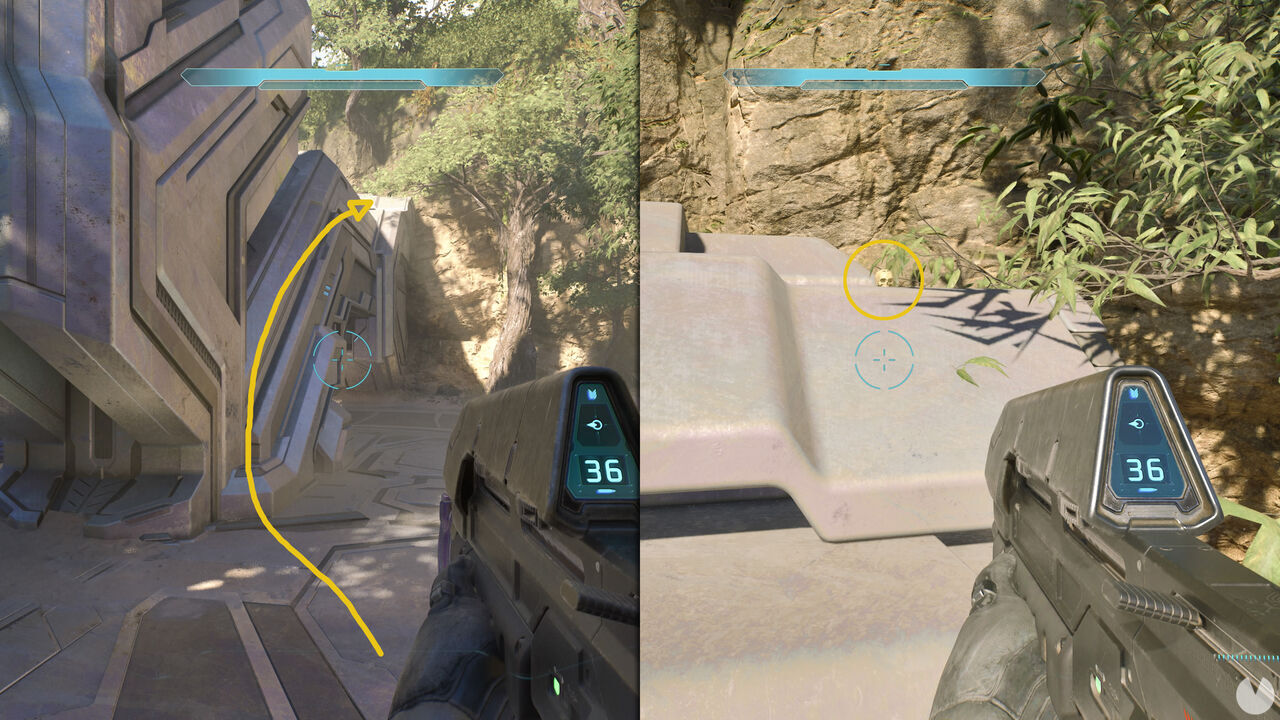
Instead, as shown in the image above, head toward a small cave on the right. You'll find the skull lying on the floor inside.

While completing the objective to locate the security system override substation, you'll follow a path up from the beach and reach an area containing a tower-like structure, like the one shown below:
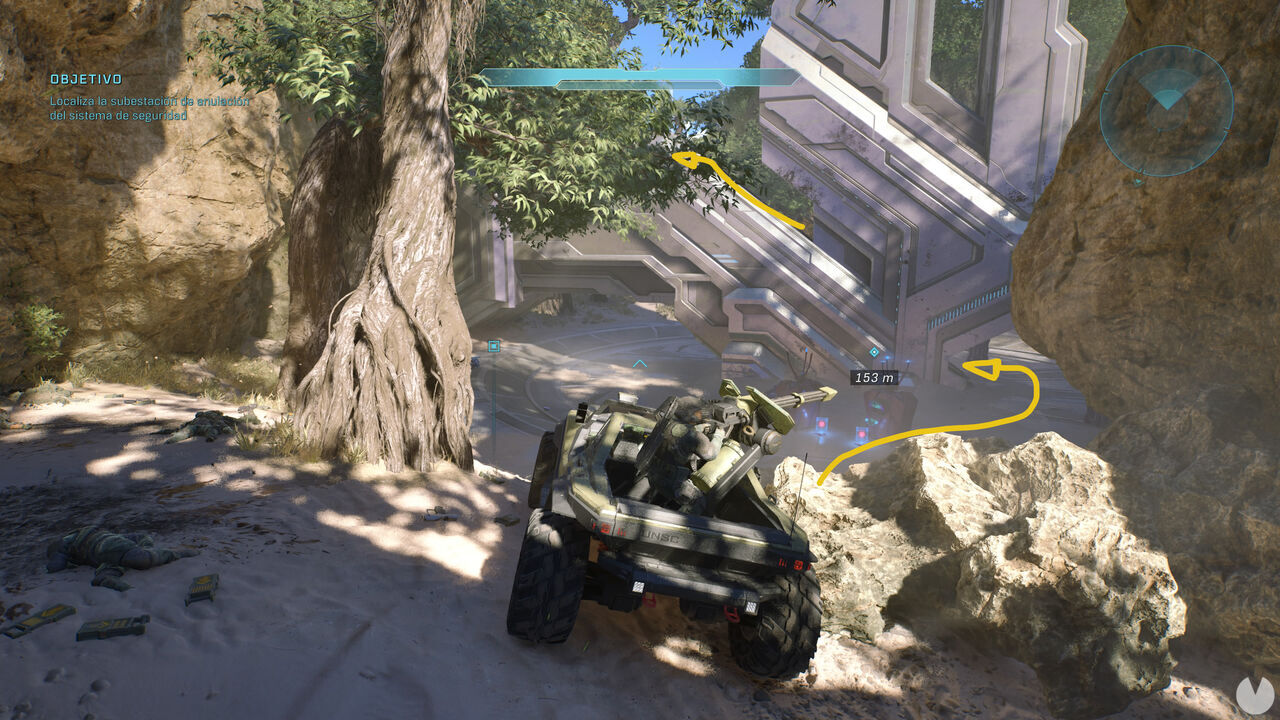
After eliminating the enemies, stop here and walk up the side of this structure toward the top. You'll find the skull waiting for you up there.

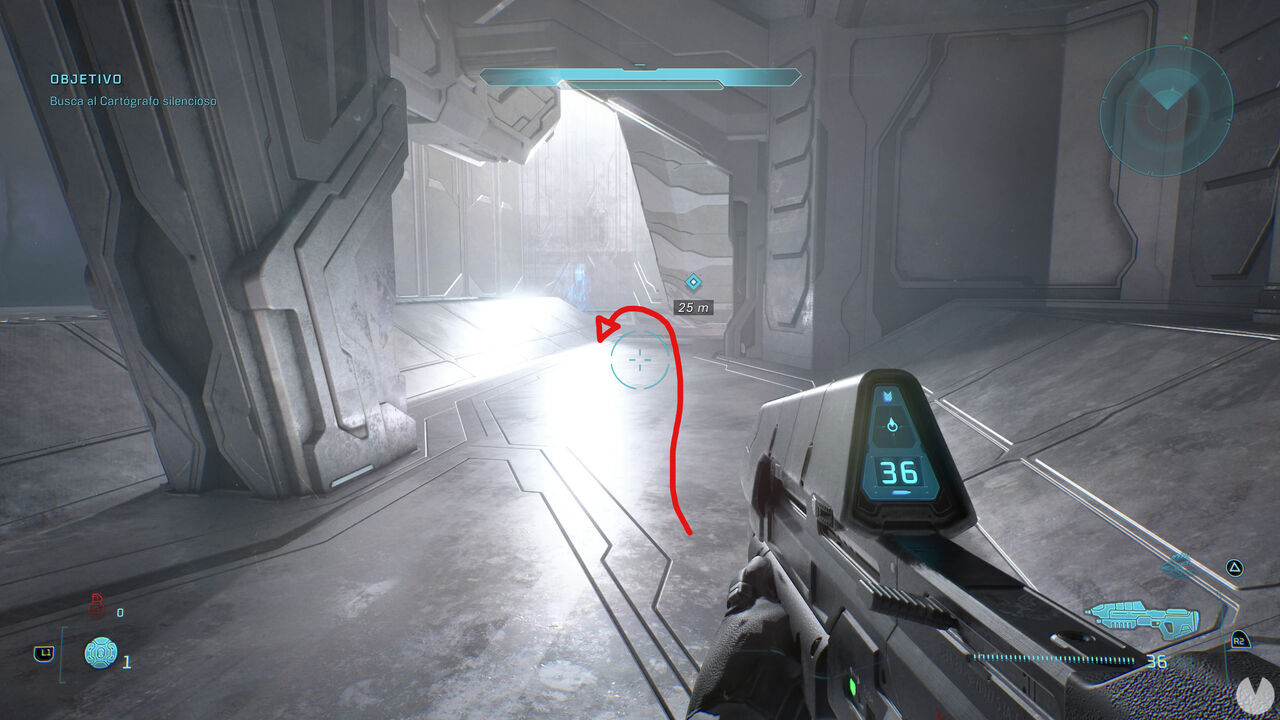
After entering the shaft, you'll begin descending through floors filled with enemies while searching for the Silent Cartographer. After clearing the first floor and defeating the two Hunters, you'll need to walk down a slope flooded with white light from above and featuring a blue hologram in the middle.
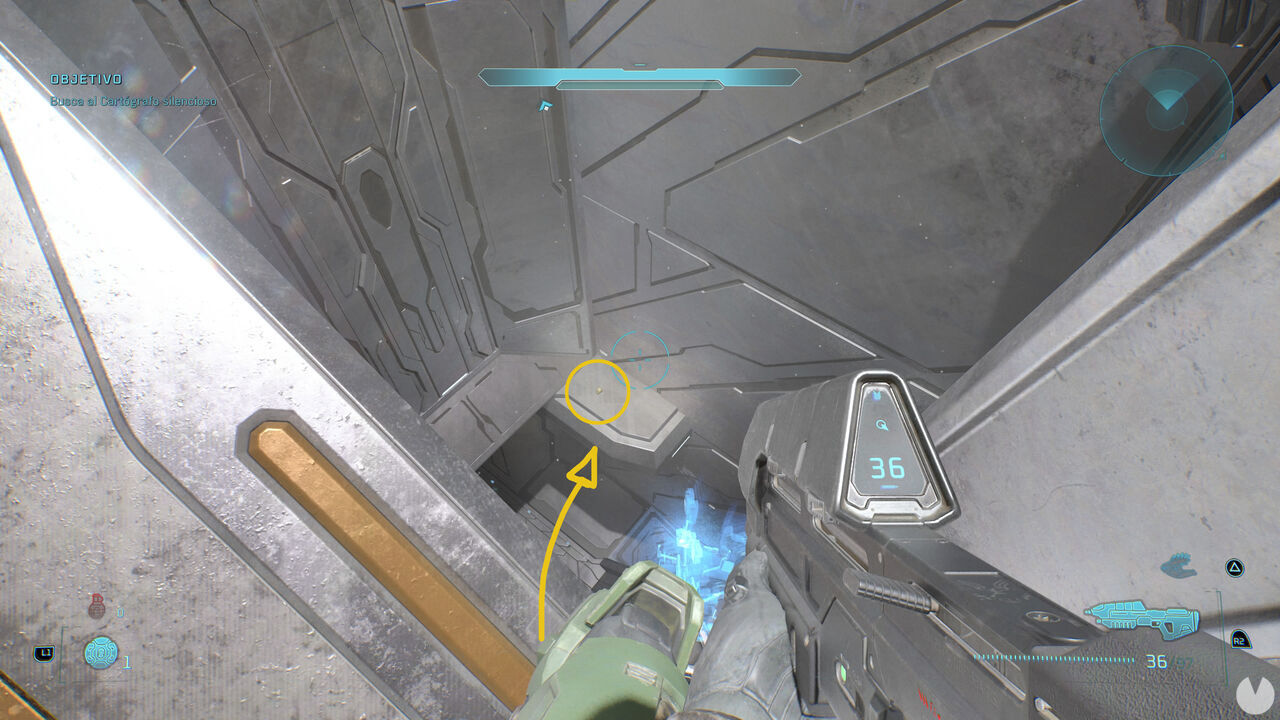
Look into the central opening in the slope and then look down. You need to drop onto the lower ledge containing the skull.
During mission 5 of the main campaign, titled Assault on the Control Room, you can find the following 3 skulls in this order:

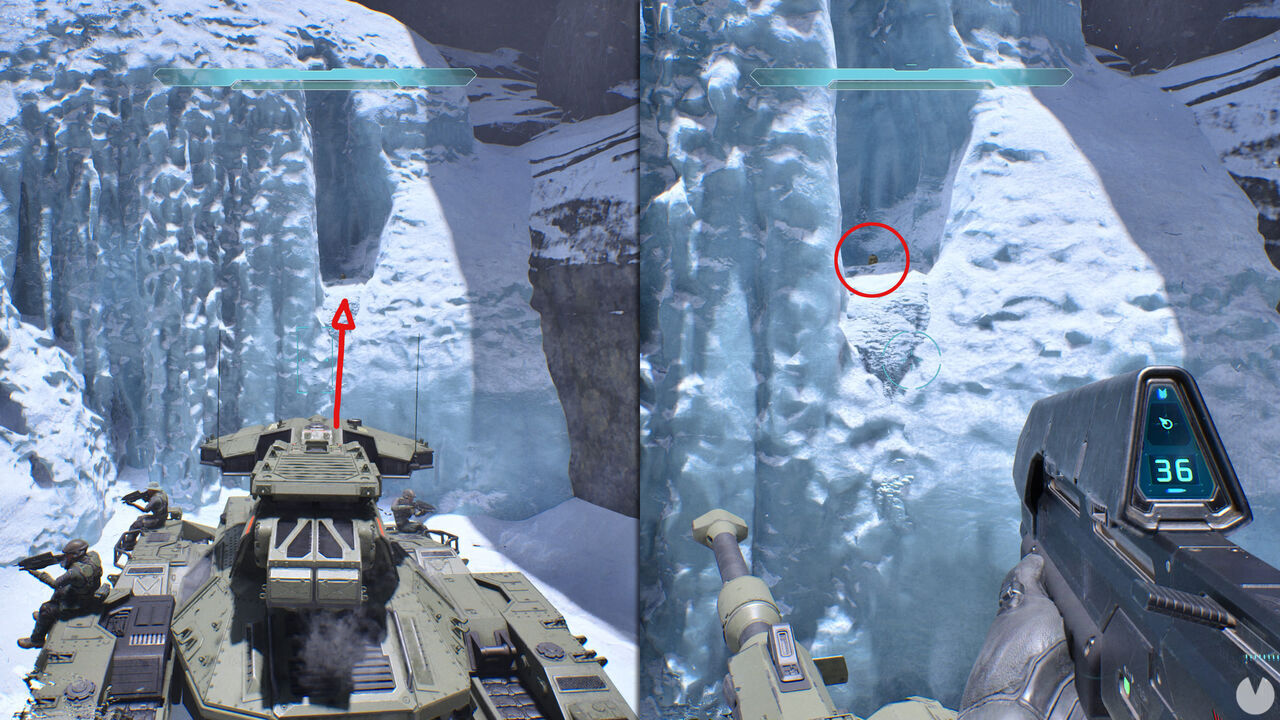
After regrouping with Fire Team Zulu and getting into the Scorpion tank, continue through the mission until you reach an area where you need to cross a bridge in the vehicle. Immediately after crossing it, take the path on the left instead of the one on the right.
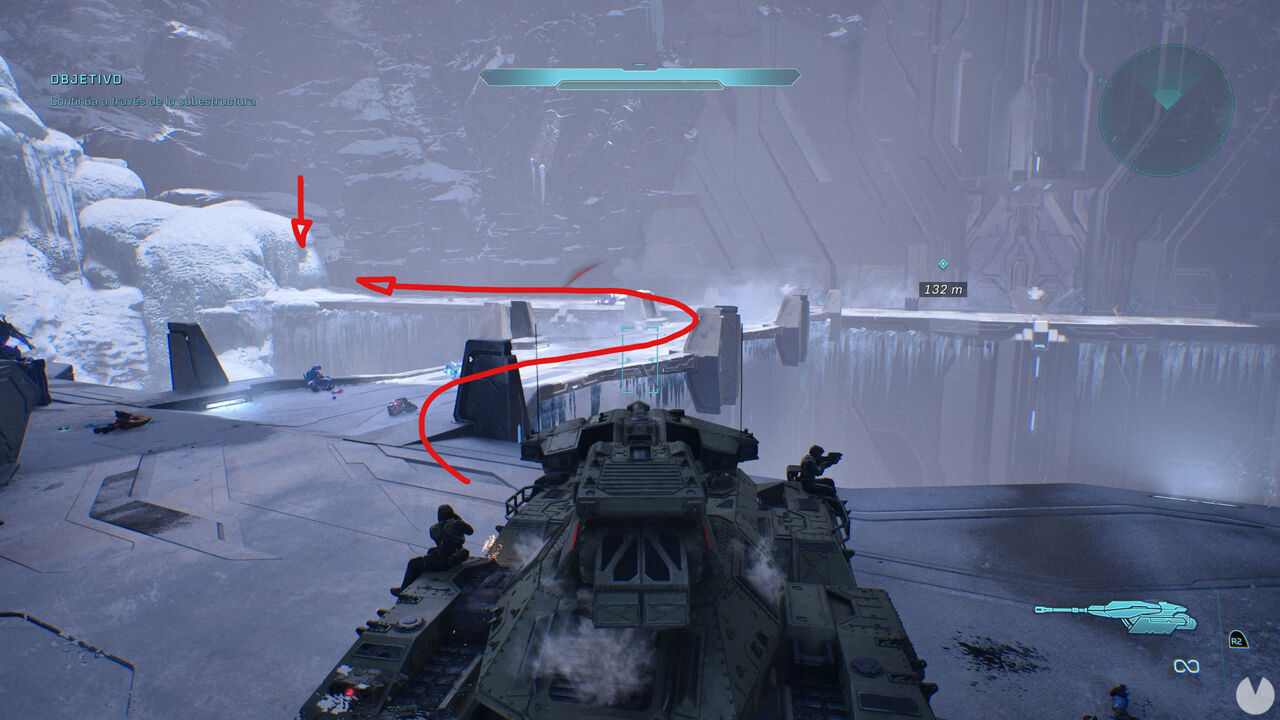
Drive the tank to the end of this path to find the skull in an elevated recess in the frozen wall. Park the tank close to the recess, get out and climb onto the vehicle so you can jump across to the skull.

On the way to the Ziggurat control center, you'll need to leave the tank behind and walk over a ridge to reach a large open area filled with enemies and vehicles. There are three arch-shaped structures in the middle of this area.
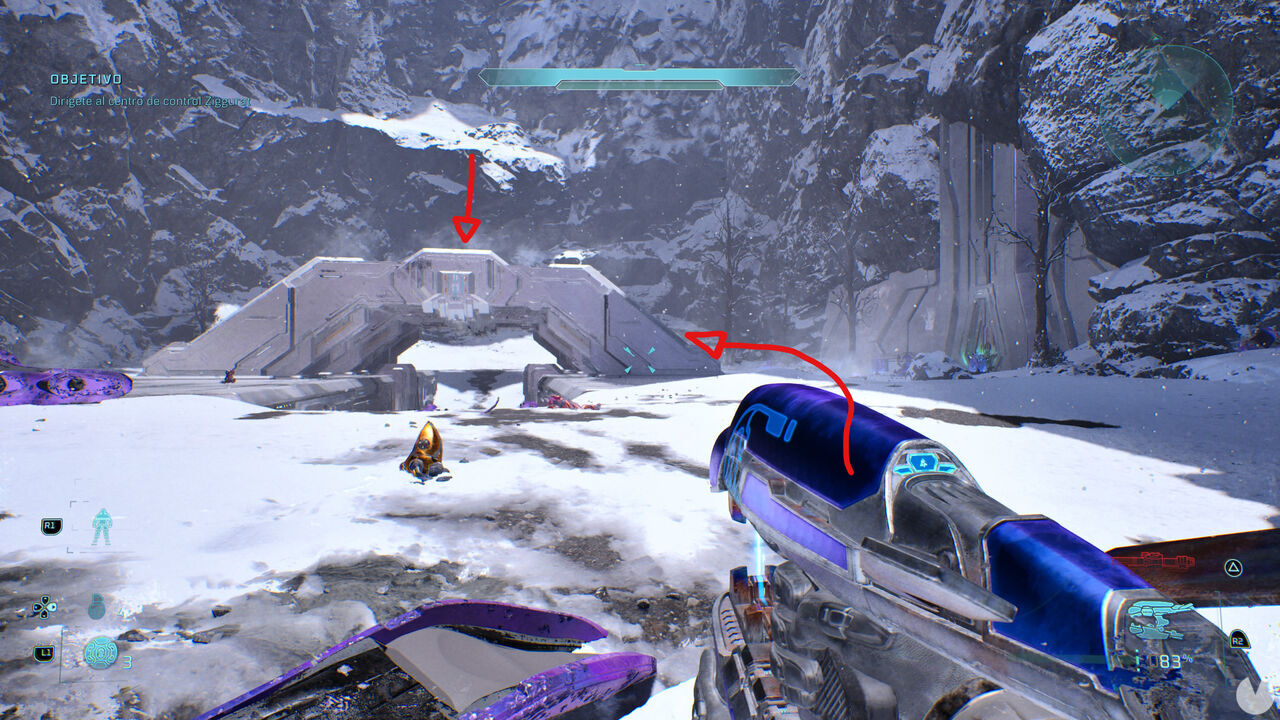
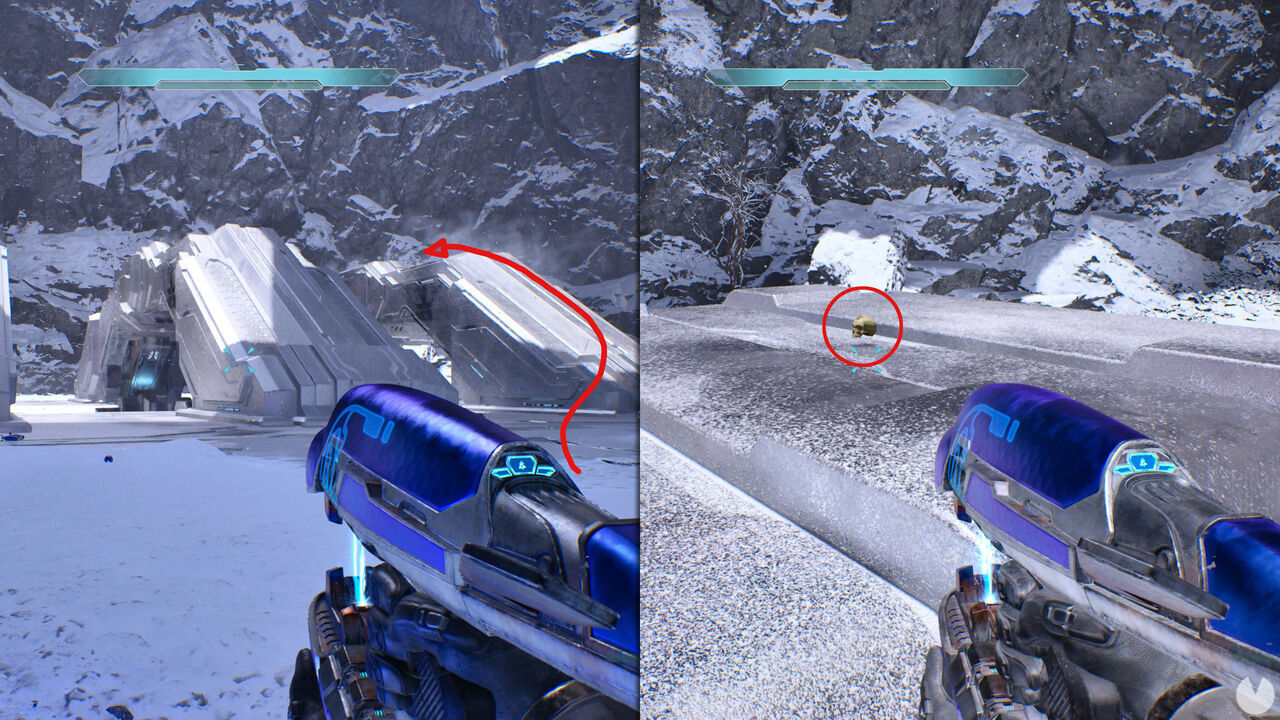
To find the skull, simply walk up the rearmost of the three structures, as shown in the image below:

While completing the objective to reach Halo's control room, you'll eventually enter an area containing a bridge you need to cross while enemy Banshees fly overhead.
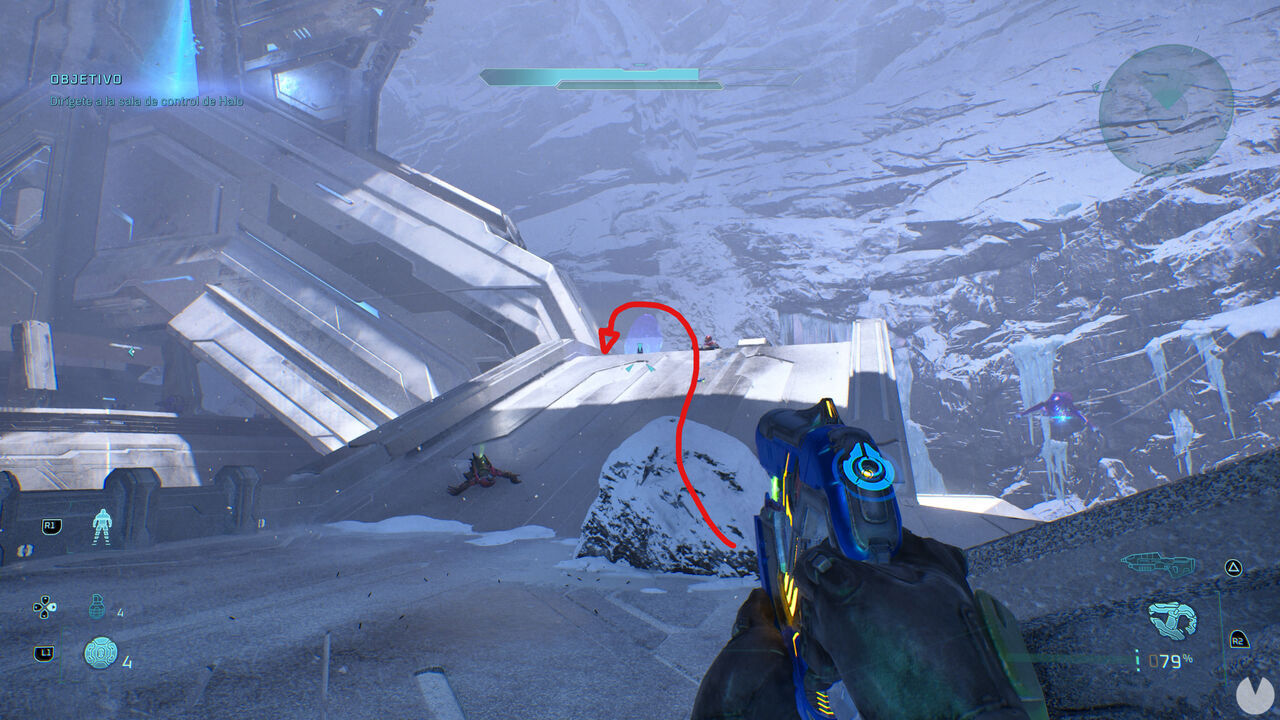
Halfway across the bridge, look to the left, toward the large structure, and drop down to find the skull hidden beneath the bridge.
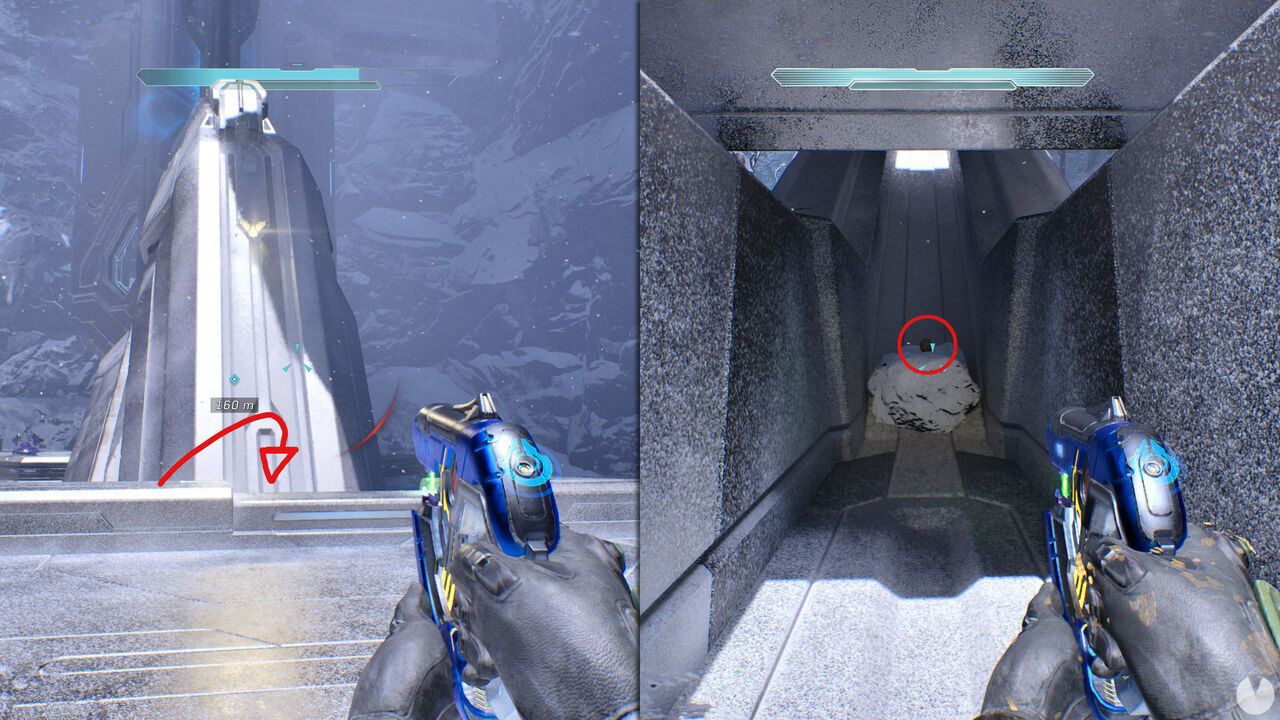
During mission 6 of the main campaign, titled 343 Guilty Spark, you can find the following 3 skulls in this order:

At the beginning of the mission, move forward until you see a crashed enemy ship lodged in a tree. From the position shown in the image below, walk up the dirt slope on the left side of the path.
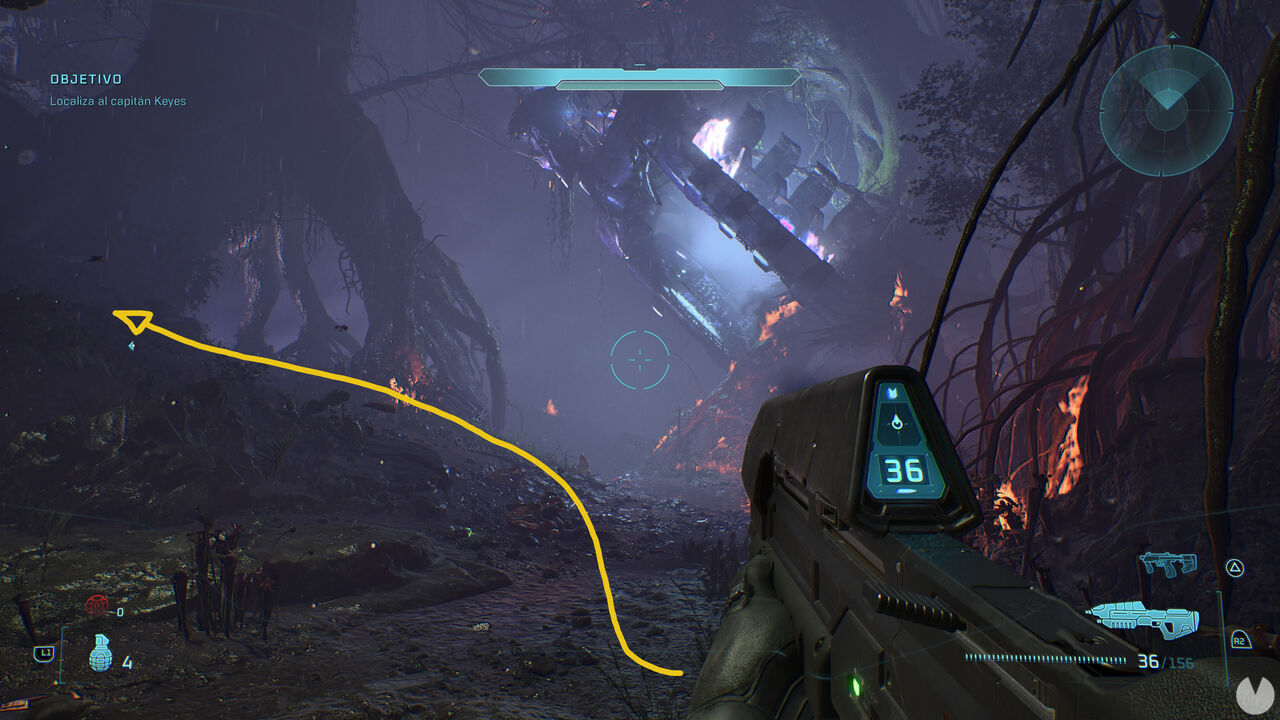
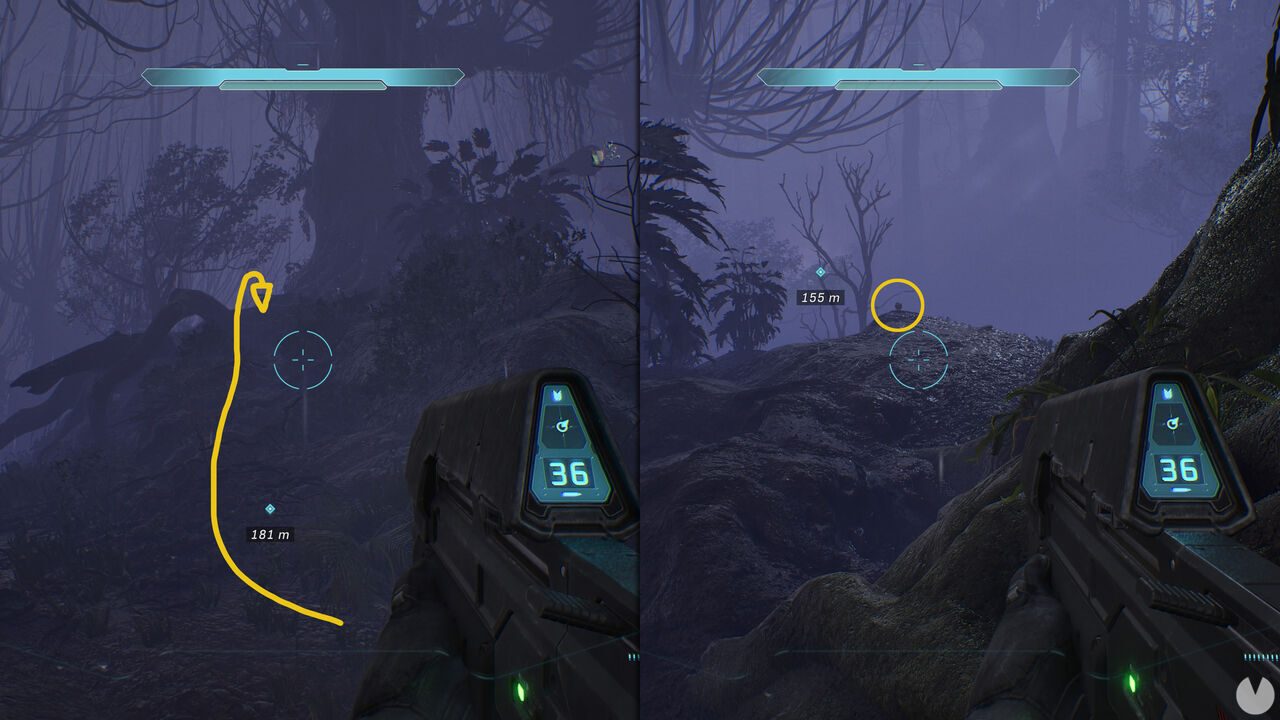
Follow the slope to the base of a tree, then jump between its roots to climb higher and reach the rock containing the skull.

As you progress through the mission and search for Captain Keyes inside the facility, shortly after opening a door in one of the corridors, you'll encounter a traumatized Marine who screams at you and drops to the floor.
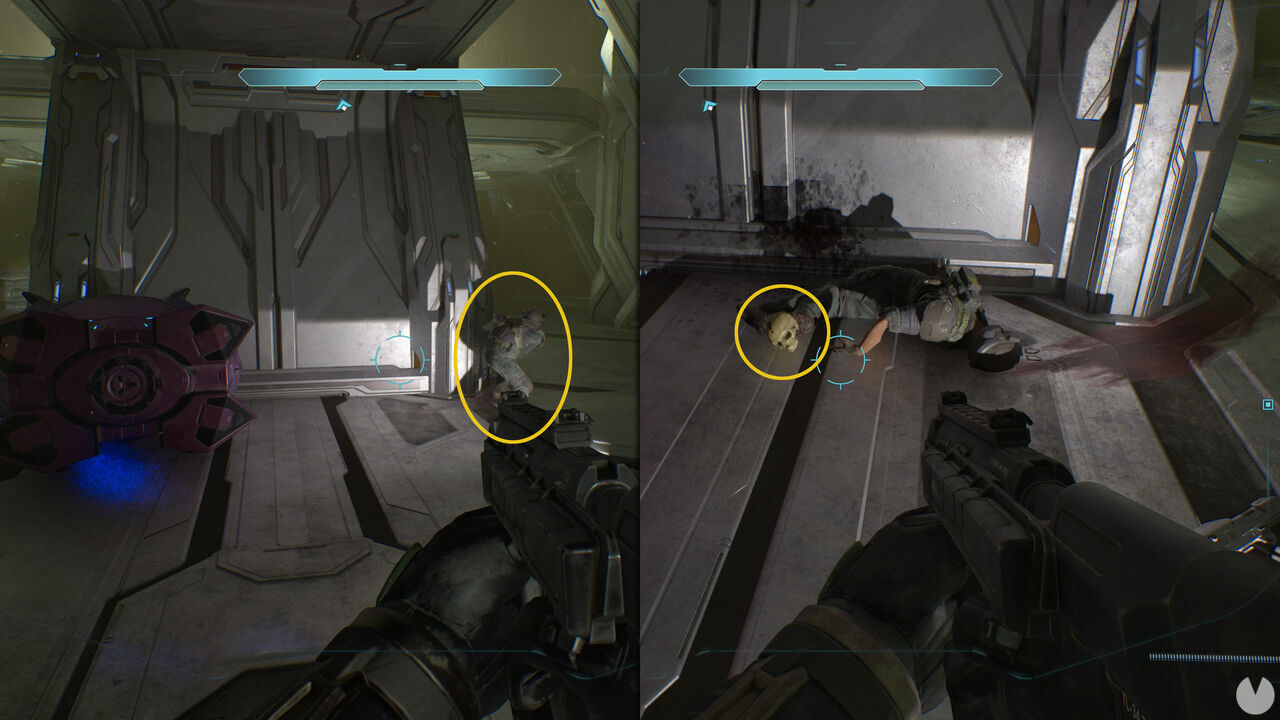
Shoot and kill this Marine to make the skull appear beside his body.
Near the end of the mission, when you return to the jungle and need to guide the Marines to the extraction point, continue until you see a building illuminated by an intense white light, like the one shown below.
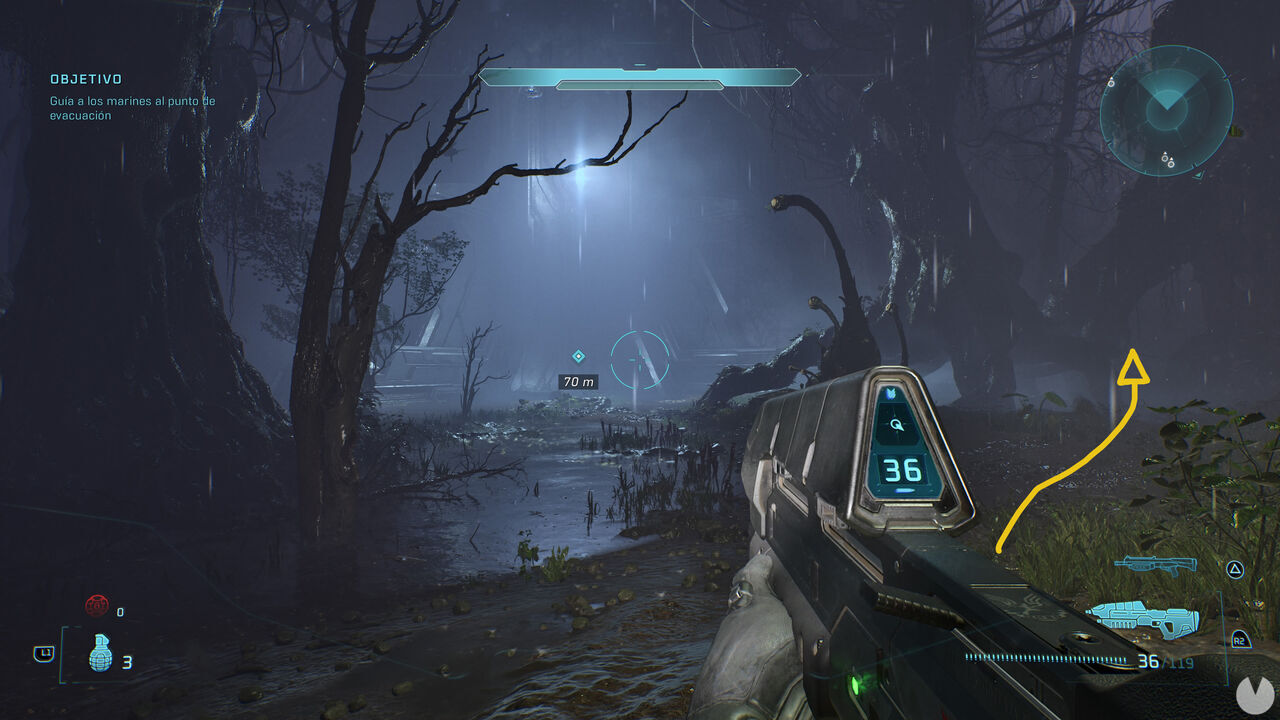
At this point, head into the forest on the right, as indicated in the image, toward a swamp-like area. Continue in this direction even though it may seem like you're moving away from the battle. Among the trees and rocks at the far end, look for a fallen tree trunk with several branches, like the one shown below:
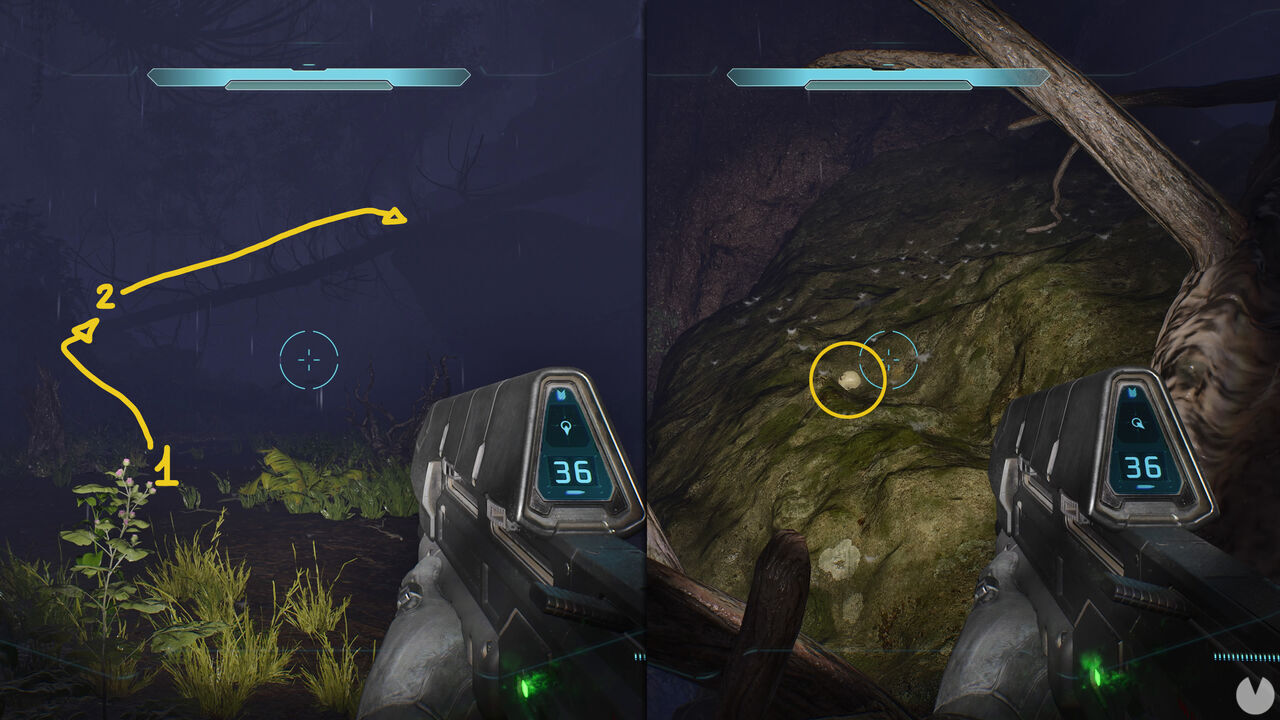
Climb onto the trunk from its lowest end and follow it toward the highest end. You'll find the skull on the rock supporting the trunk.
During mission 7 of the main campaign, titled The Library, you can find the following 3 skulls in this order:

Immediately after passing through the service tunnel, you'll enter a large room where friendly Sentinels appear for the first time and help you defeat the Flood. The skull is located near the door through which you entered this room:
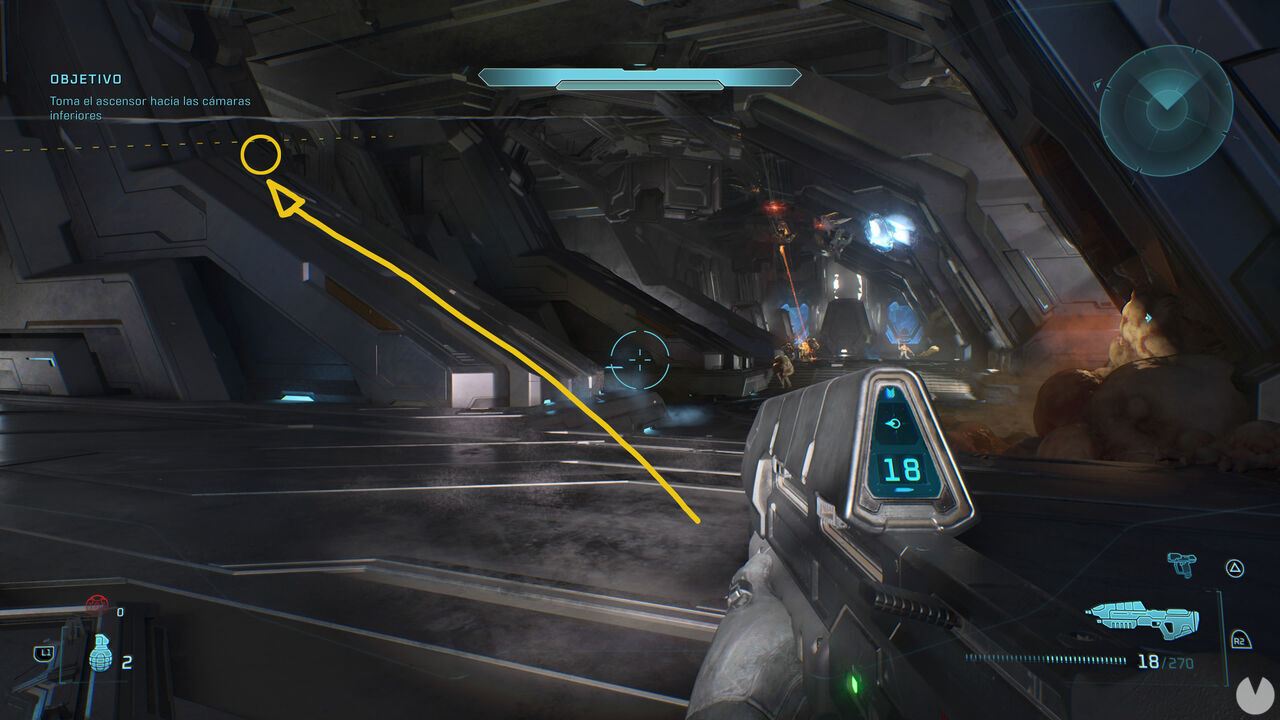
To reach the skull, simply walk up the sloping structure shown in these images.
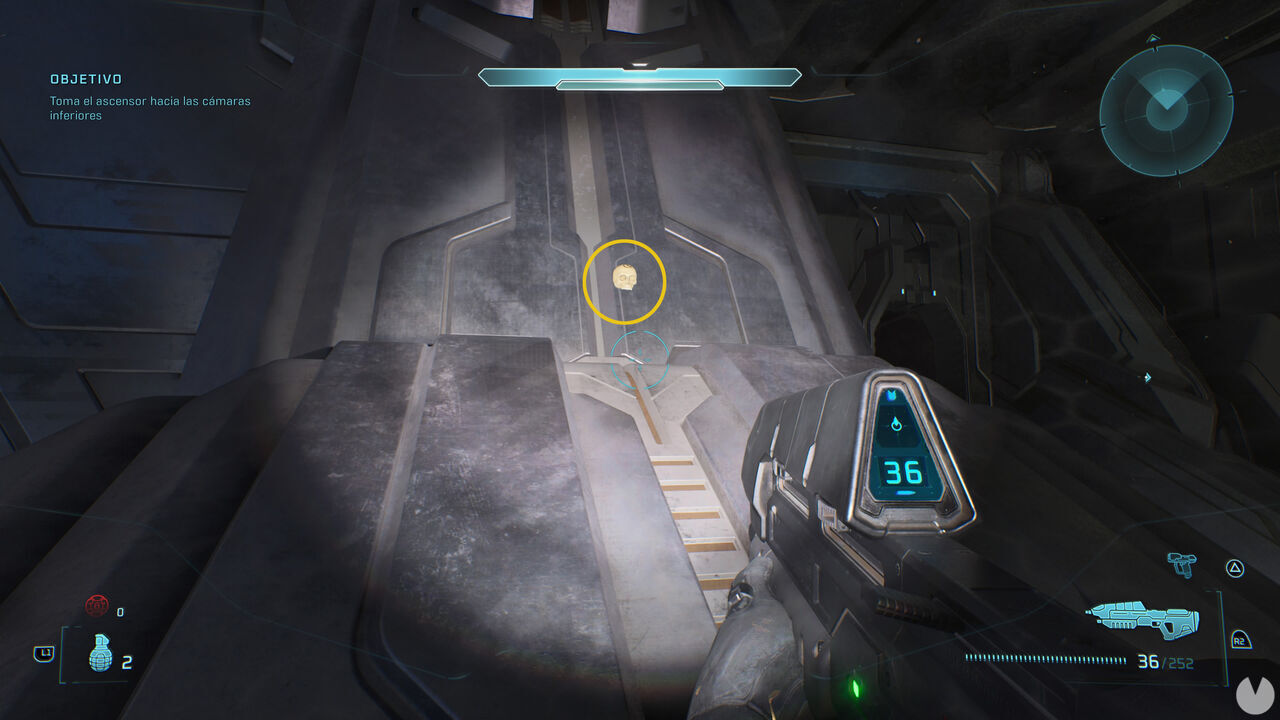

Shortly after taking the first elevator down to the lower chambers, you'll reach a locked door that the Monitor needs to open while you defend the area from the Flood. Face the door, turn around and you'll see the skull on top of an illuminated post.
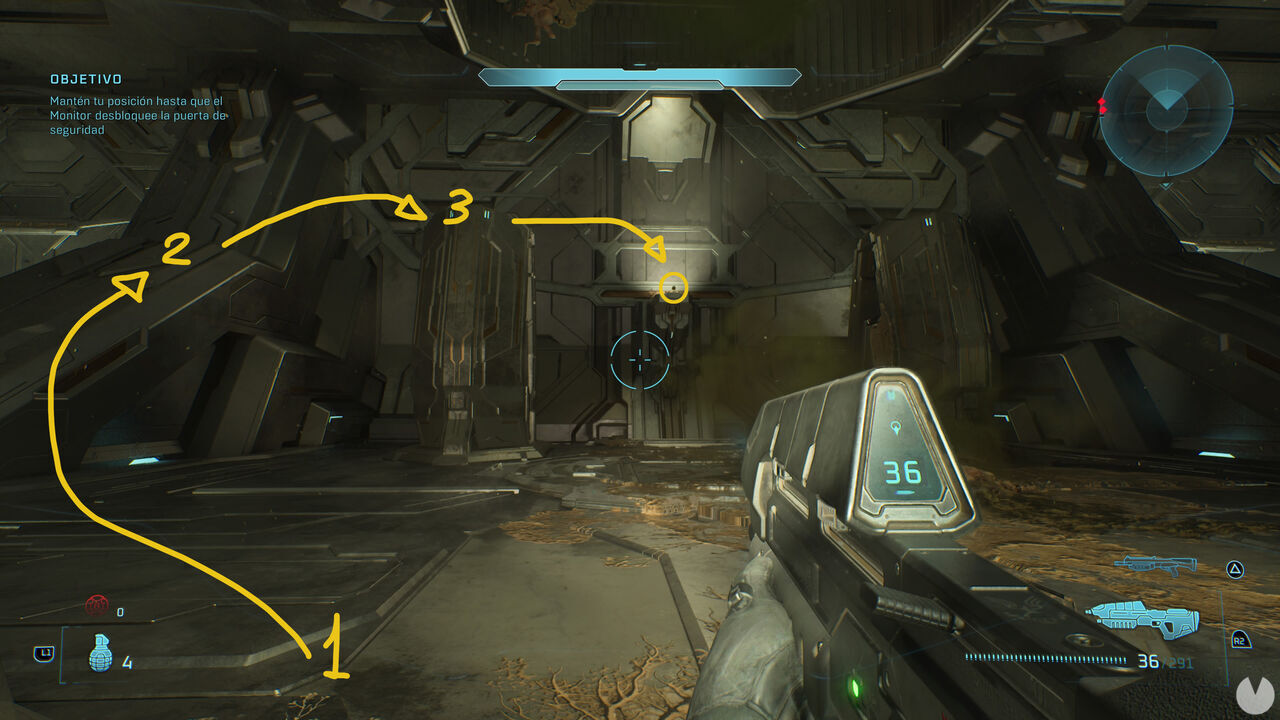
To reach the skull, climb either of the sloping structures on the sides and jump from there onto one of the nearby pillars. You can then reach the skull with another jump.
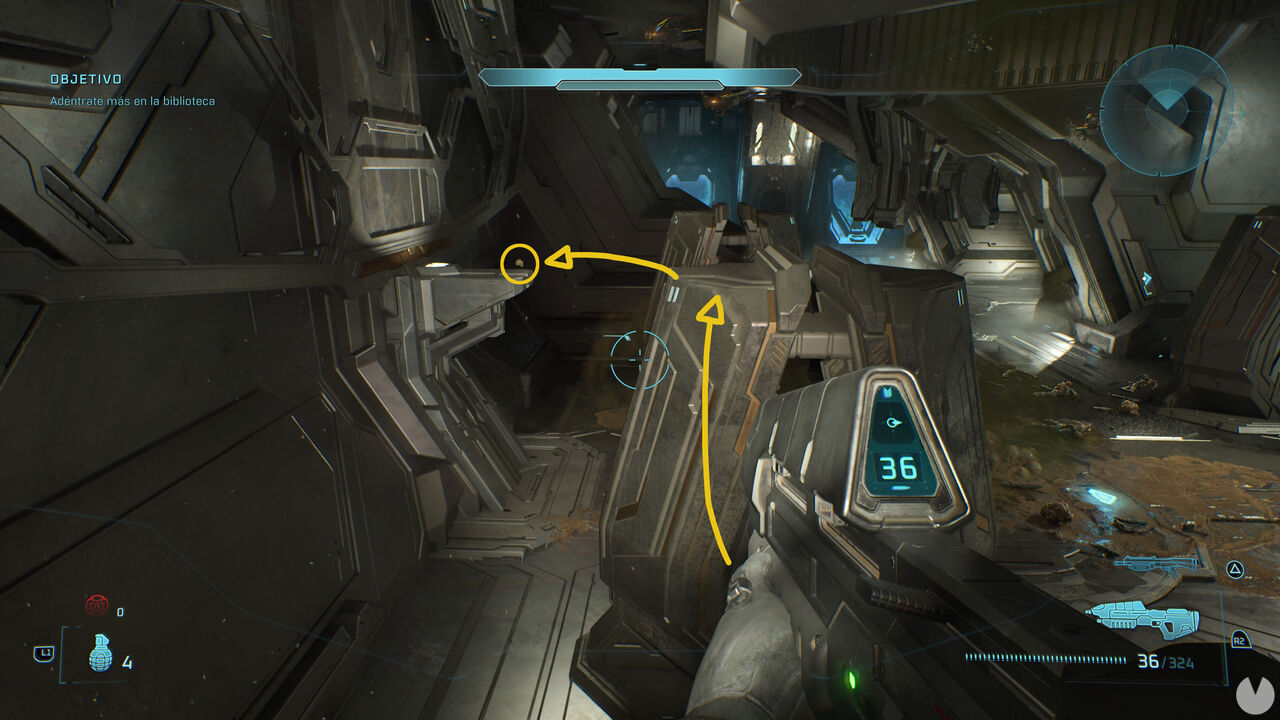

Once you've taken the elevator down to the Library's final chamber, near the end of the mission, walk straight ahead as soon as you reach the bottom and head down the slope shown in the following image:
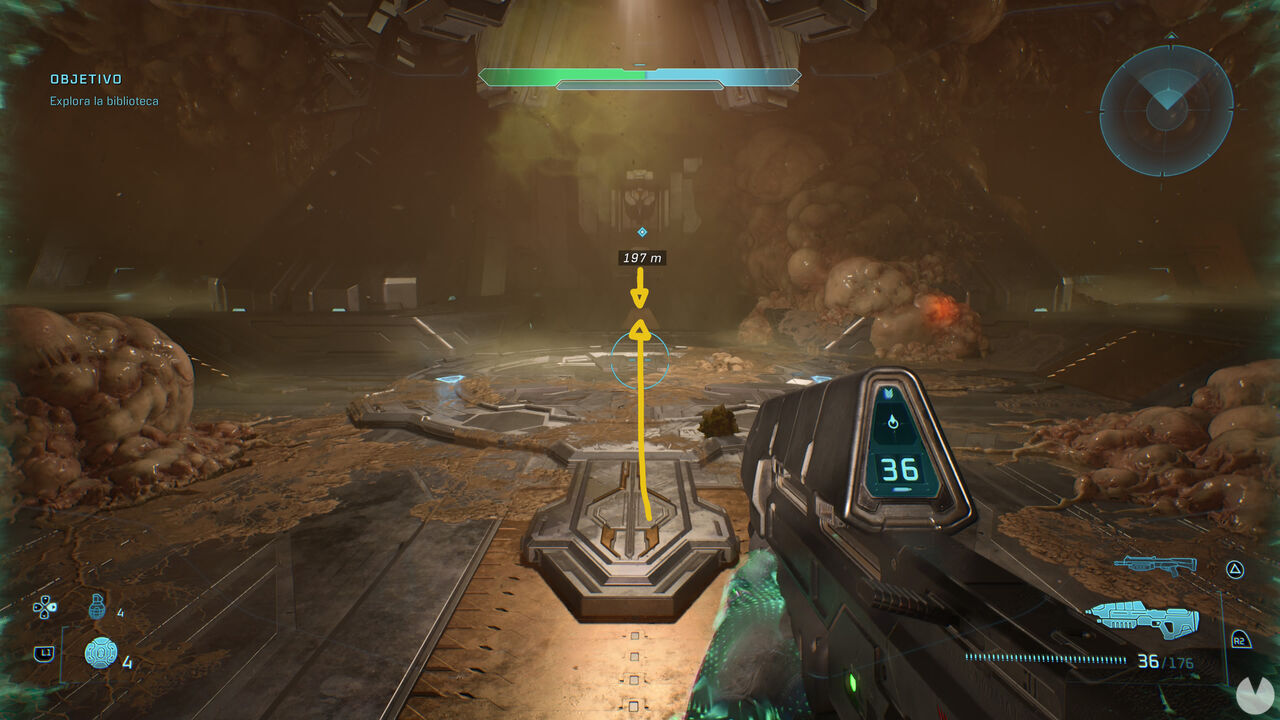
Go through the open door after the slope and immediately look to the left to see the skull lying on the floor.
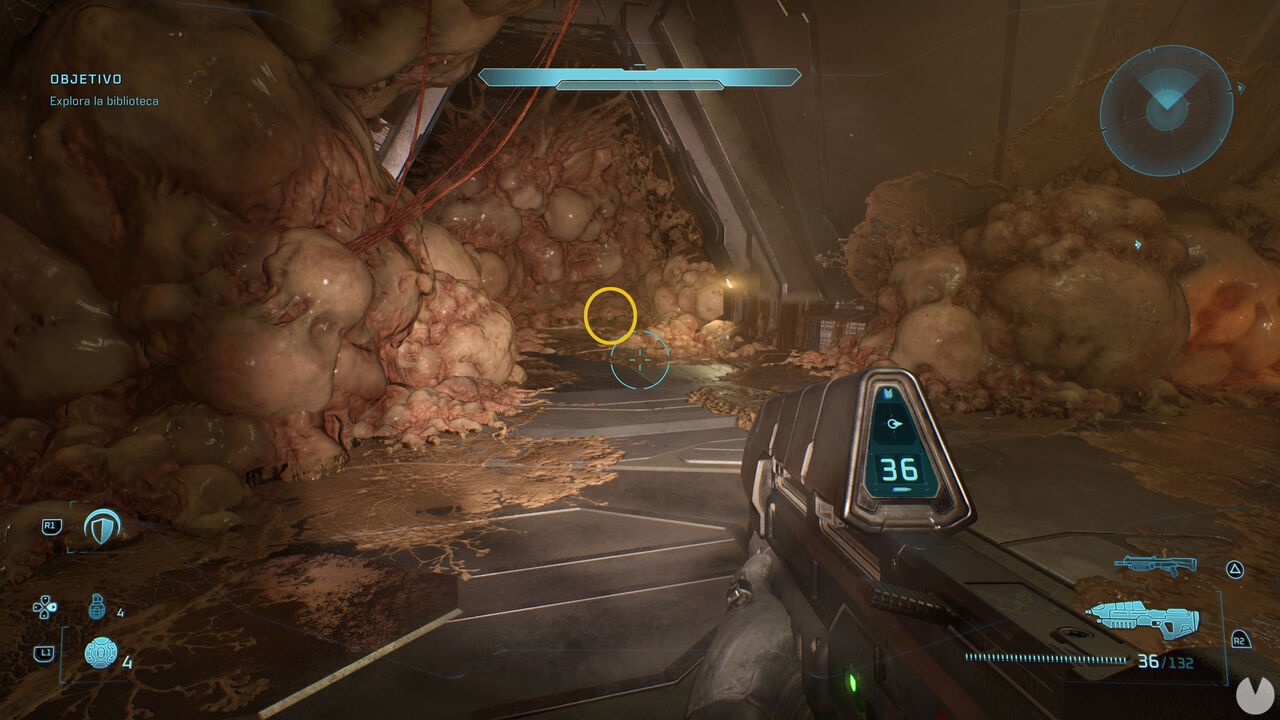
During mission 8 of the main campaign, titled Two Betrayals, you can find the following 3 skulls in this order:
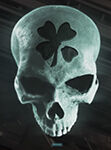
As soon as you leave Halo's control room and enter the outdoor area, the mission objective will ask you to take control of a Banshee in the courtyard. Get into it and fly toward the top of the control room building, heading for the structure emitting a large beam of blue light.
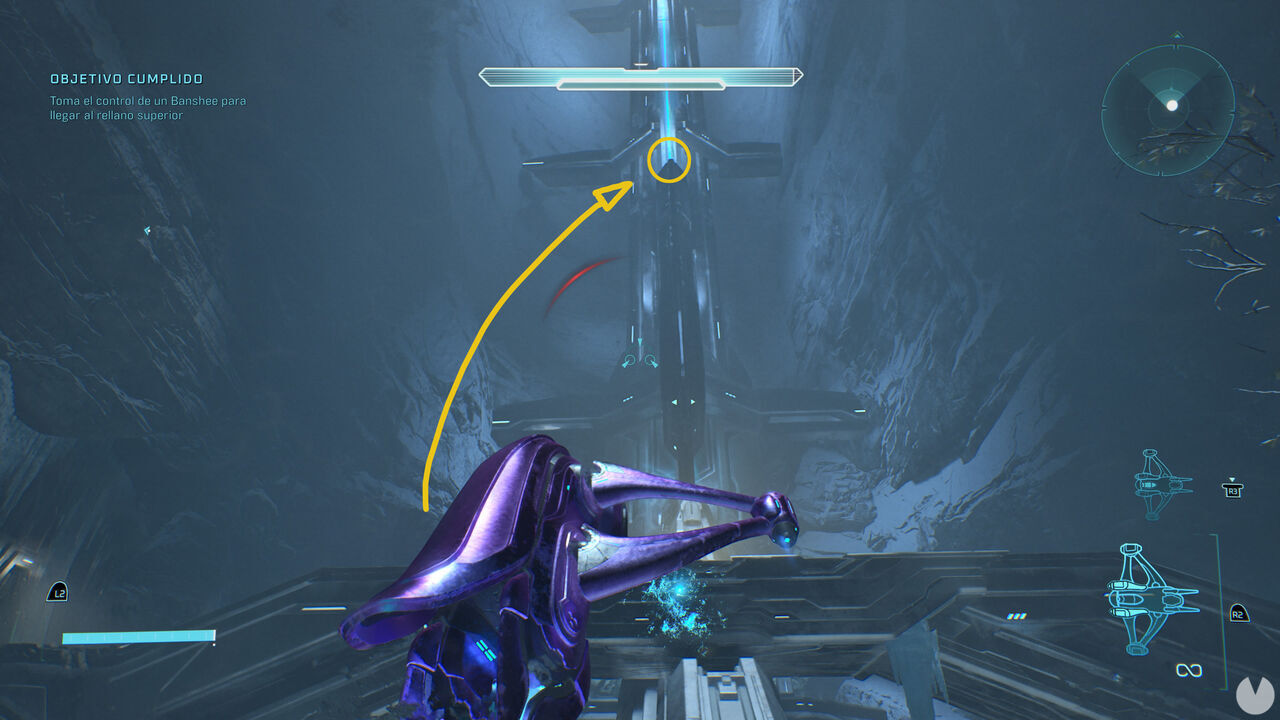
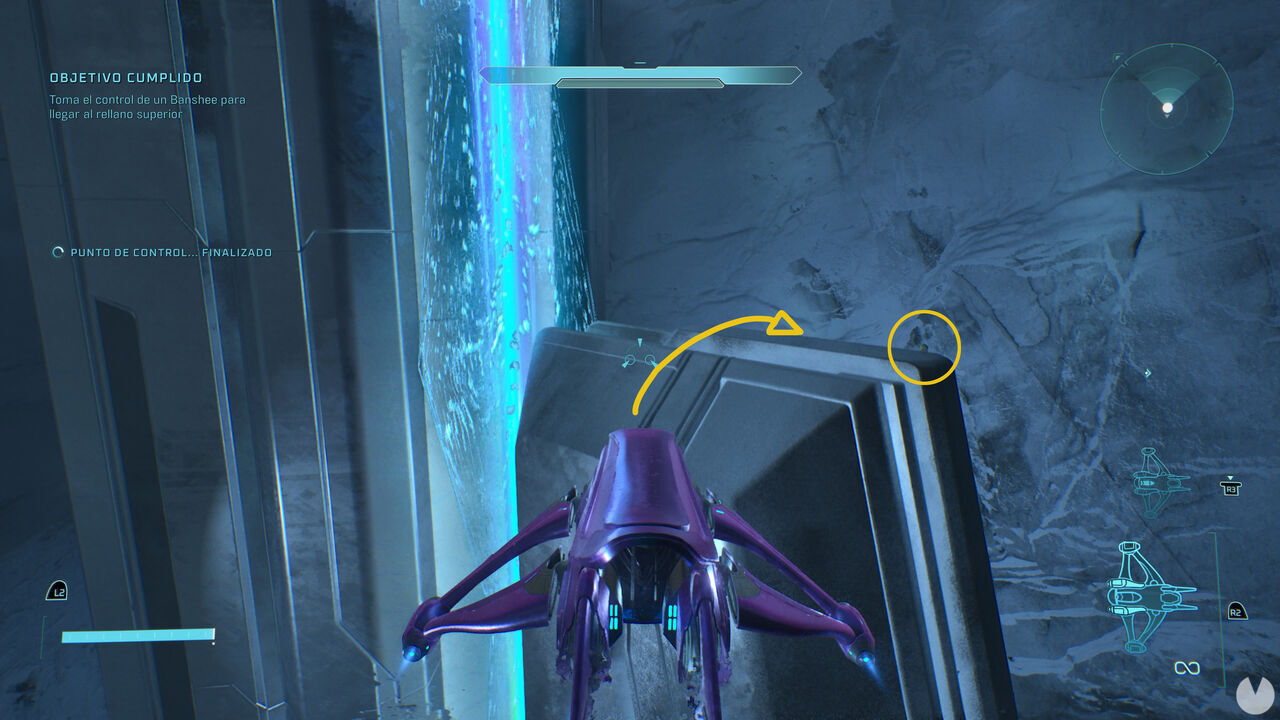
The skull is up here, so you'll need to jump out of the Banshee in the right place to collect it. Time your exit carefully so you don't fall into the void.

While heading toward the second pulse generator, you'll eventually enter a large courtyard containing three arch-shaped structures, like those shown below:
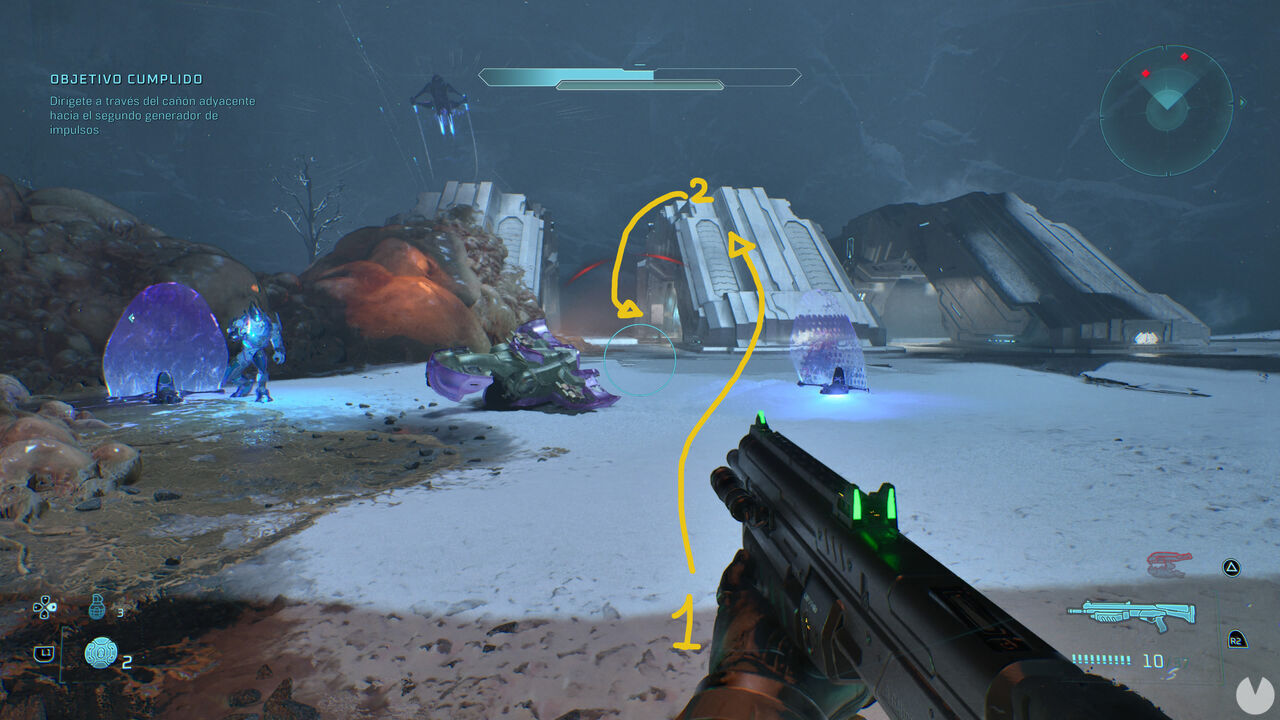
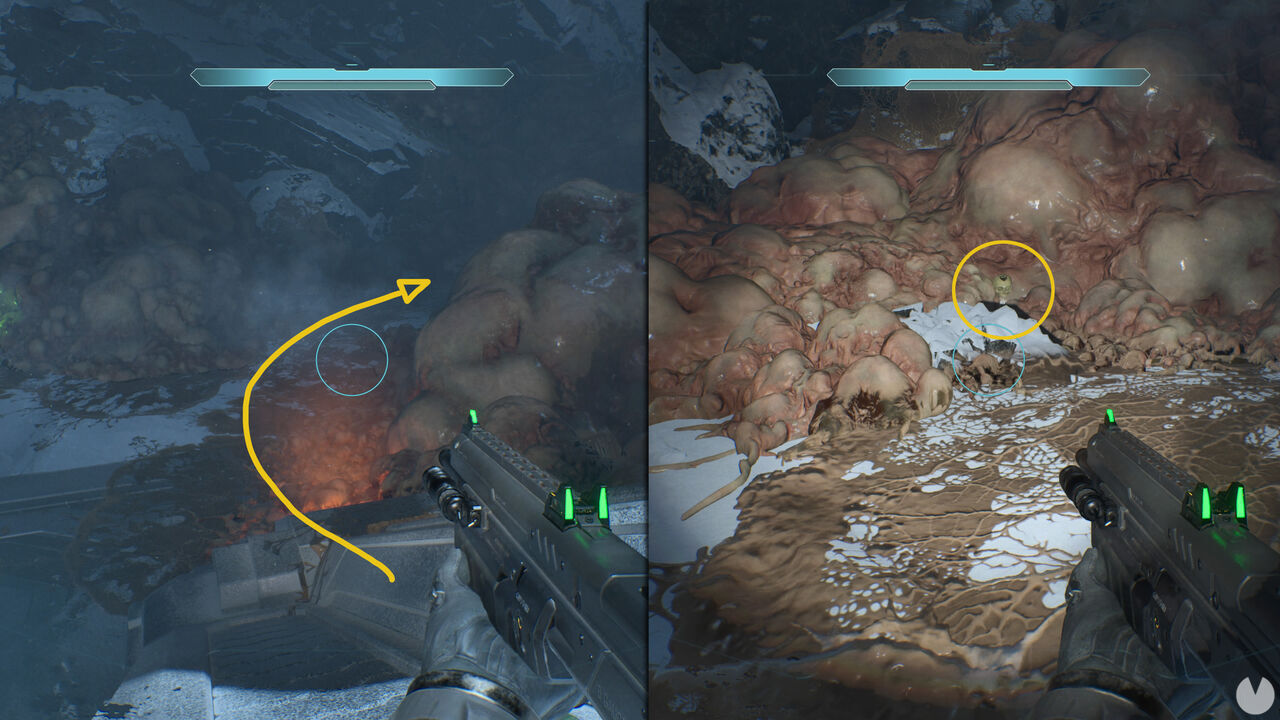
Cross over the top of the middle structure to the opposite side. You'll see an area surrounded by infected growths directly ahead. Head there and search among the growths for the skull. Turn on your flashlight to see it more clearly.

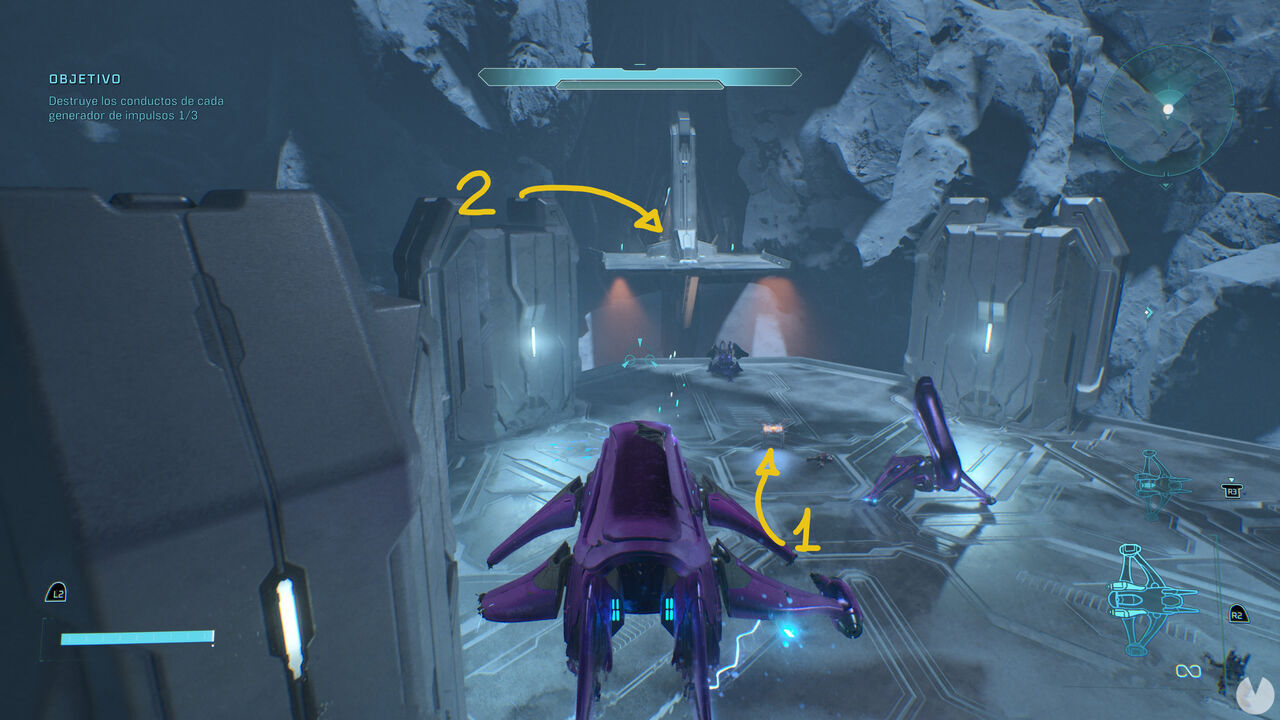
Shortly after collecting the previous skull, you'll need to get into a Banshee and fly to the top of a tower. You'll find a console there that can be activated to open a secondary door on the opposite side from the mission objective, as shown below:
Open the door and head over to it. Inside the building, you'll need to defeat a large number of enemies in the first room. Once they're all dead, you can interact with another console to open a door. Continue through it into a corridor filled with more enemies, head to the end and interact with another console to open one more door.
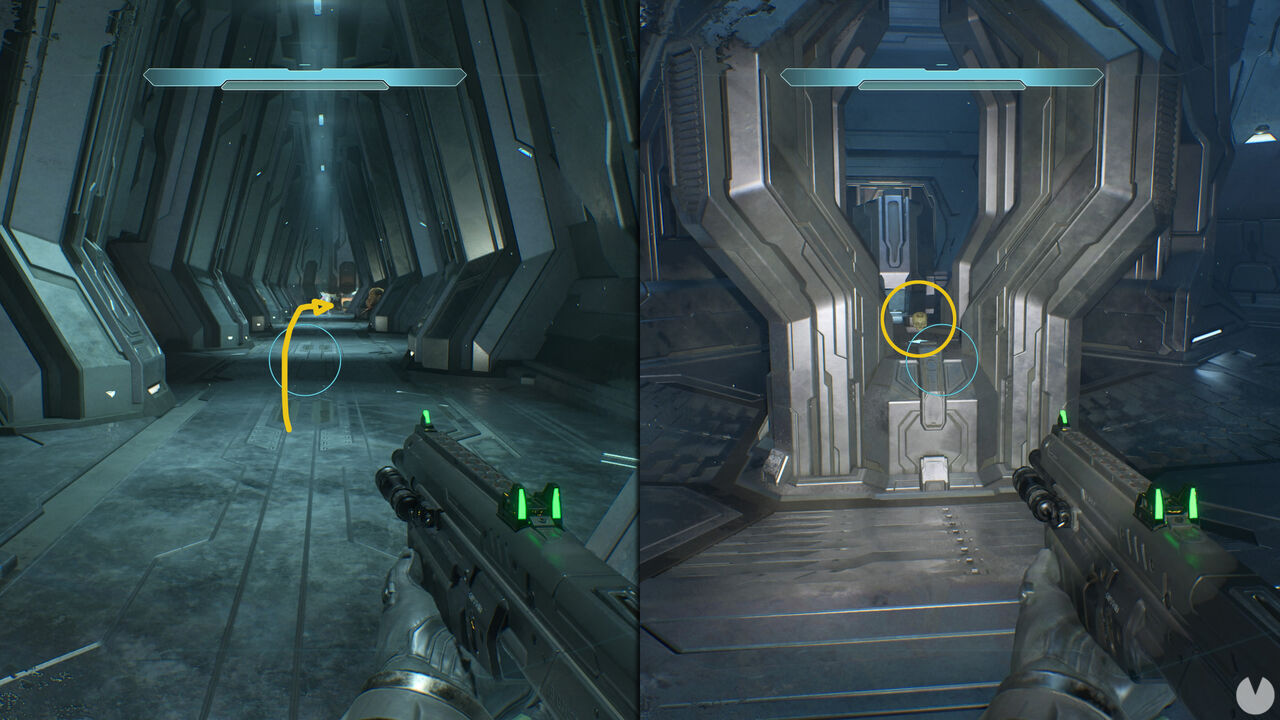
You'll finally reach one last room filled with enemies. If you manage to kill them all, the skull will appear on the structure in the middle of the room, as shown above.
During mission 9 of the main campaign, titled Keyes, you can find the following 3 skulls in this order:

To obtain this skull, you must play on Heroic difficulty without activating any other skulls. You also need to complete the first part of the mission and reach the gravity lift as quickly as possible. This means avoiding most of the enemies on your way to the lift shown below:
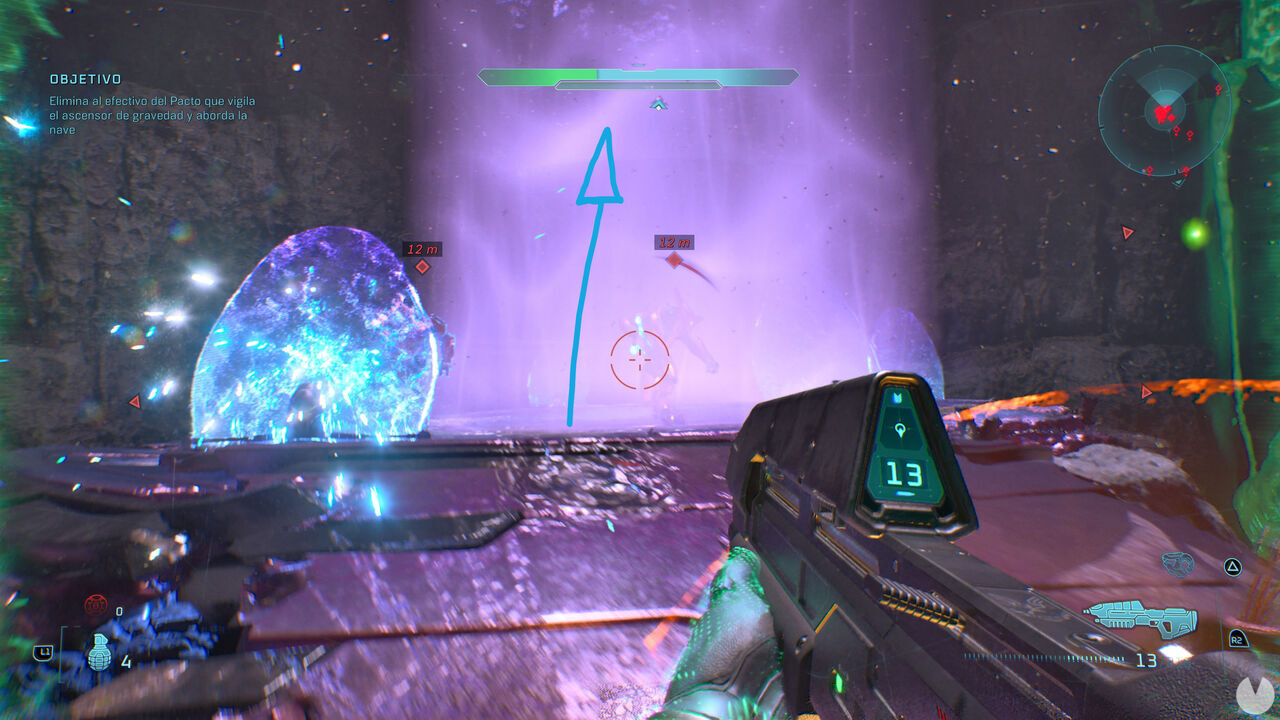
Run past and dodge the enemies until you reach the lift, using any power-ups you find along the way to make things easier, such as Active Camouflage or an Overshield. It doesn't matter if you die and reload a checkpoint. Once you reach the lift, however, you will need to eliminate the small group of enemies surrounding the gravity lift.
If you complete all of this quickly enough, look straight up as soon as the lift activates and begins carrying you upward. Hold down the interact button to collect the skull, which will have appeared near the ceiling of the ship in the position shown below:
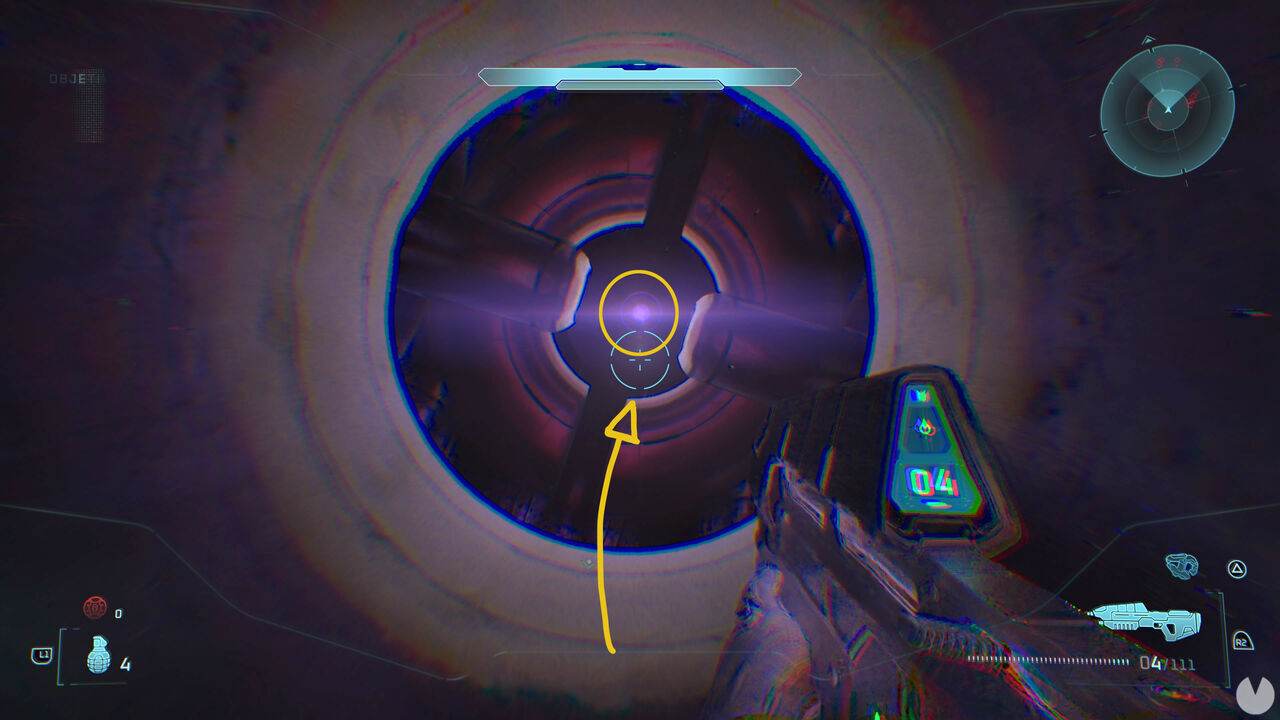
Bear in mind that you only get one chance to grab the skull while moving through the air, so reload the checkpoint if you miss it. If the skull does not appear, you'll need to repeat the process and reach the lift faster.

After using the gravity lift, continue until you head up a corridor and enter a large room filled with enemies. As soon as you arrive, look down to the lower floor on your right to get a view like the one shown below:
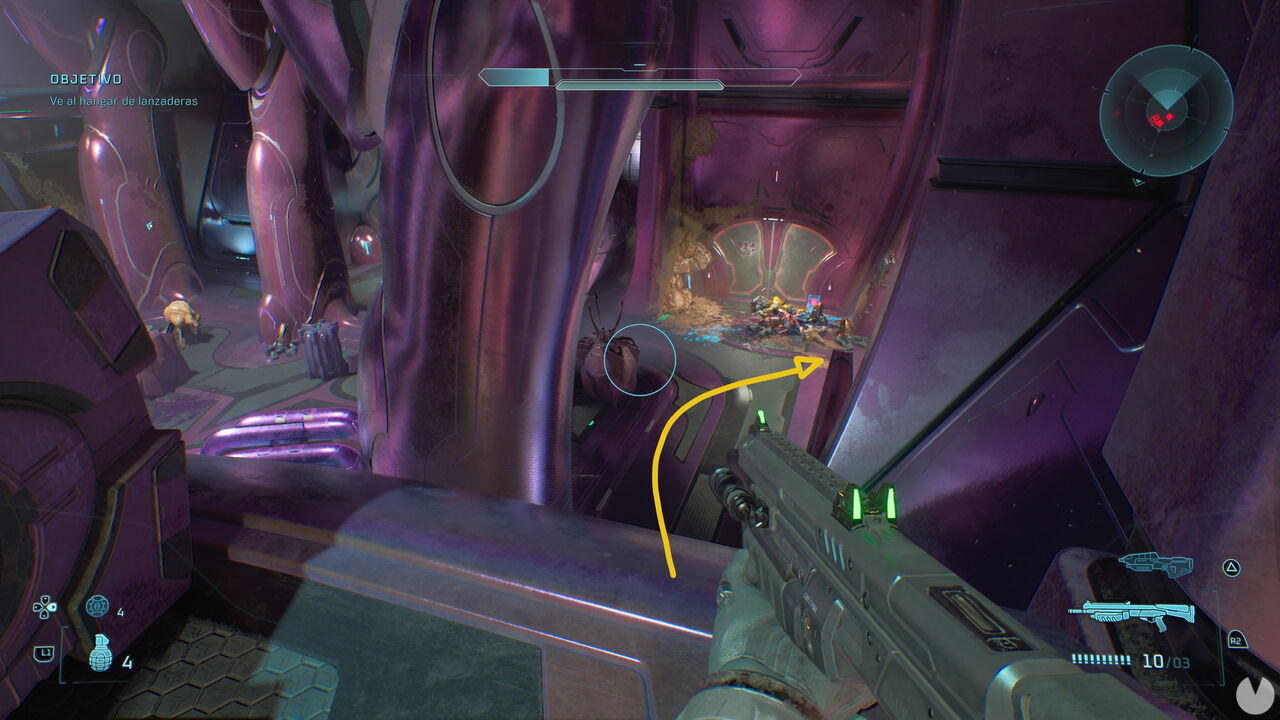
Drop down and turn right at the indicated spot to face a corridor blocked by a destroyed, burning vehicle. You can get past the wreckage by jumping over it. You'll find the skull at the end of the corridor, in the corner beside the locked door.
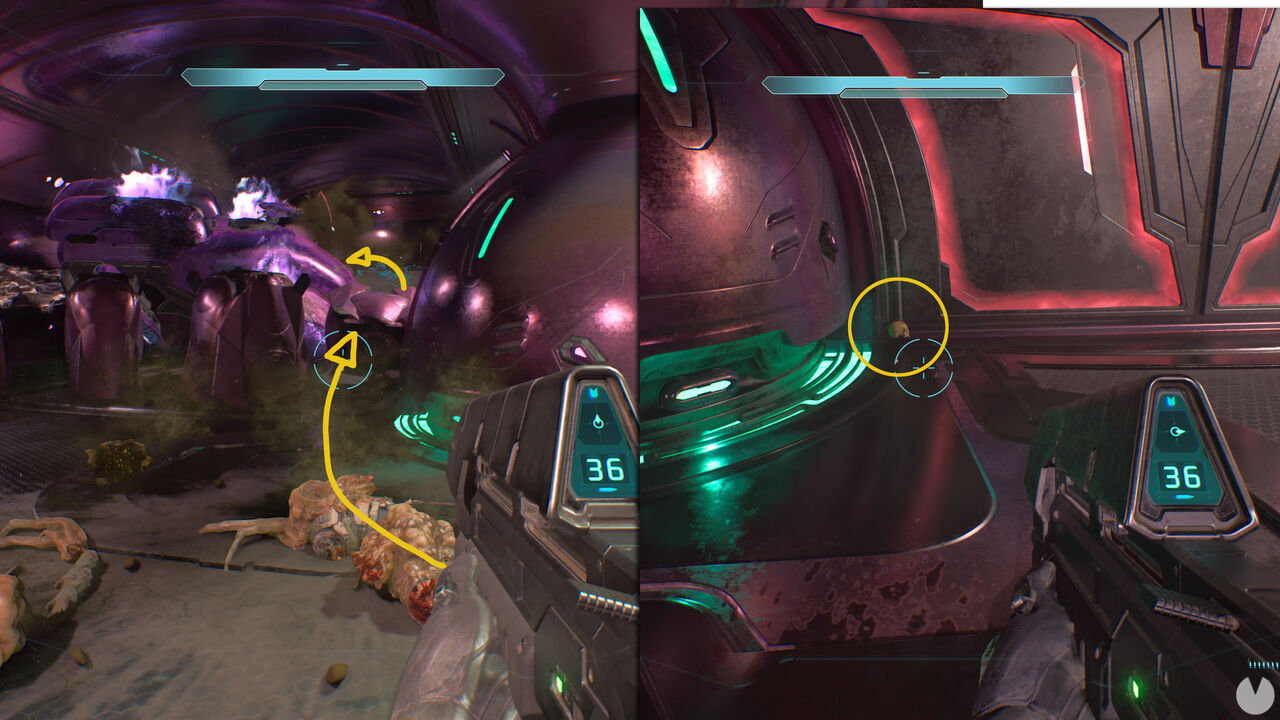

As soon as the cutscene ends in the room containing Keyes, turn around and repeatedly melee the infected structure shown below:
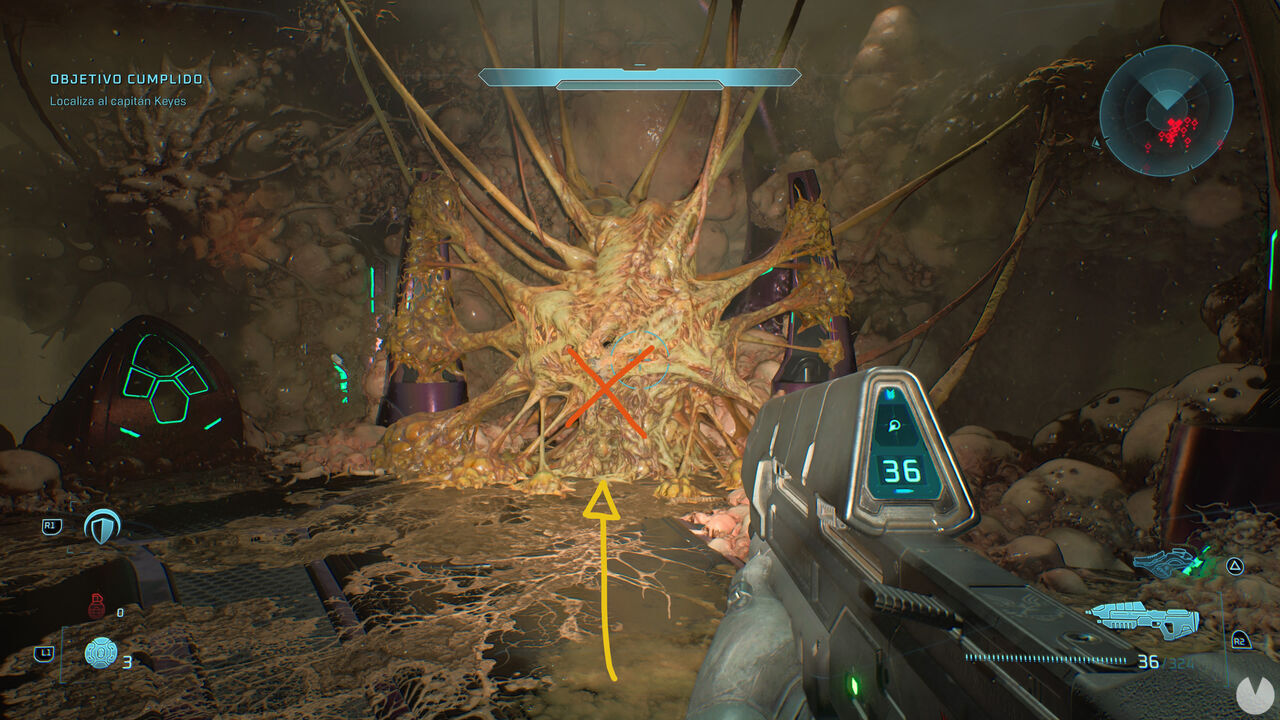
After hitting the structure enough times, the skull will drop onto the floor for you to collect.
During mission 10 of the main campaign, titled The Maw, you can find the following 3 skulls in this order:
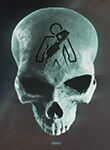
During this part of the mission, you'll enter the ship's cryogenic chamber, the same room where the campaign began. Eliminate all the enemies and then look toward the corner where the elevated walkway has broken and collapsed onto the floor.
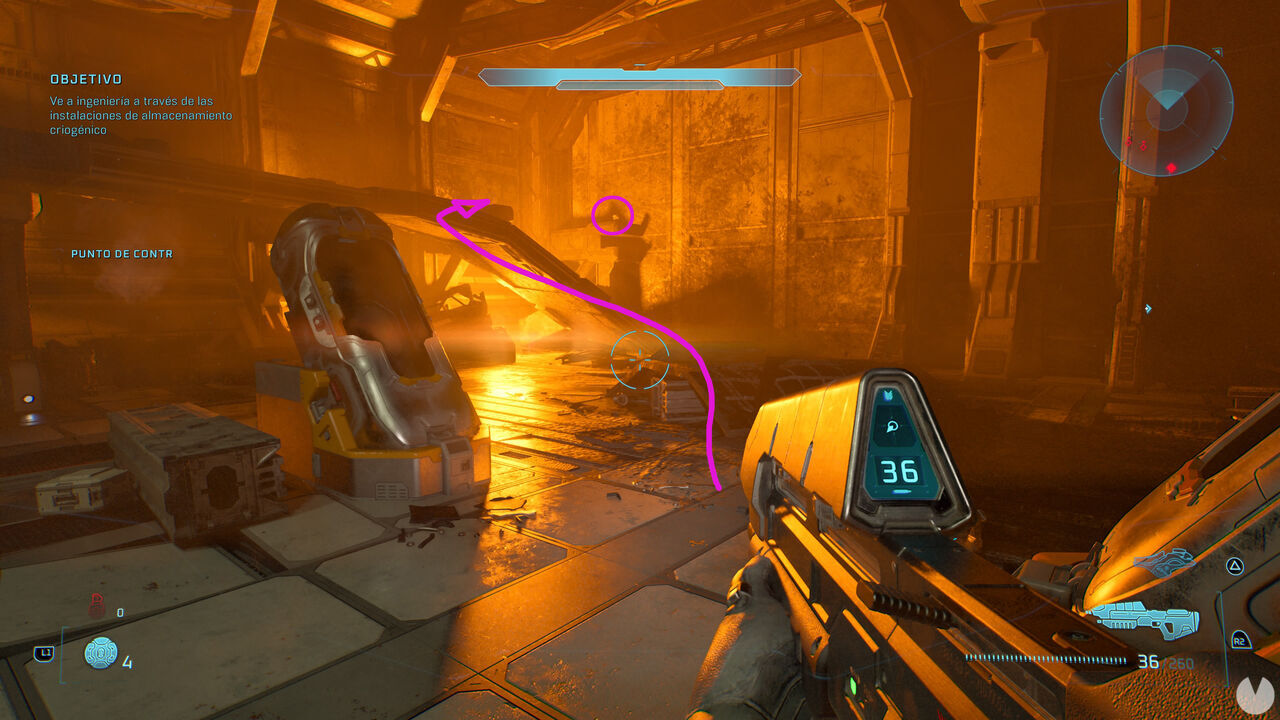
The skull is right here, on top of a post that you can jump onto as shown below:
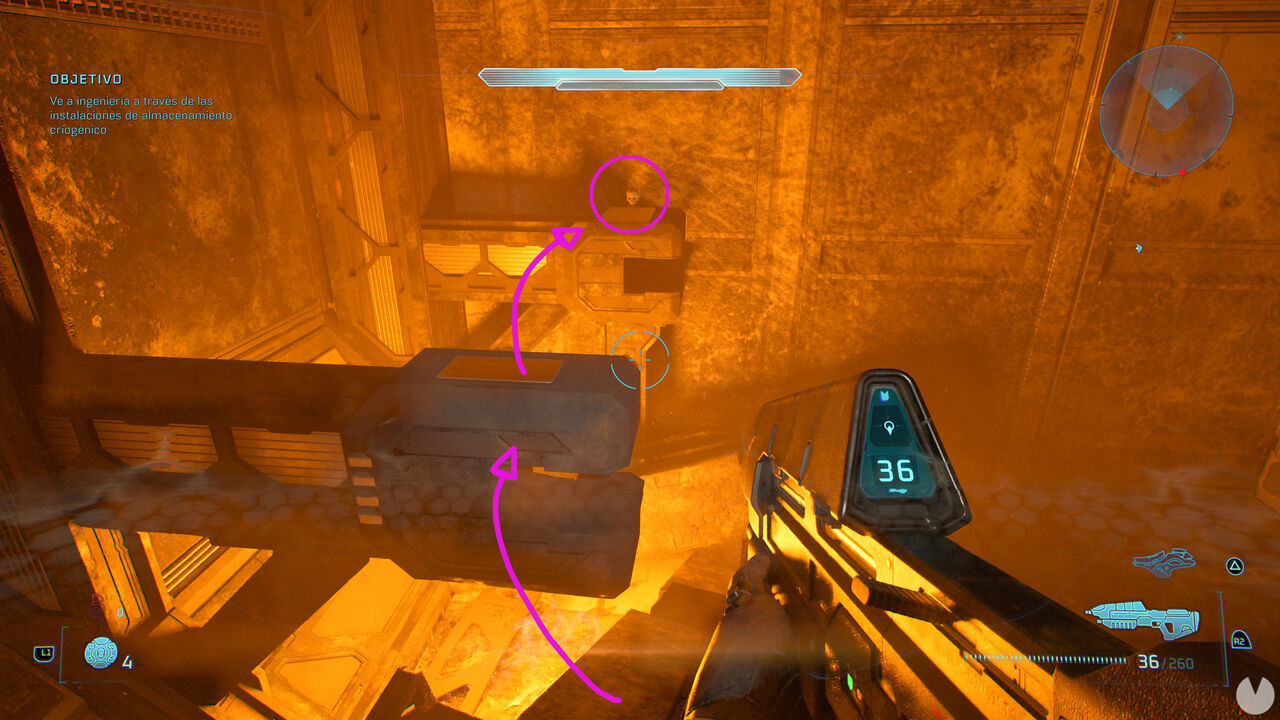
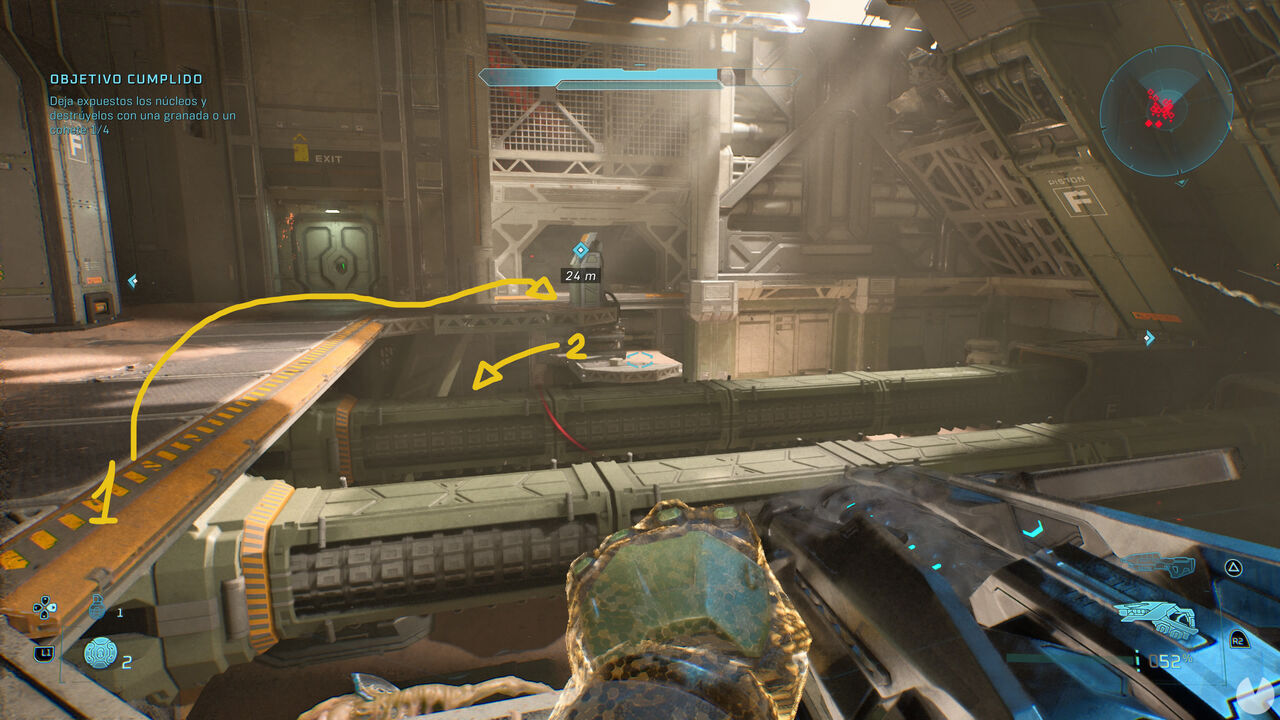
This skull is located on an elevated ledge in the engineering engine room. To reach it, first head toward the console that exposes one of the cores, as shown below:
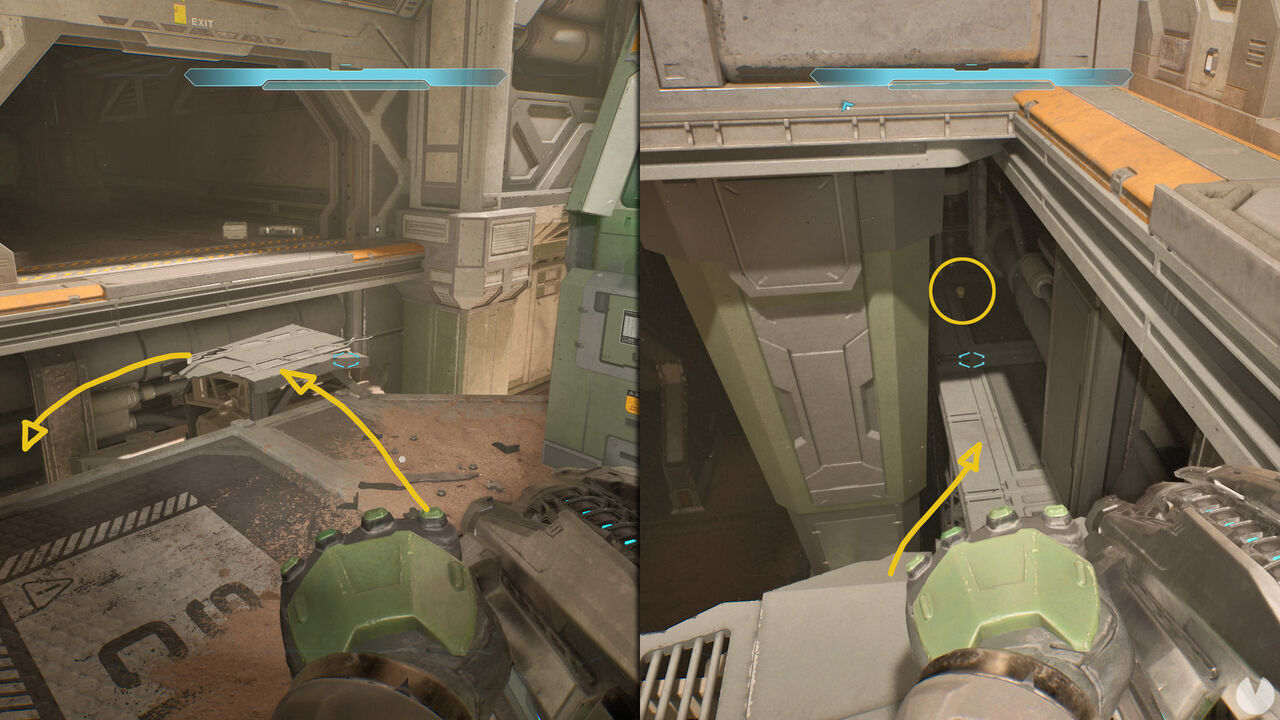
As you can see, there is a piece of broken structure to the left of this console. Jump onto it and look down toward the ledge. You can drop down from here to collect the skull.

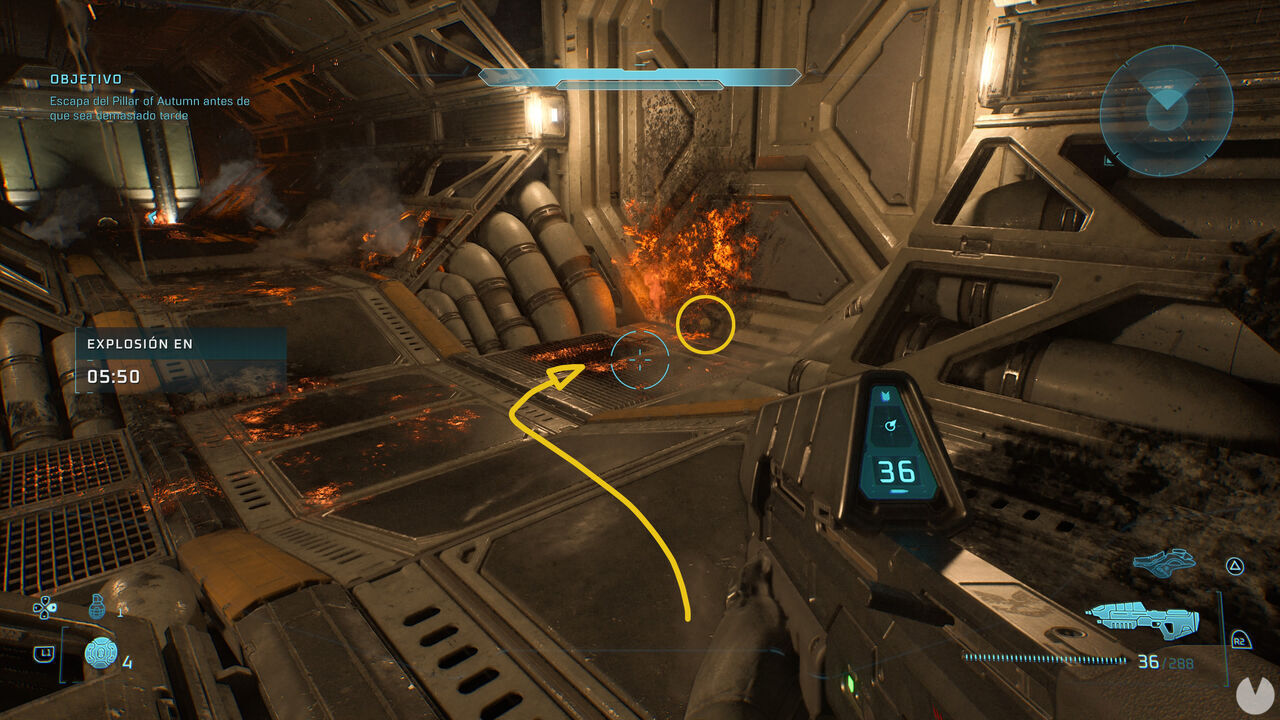
This final skull can be obtained during the ship's escape sequence while driving the Warthog. Continue through the first section until you reach a long, winding tunnel with columns running down the middle. At one point, you'll see a passage on the right that you can enter with the vehicle. Be careful: it isn't the first passage of this type that you see, but the second. It looks like this:
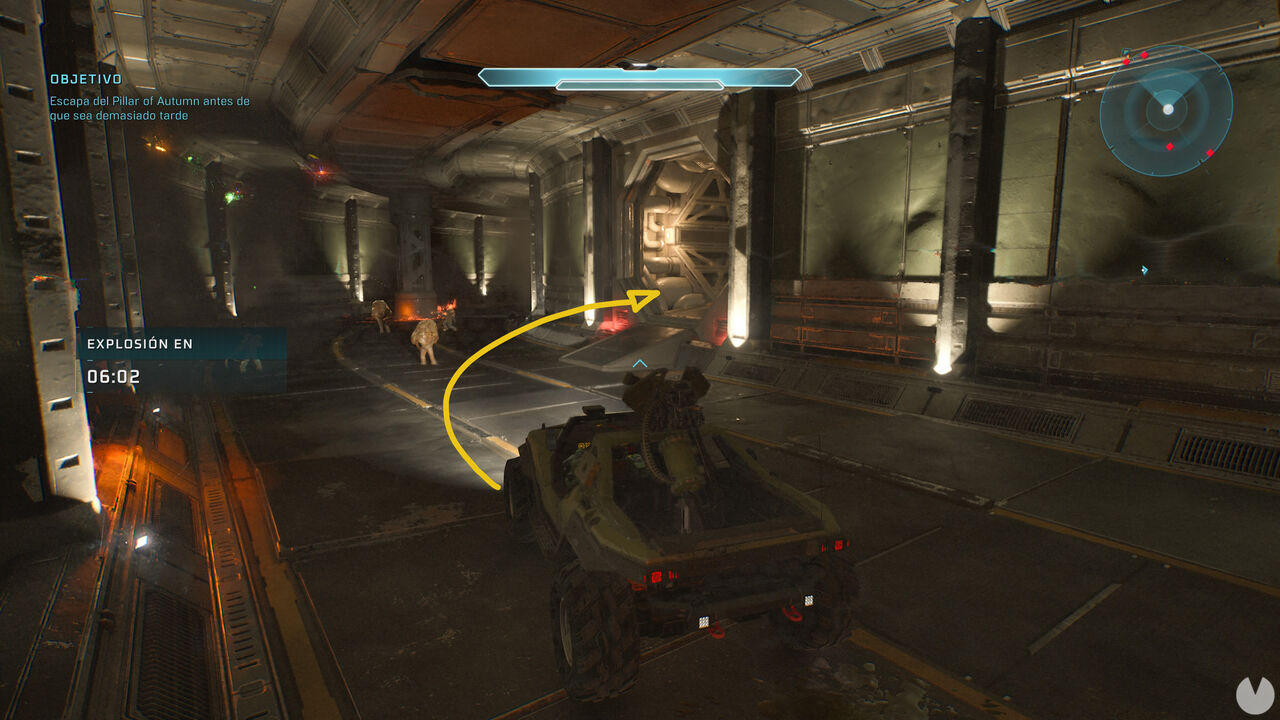
Drive inside and get out of the vehicle halfway through the passage. The skull is lying on the floor of the central recess.
In addition to the 39 skulls found throughout the missions, there are 3 additional skulls that are not hidden in any level. Instead, they are unlocked automatically after collecting any 3 skulls. This means that once you've found your first three skulls, you'll also receive the following: